
Combining Silhouette and Ghost prints on the gel plate
I will begin by defining what I mean by silhouette and ghost. When you place a leaf or stencil on the plate and take a print that print is known as a silhouette. Anywhere the foliage or stencil covers will resist the print on the paper/fabric being used.
When the print media is removed and a subsequent print is taken, this is called the ghost print. With foliage, these prints often display vein impression so are more detailed and interesting than a straight silhouette - unless you are overprinting multiple images of silhouettes one on top of the other.
The two can be combines so that the ghost print is superimposed on the silhouette for a more interesting single print
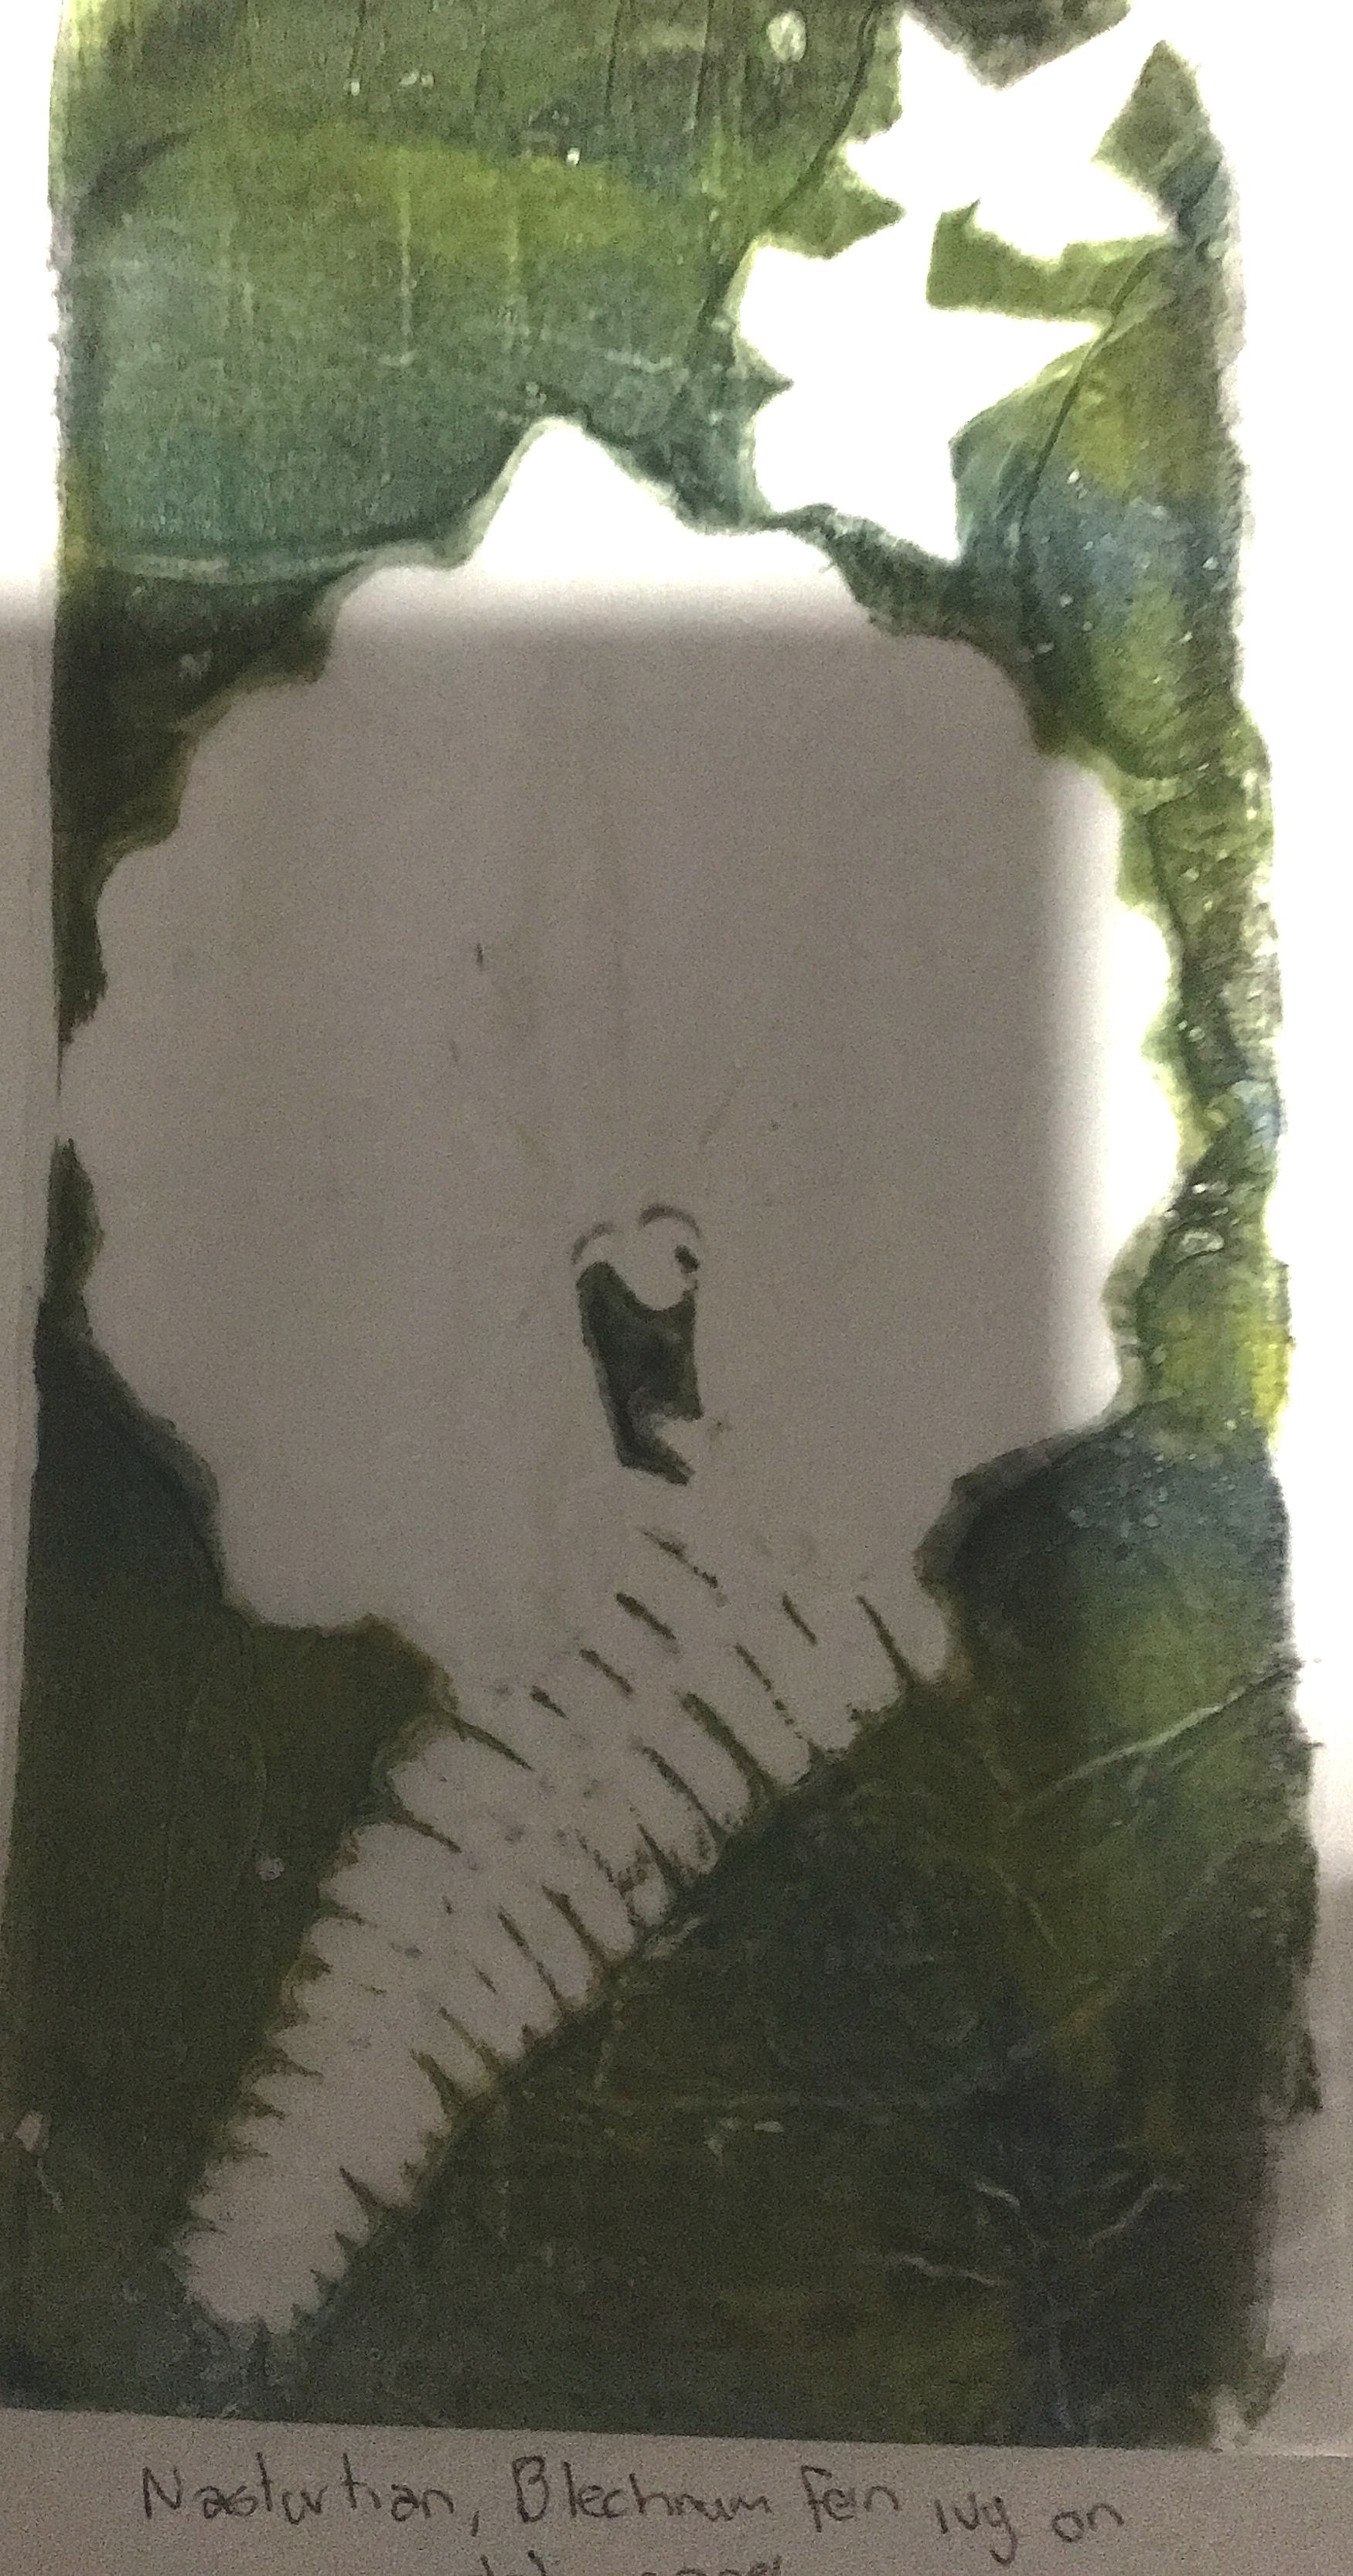
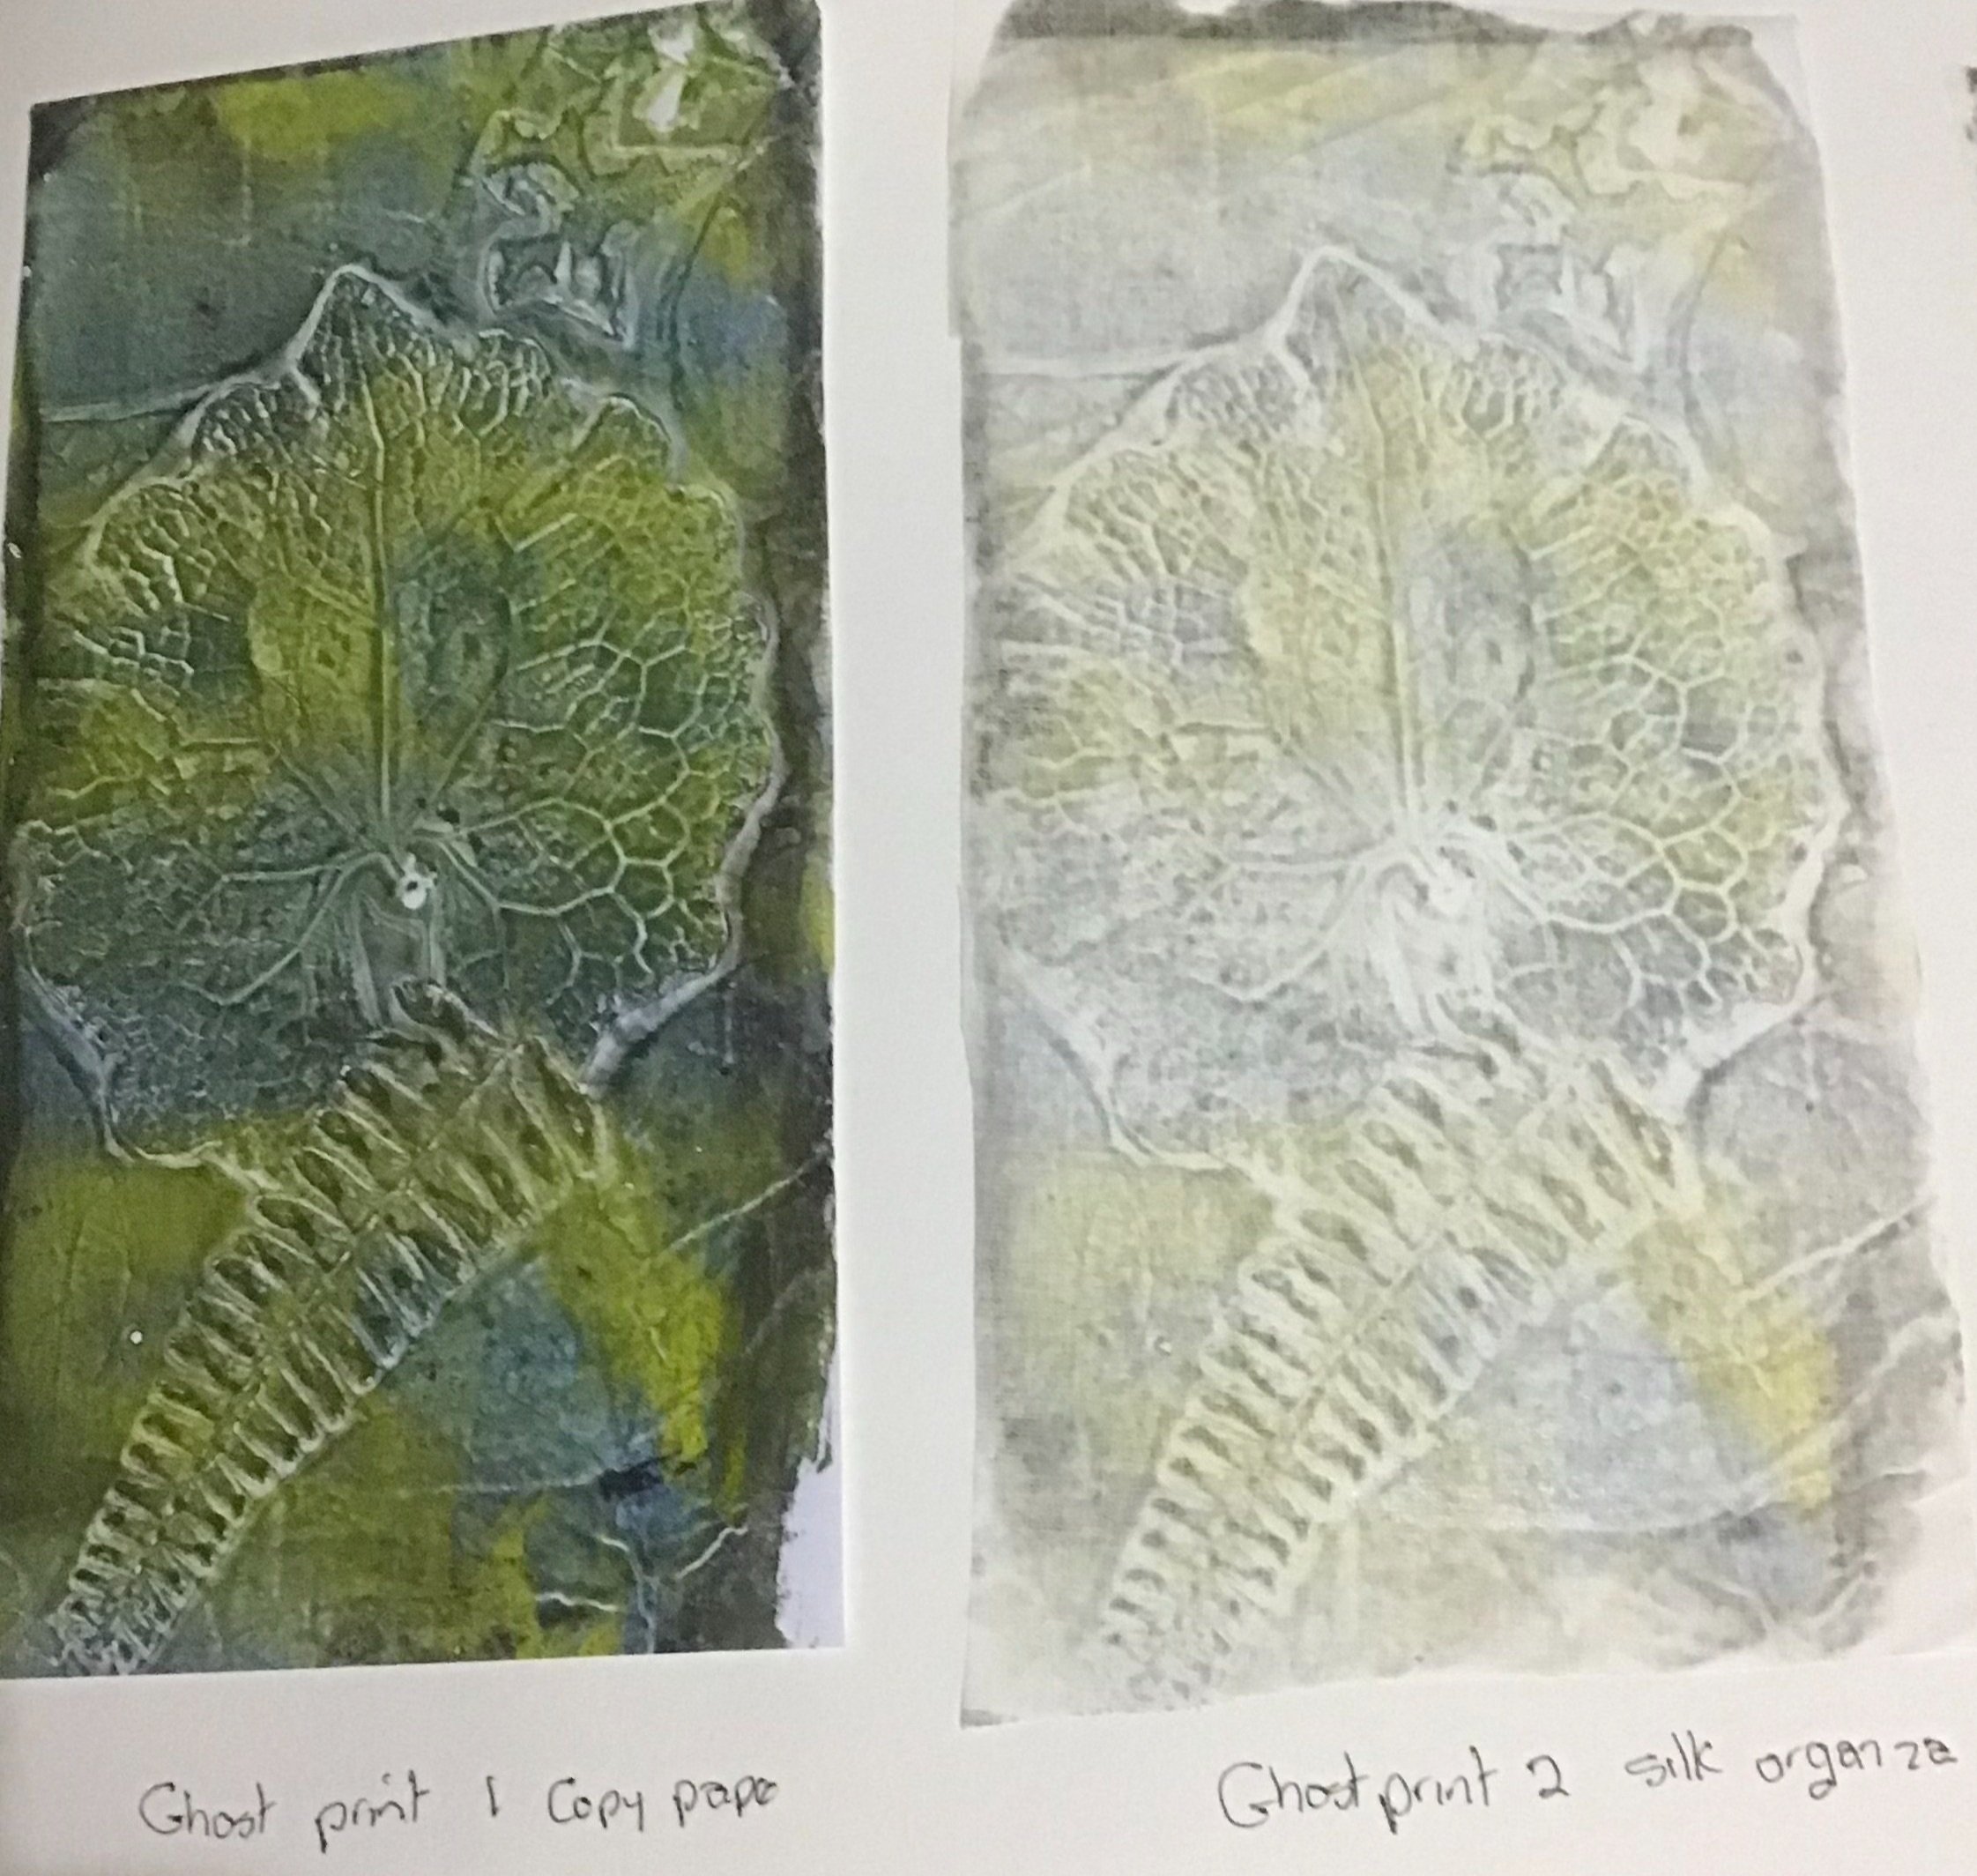
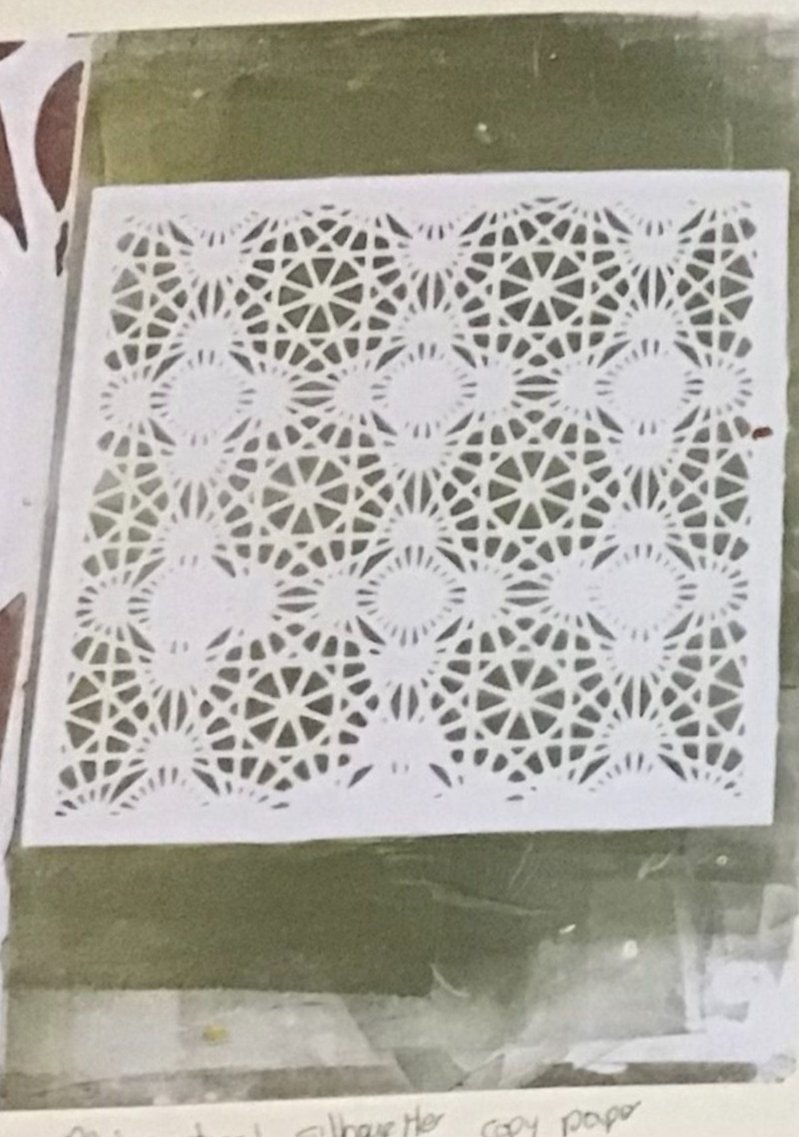
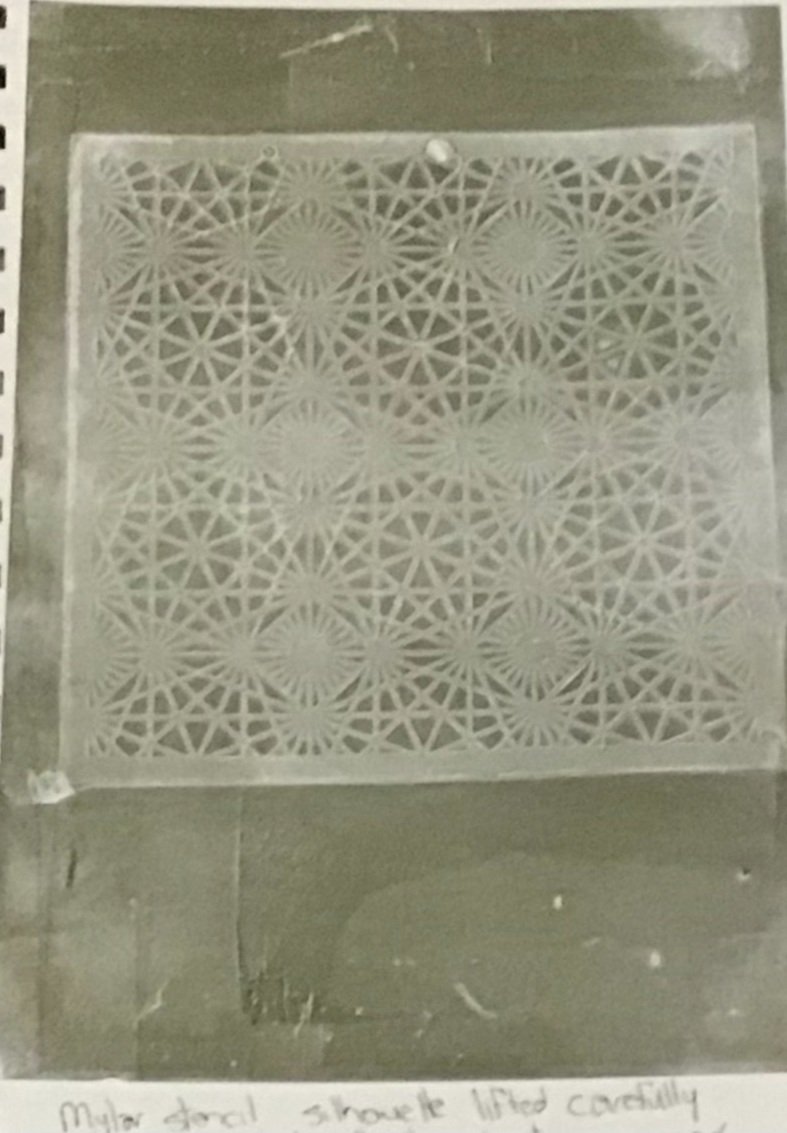
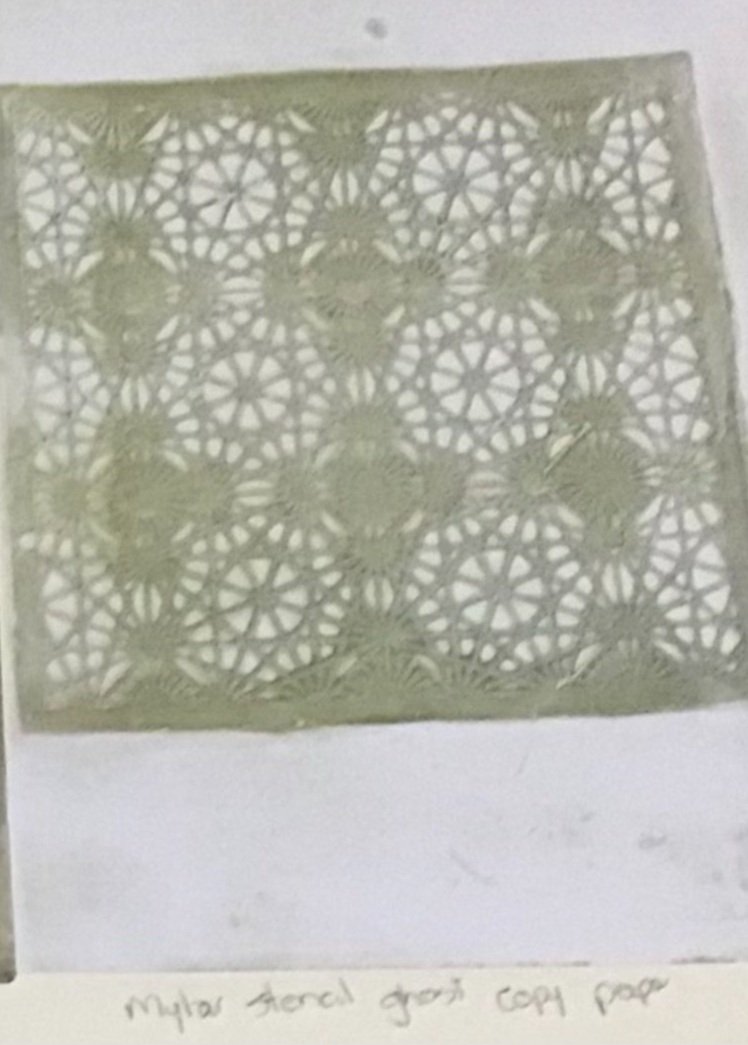
In the small images above the first photo shows a silhouette image of a nasturtian leaf and blechnum fern, The second image shows the ghost print pulled after the leaves were removed - first on copy paper, then on silk organza. You can often get more than one ghost print from the plate but they will be successively lighter in print. The third image shows the use of a mylar stencil - a silhouette print, The next image is a silhouette print with the ghost print placed in the resisted areas and finally the straight ghost print of the same stencil. You can see the results can be quite different
Especially with prints with large resisted silhouette areas overlaying the ghost print into those areas can make a much nicer end product. This is done by taking the silhouette image in the normal way. Then use a small piece of delicate/repositional tape to hold the paper in the same place. Remove the foliage or template and then replace the paper over the printed silhouette so that the ghost print is now in the areas that did not print previously. Apply pressure in the normal way to ensure a good ghost print into the blank areas.

Ghost Prints on Deli Paper
When I first purchased a packet of 1000 deli papers I thought I was being very extravagant but they have become and excellent resource. Not only are they so useful in cleaning up the gel plate or removing background plate tone for sharp ghost images but as a printing medium in their own right they make lovely translucent prints. Above is an example of gingko ghost prints onto deli paper

Using Gel Prints in Other Art Work
Fabric (or paper) can be used in other art work. In the little sample above I have printed some light acrylic onto silk to create the effect of fungi growing on a log. I have used a piece of wool jersey dyed in a dirty pot ands some pieces of cut felted grey wool from some felted balls I made. The green is random stitched dyed cheesecloth using elongated button hole stitch.
The silk satin was crumpled and placed on the plate which had a light green/grey application of acrylic applied to the plate. The crumpled satin meant the paint would be taken up in varying degrees with the hollows of the crumples getting less paint than the hills. I didn’t want too much contrast but I didn’t want to use plain white. To add additional texture I also used some clean up baby wipes from cleaning the plate.
I cut out circles and made a series of Suffolk puffs (yoyos) which I folded in half and stitched onto the substrate fabric. The silk did not lose its sheen so I am encourages to try this method of colouring small pieces of silk in a more 2 D landscape piece.
![IMG_6945[1].JPG](https://images.squarespace-cdn.com/content/v1/639f6bda61e0456d11776132/1688334183135-T9EN8W1NGRLOGO7M9SJT/IMG_6945%5B1%5D.JPG)
![IMG_6946[1].JPG](https://images.squarespace-cdn.com/content/v1/639f6bda61e0456d11776132/1688334126071-3IGH4KBILTQ0PSL34L1K/IMG_6946%5B1%5D.JPG)
Above you can see the crumpled silk satin as it was placed on the plate and the resulting fabric that was used to make the fungi.
Overprinting on the Gel Plate
![IMG_7014[1].JPG](https://images.squarespace-cdn.com/content/v1/639f6bda61e0456d11776132/1688246522066-UPEJBFDO6GUSKN2QEYTV/IMG_7014%5B1%5D.JPG)
![IMG_7017[1].JPG](https://images.squarespace-cdn.com/content/v1/639f6bda61e0456d11776132/1688246565030-4BMK95AICM0G3FCO8QVD/IMG_7017%5B1%5D.JPG)
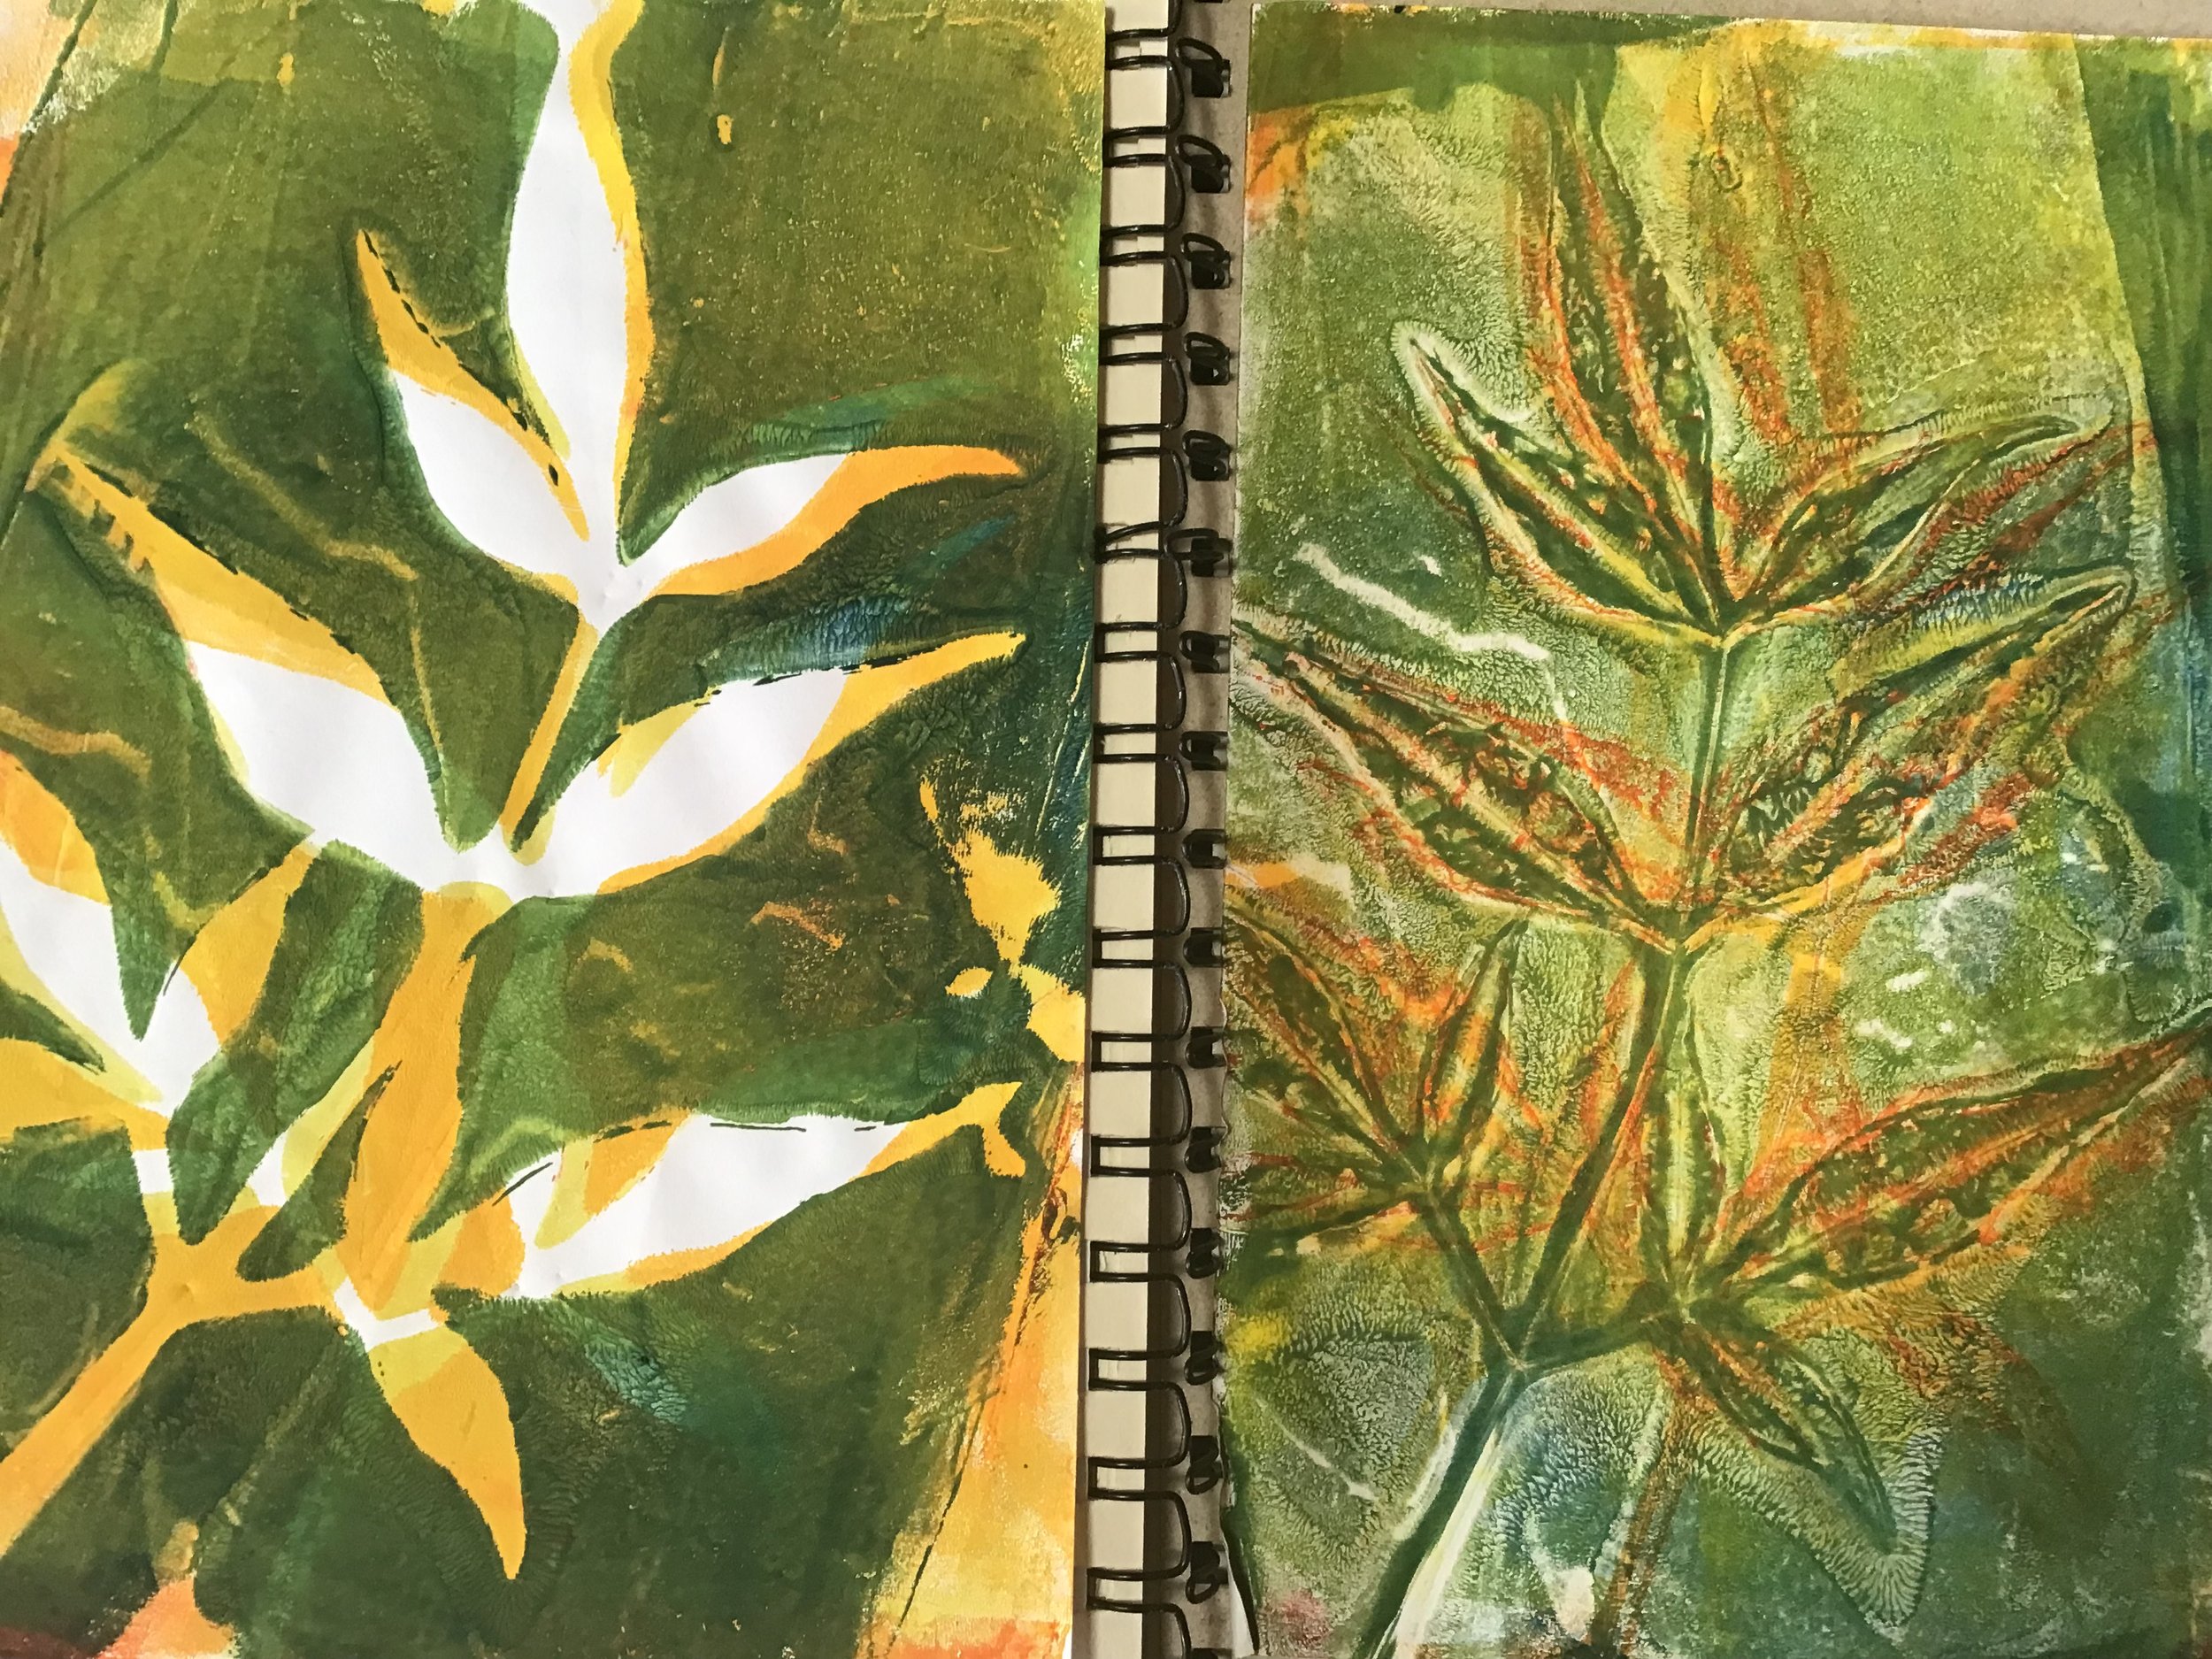
I have been doing Tara Axford’s gel plate design course through Fibre Arts Take two and it has pushed me to try numerous things on the gel plate. The results are instantaneous so you can end up with a pile of prints quite quickly . In this series I have been mixing colours on the gel plate using only the three primary colours and over printing the leaf on copy paper. Each of the first two images print has three prints overprinted on top of one another. The first image shows red, orange and yellow overprints in leaf silhouettes with the second print using the reverse colour order. The third print in this image is the ghost of the prints. The second photo shows the same process with blue, yellow and green overlays. By using the same colours in different combinations it is possible to get a wide range of effects that all blend nicely together. I used nandina major sprigs for these prints.
The third image shows the final overprint ghost image with all plate tone removed with deli paper before removing the plant material to get the ghost print. This gives a very clear background image and I will probably make these into a concertina book form. This image provides possibilities for added stitch on fabric.

Printing With Leaves - Silhouette
I tried cutting out leave shapes in yuppo but I just wasn’t happy with the results. It is Autumn here and there is a wealth of windfall leaves around so I decided to go with the actual leaves and use them as a mask on the gel plate. I also used some bits of palm fibre to get the squiggly lines in the prints. Experimenting with colour as I go. These are just basic silhouette shapes - It is the ghost prints that I am interesting in pulling off the plate. Still using just the basic colours in Golden open acrylics.

Simple Shapes
Next was a move to simple shapes referenced by Kandinsky. The first print above is my brayer cleaning sheet which shows the colours I was working with, mixing them on the plate.
You can see the silhouette print and its corresponding ghost print in the next four prints. The very fine lines of the first print were made with a credit card edge.
The last print is an overlay of a ghost print printed in lavender (red, blue and white paints) with sienna overprint.
The shapes were cut from yuppo to give a sharp definition. This sort of experimentation makes you realise the complexity of work like the Kandinsky inset at the top which was my starting point for inspirations

Experimenting with Lines
I have been playing around with some experiment. The i s directed by Tara Axford designing with the gelli plate. The modules are referenced around art movements and the first one focuses on the Bauhaus movement which abstracted lines from urban architecture. Mondrian was a proponent of this style. Everywhere I look now I see patterns of windows replicating this style.
In the prints above I have worked with straight intersecting lines in a limited palette. The first four are made using thin strips of tetrapak cut from a soy milk container - the silhouette print followed by the ghost print. The ghost prints exhibit some interesting texture, the silhouettes are a bit blurry due to the depth of the tetrapak.
The last two are printed using strips cut from an OHP transparency so the lines are more defined. The introduced dark textures have come from using a strip used in a previous print and the paint transferred to the subsequent print.
These prints are just made on standard copy paper

Using Oil Pastels as a Resist on a Gel Plate
![IMG_6667[1].JPG](https://images.squarespace-cdn.com/content/v1/639f6bda61e0456d11776132/1682369971324-MQ1MPDTXIU8P8DPWTLV4/IMG_6667%5B1%5D.JPG)
![IMG_6669[1].JPG](https://images.squarespace-cdn.com/content/v1/639f6bda61e0456d11776132/1682370011608-CV447DZFA44TPWRSRRDH/IMG_6669%5B1%5D.JPG)
Oil pastels and some other crayons and media can be used as a resist to transfer the outline of an image to the gel plate and then to fabric/paper. Draw or trace the image onto copy paper. Remember your final print will be a mirror image. If using text you will need to write it back to front. Use any coloured pastel and make the lines reasonably thick. I tend to use black as it is easy to see on the plate. In this exercise, the lines will be transferred onto the gel plate ready to “pull” as an outline or to colour with other acrylic mediums
Ink up the gel plate in the normal way and then lay the copy paper image face down on the plate. Wait a few minutes and check to see if the image is appearing on the plate. When you pull up the copy paper, the acrylic ink will have transferred to the paper and the oil pastel (resist) will remain on the plate, as in the left hand photo above. The mottling you can see is my drop cloth underneath the gel plate. If you want just an outline you can pull this image off the plate by adding acrylic paint (for a coloured background or gel medium for a clear back ground) to the gel plate in the normal manner.
The second alternative is to paint or colour the image on the gel plate as I have done in the right hand photograph above.. You can mix colours on the plate but it you want to add details such as the line on the leaves and petals, you will need to wait till the under layer of acrylic is dry. Once it is dry you can pull the print off the plate using either acrylic paint or gel medium. Remember if transferring to fabric the bonding process will take longer than if transferring to paper

Creating Art Directly on the Gel Plate
In this example of a sunflower I have made a painterly image with a couple of layers of paint. The background is a mix of turquoise and white acrylic just to show you that you can use multiple colours here too. You will note some black dots here and there. I don’t always thoroughly clean my Gel Plate as I quite like the grungy looks and these are specs of dry paint that have been lifted along with the image
The reason the layering processes work on the Gel Plate is that as long as the underlying acrylic layers are dry, subsequent layers bond to those below so that once you lift the work off the plate all layers are taken with it. The secret is all layers need to be acrylic
Enter acrylic paint markers. These come in a packet and are like a felt pen but are filled with acrylic paint. When new the fibre tip will be dry and not have paint in it so you will need to prime each pen by pouncing it a few times until the ink comes through - Once the ink appears in the tip you can draw with it as you would any felt tip.
This means you can draw with it on the Gel Plate - you could use acrylic paint and a paint brush but the acrylic markers gives so much more control. You can draw freehand or you can put an outline under the Gel Plate and use it like a tracing. If you want to do mulit layers you will need to let each subsequent layer dry before you put the next layer on.
When all layers are dry use either acrylic paint for a coloured background or gel medium for a clear background and brayer the plate in the normal way. Place your substrate over the artwork and rub with a barren, your hand or the back of a spoon. Let dry. Remember if you are using fabric it takes longer for the bond to adhere so don’t be in too much of a hurry to pull your plate. The image will also be mirror image so remember to take that into account when doing your painting. If you are adding text it will need to be mirror imaged so that it comes out the right way round when the plate is pulled
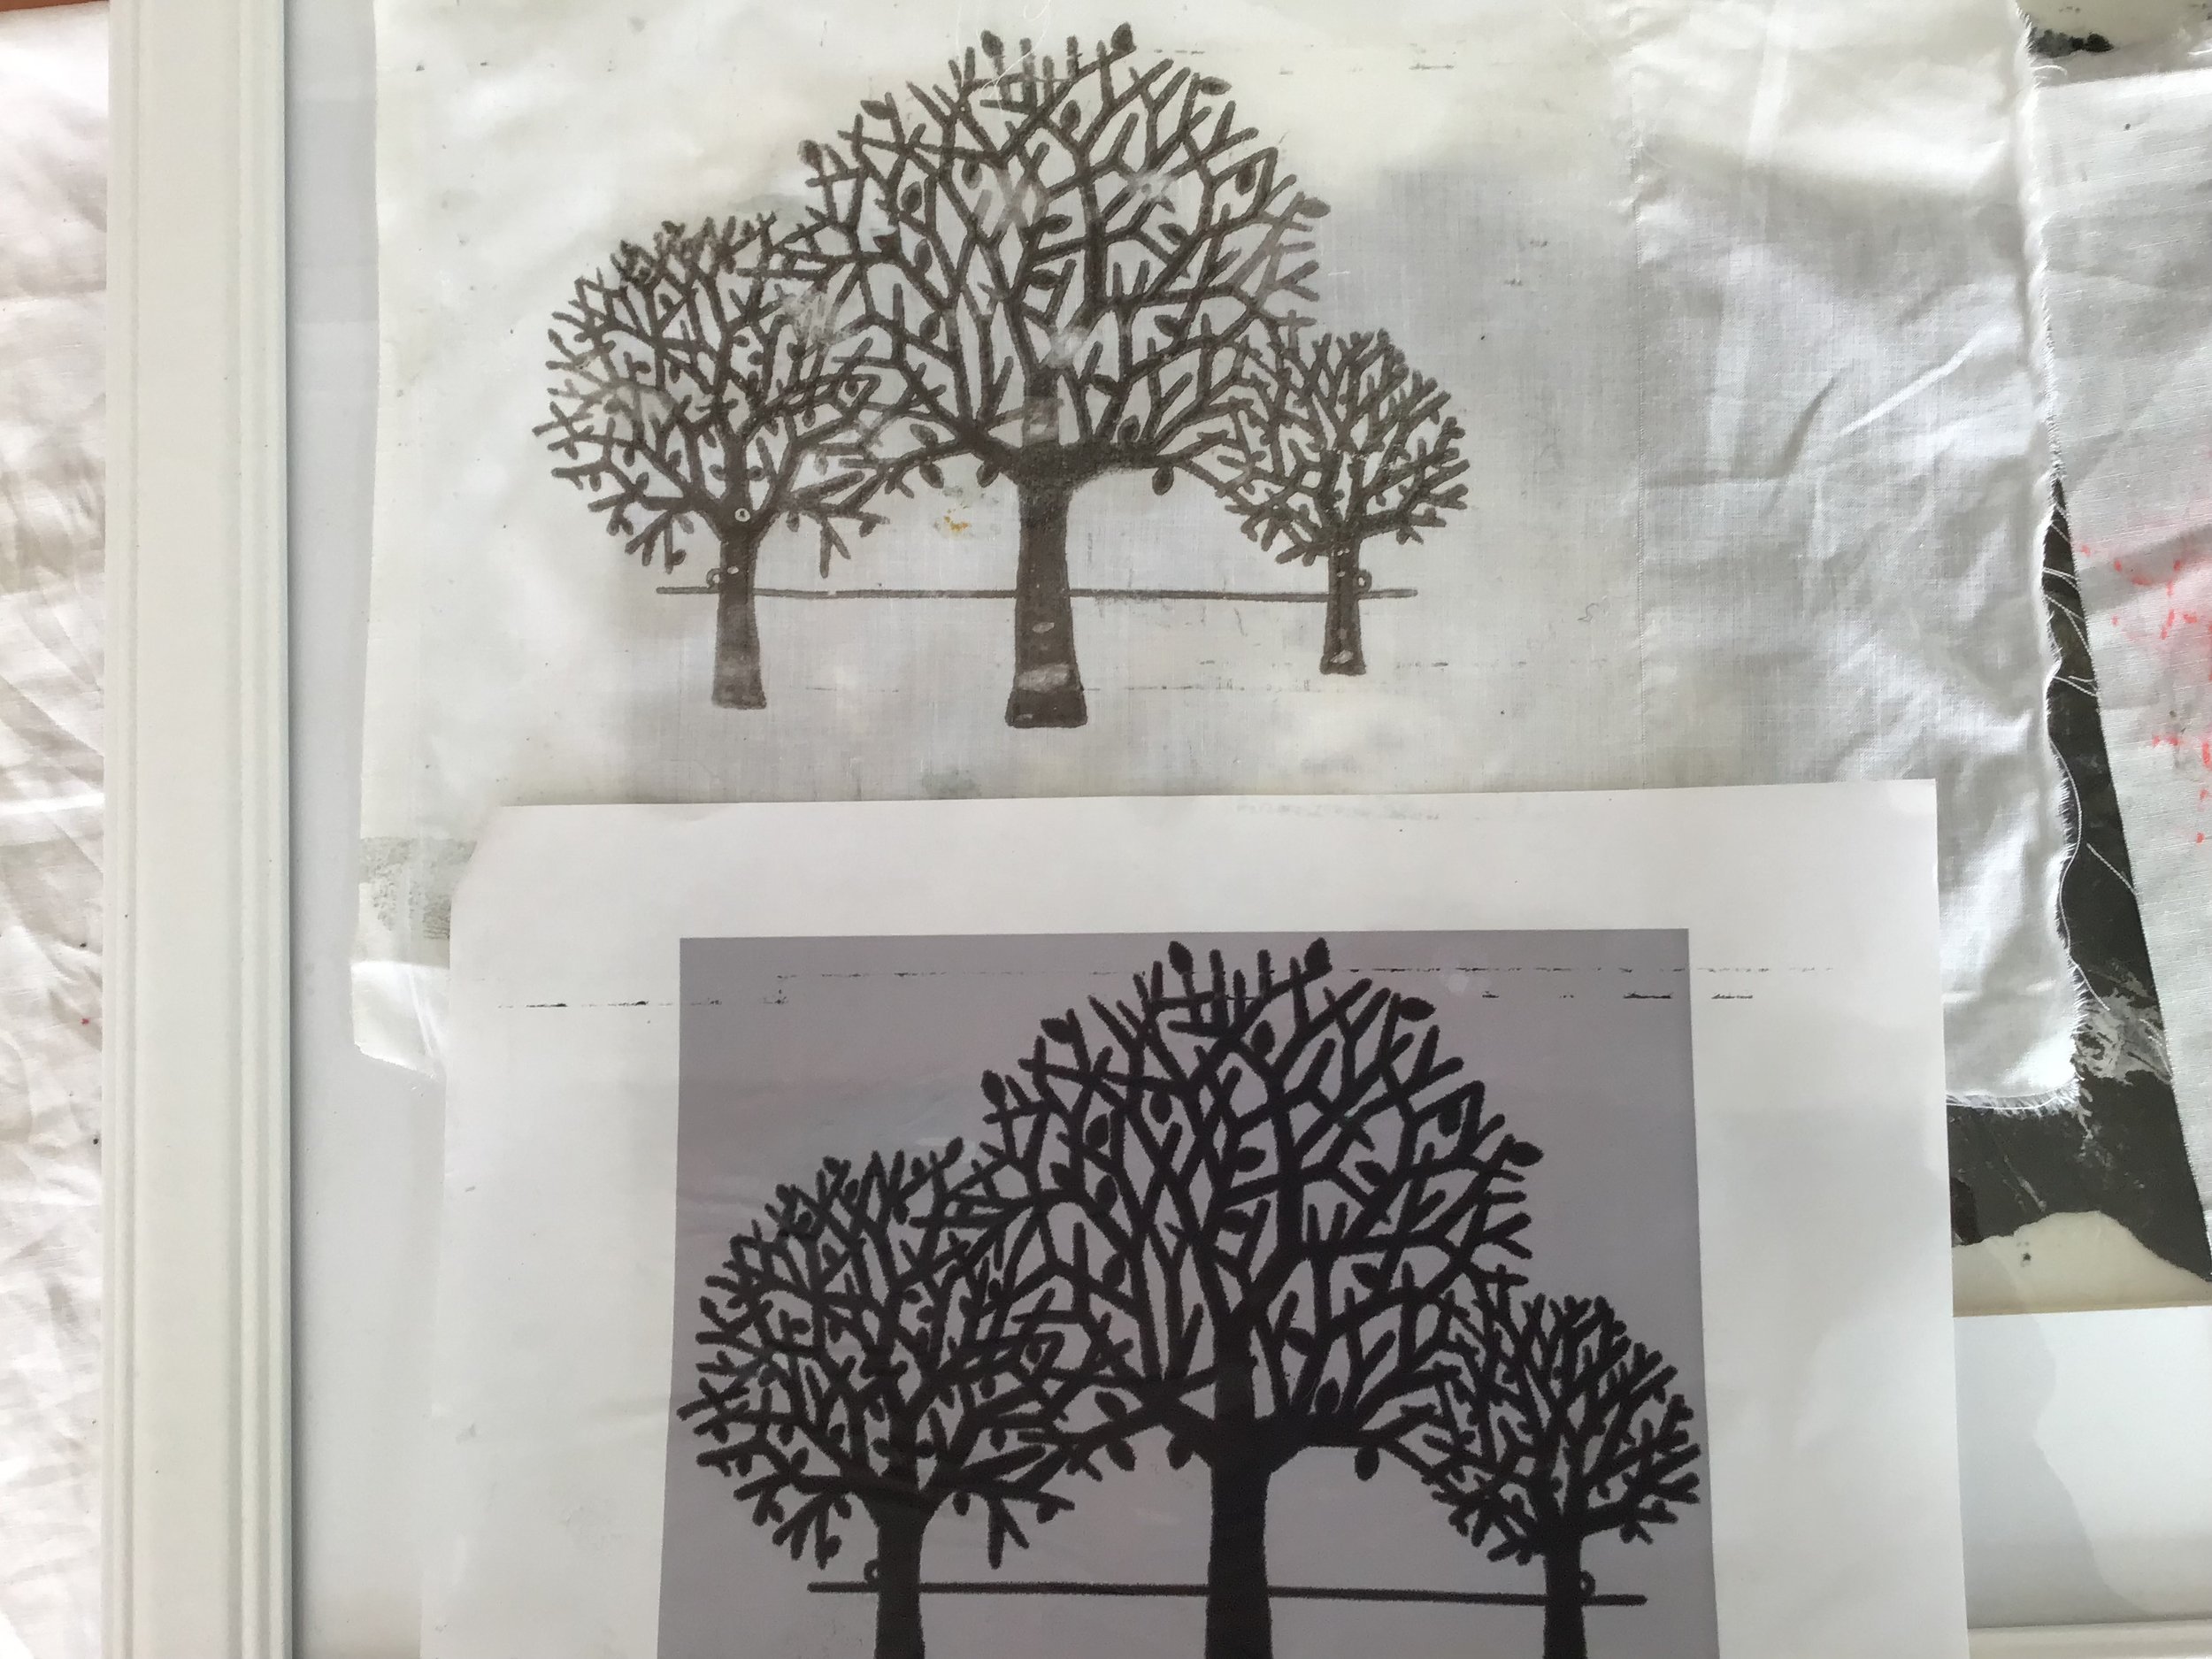
Using a Gel Plate to transfer a Black and White Injet Image

A Black and white Image (at bottom and its transfer to white cotton
The gel plate can be used to transfer images to fabric from a black and white print out to fabric. It only works with black and white images and it only works with presentation paper. This presentation paper has a gloss finish (on both sides). DO NOT USE PHOTO PAPER as this will stick to your plate and ruin it. There is some sort of chemical reaction that occurs between the photo paper and the gel plate.
The process is print off your black and white image on an inkjet printer using the gloss presentation paper. Place the image flat down on the gel plate. Wait a few minutes and you will be able to peal off the paper and see the imprint of the image on the gel plate.
Use either an acrylic paint or gel medium to make a light layer over the top of the gel plate image and place the paper/fabtic substrate over the acrylic medium you have used. Wait a few minutes and lift up one corner to check if transfer has occurred. Remember fabric prints will take longer than paper for the bond to set. If it has, pull up the substrate and there is your print - it will be mirror image.
![IMG_6672[1].JPG](https://images.squarespace-cdn.com/content/v1/639f6bda61e0456d11776132/1682144943613-M4LB8DLUU6HF78C2UFLP/IMG_6672%5B1%5D.JPG)
![IMG_6674[2].JPG](https://images.squarespace-cdn.com/content/v1/639f6bda61e0456d11776132/1682144957214-0P0QZDECPXL5MBEKFKF9/IMG_6674%5B2%5D.JPG)
The images above are a printed copy of a zentangle my granddaughter created and the print onto fine cotton. I used gel medium in the transfer so that the print remained black and white. When trialling things I usually use a fine cotton because the paints dry much more quickly on the fabric and I do not need to leave the fabric sitting on the gel plate overnight. Of course now the image is ready for further stitch or embellishment.
At our local art show some of the ladies had stitched copies of drawings their grandies had made. This would be an easy way to transfer those drawings to cloth. Make a black and white copy of the drawing and transfer it to cloth and then use stitch/paints to reintroduce the colour

Introduction to Printing with a Gel Plate
In this example I have limited the paint palette to orange, citrus and green. I have created a range of simple stamped textures then cut out hexagons centred over the textures I wanted to preserve. These have been paper pieced together and are now waiting to be applied to a base substrate for a cushion. Then I will quilt the cushion front before completing the project
Most of us have played around with stamping as a child or with our children and this is where it starts with the gel plate.
First I need to explain there are two types of gel plate. One is the type that is made from gelatine and set in a tray in your kitchen This plate will work well but over time it may begin to develop cracks as it dries out and will need to be melted down and reset. The second type is a commercially prepared plate that is based on gelatine but has other factors added to it so that it remains stable. These are relatively stable but last indefinitely. Do not try to melt down a commercially prepared plate. I have always worked on a commercially prepared plate as my printing forays on the gel plate are spasmodic, usually dictated by a project I have in mind that I want to create some individual fabric for. Both types of plates give great results. The softness on the gel allows imprints to be made on the medium of the plate that can then be “pulled” off on various papers and fabric.
Note from the outset that to get good prints on fabric you may need to allow a longer bonding time than with paper substrates. I did not know this when I started so some of my early fabric prints were disappointing. It takes longer for the bond between fabric and paint to develop. Best prints are made when the fabric is dry before it is pulled. Layers of acrylic bonds can be made but each layer must be completely dry before the next is added. If you want to add a clear layer (say when using a mask) you can apply gel medium to the plate which will look white on applicated but dries clear. Masks (shapes placed on the plate to act as a resist) can be used to create interesting silhouettes within the layers. As long as each layer is allowed to dry first, you can add acrylic layers to the plate and then “pull” them off all together in one go.
Stamps or textures can be made with a wide variety of items - many of them hiding in your household cupboards - anything that has a texture will provide a print and once you have the dried print on fabric/paper you can further utilise these in journals or quilts to your liking. In one of the images below I show a variety of things that would be fine for adding texture. You can use just one item at a time or create a composition of textures to be pulled all together. Grasses and foliage are one of my favourites and you can see some of those in the gallery below. Lace, supermarket trays, bubble wrap, even the hospital socks with the grips on the foot and shapes cut out and stuck onto a recycled cardboard base will all give great textures. Masks can be made by tracing silhouettes from photos or using children’s foam shapes. Let your mind wander freely. I have a large plastic container of texture items in my studio that I periodically have to go through to make sure it is not getting out of hand.
The other thing you will need is a firm brayer. Brayers are like a paint roller in miniature and come in various strengths. The brayer is used to spread the paint evenly over the surface of the gel plate to get a consistent covering to stamp into. A few dobs of acrylic paint at the top of the gel plate and a light hand on the brayer are all that is required. When cleaning the brayer take particular care that the round edges on the side of the brayer are cleaned of paint as a build up of paint on the edges makes it difficult to get a smooth finish - you will get lines in your paint smoothing no matter how light a hand you use on the brayer.
![IMG_6666[1].JPG](https://images.squarespace-cdn.com/content/v1/639f6bda61e0456d11776132/1682053463439-H43D6DXEBB8GQ6INASRA/IMG_6666%5B1%5D.JPG)
![IMG_6637[1].JPG](https://images.squarespace-cdn.com/content/v1/639f6bda61e0456d11776132/1682052386943-RXUHF2ZTJMCYAJOYVF9R/IMG_6637%5B1%5D.JPG)
![IMG_E6641[1].JPG](https://images.squarespace-cdn.com/content/v1/639f6bda61e0456d11776132/1682052406376-4SBBPETVCHTQM8DKYOHJ/IMG_E6641%5B1%5D.JPG)
![IMG_6638[1].JPG](https://images.squarespace-cdn.com/content/v1/639f6bda61e0456d11776132/1682052449931-TRZWTRC59QPGFUU40TJA/IMG_6638%5B1%5D.JPG)
![IMG_6640[1].JPG](https://images.squarespace-cdn.com/content/v1/639f6bda61e0456d11776132/1682052473873-SD0MAOJ0GUXPZWW1YCFG/IMG_6640%5B1%5D.JPG)
![IMG_6635[1].JPG](https://images.squarespace-cdn.com/content/v1/639f6bda61e0456d11776132/1682052515328-SWY9ZOCF96ASUHNG2J4X/IMG_6635%5B1%5D.JPG)

An Experimental Aside
Today’s post is quite a short one on an experimental method I tried. My left eye has a stigma that means focusing it is never quite right and I have been to the surgeon to have a meeting regarding fixing the problem so I have just pulled this little experiment out of my library to keep the impetus going. Tomorrow I will start on looking at ways to use a gel plate in printing from basics to more advanced techniques.
As so often happens with me, I am working on something when another idea pops into my head. And I just have to try it. I had been working on using citric cleaner to print from OHP and I had printed off a lovely image of an iris on presentation paper. This is a high gloss paper but not photopaper. I wondered if I used the same citrus method as the OHP if I would get a print. The lovely water colour image on fine cotton was the result.
While the detail has been softened it opens up a whole new range of areas that I could try with stitch or applique over the actual flower to increase its detail and 3 D effect. While leaving the softened background (or even painting over it) as an optionAnd so my interest in printing without a press continues to grow

The original image

Transferring Photographs to fabric
This thread painting of my husband’s mate and his dog, Fox, began as a photograph that was transferred to fabric and then free machine thread painted
This is where my journey of printing without a press began. I wanted to create a family memorial quilt - that was just photos on fabric with lots of patchwork around it. Gradually that morphed into thread painting and I still find the gentle rhythm of thread painting very relaxing. Maybe I will talk about thread painting in another post as for the easiest results the photographs need to be posterized (reduced number of colours) and have hue intensity) by slightly altering in a photo program. Mind you when I started I didn’t do any of that.
The first problem with printing photos onto fabric comes with the fact that the fabric is floppy and doesn’t feed through the printer well. It needs to be stabilised. I have used stabiliser on the back of the base fabric and I have used ironing freezer paper onto the back of the base fabric. The base fabric must be cleanly cut so there are no lose threads that can catch in the printer. I use an Epson printer as it prints straight through without turning the paper/fabric in he printing process.
Most times now I use a product called terial magic. This comes in a spray bottle and once the base fabric is cut to size you spray it with the terial. Let it dry and then iron it. The fabric becomes stiff enough to put through the printer. If required the “stiffener” can be washed out at the end.
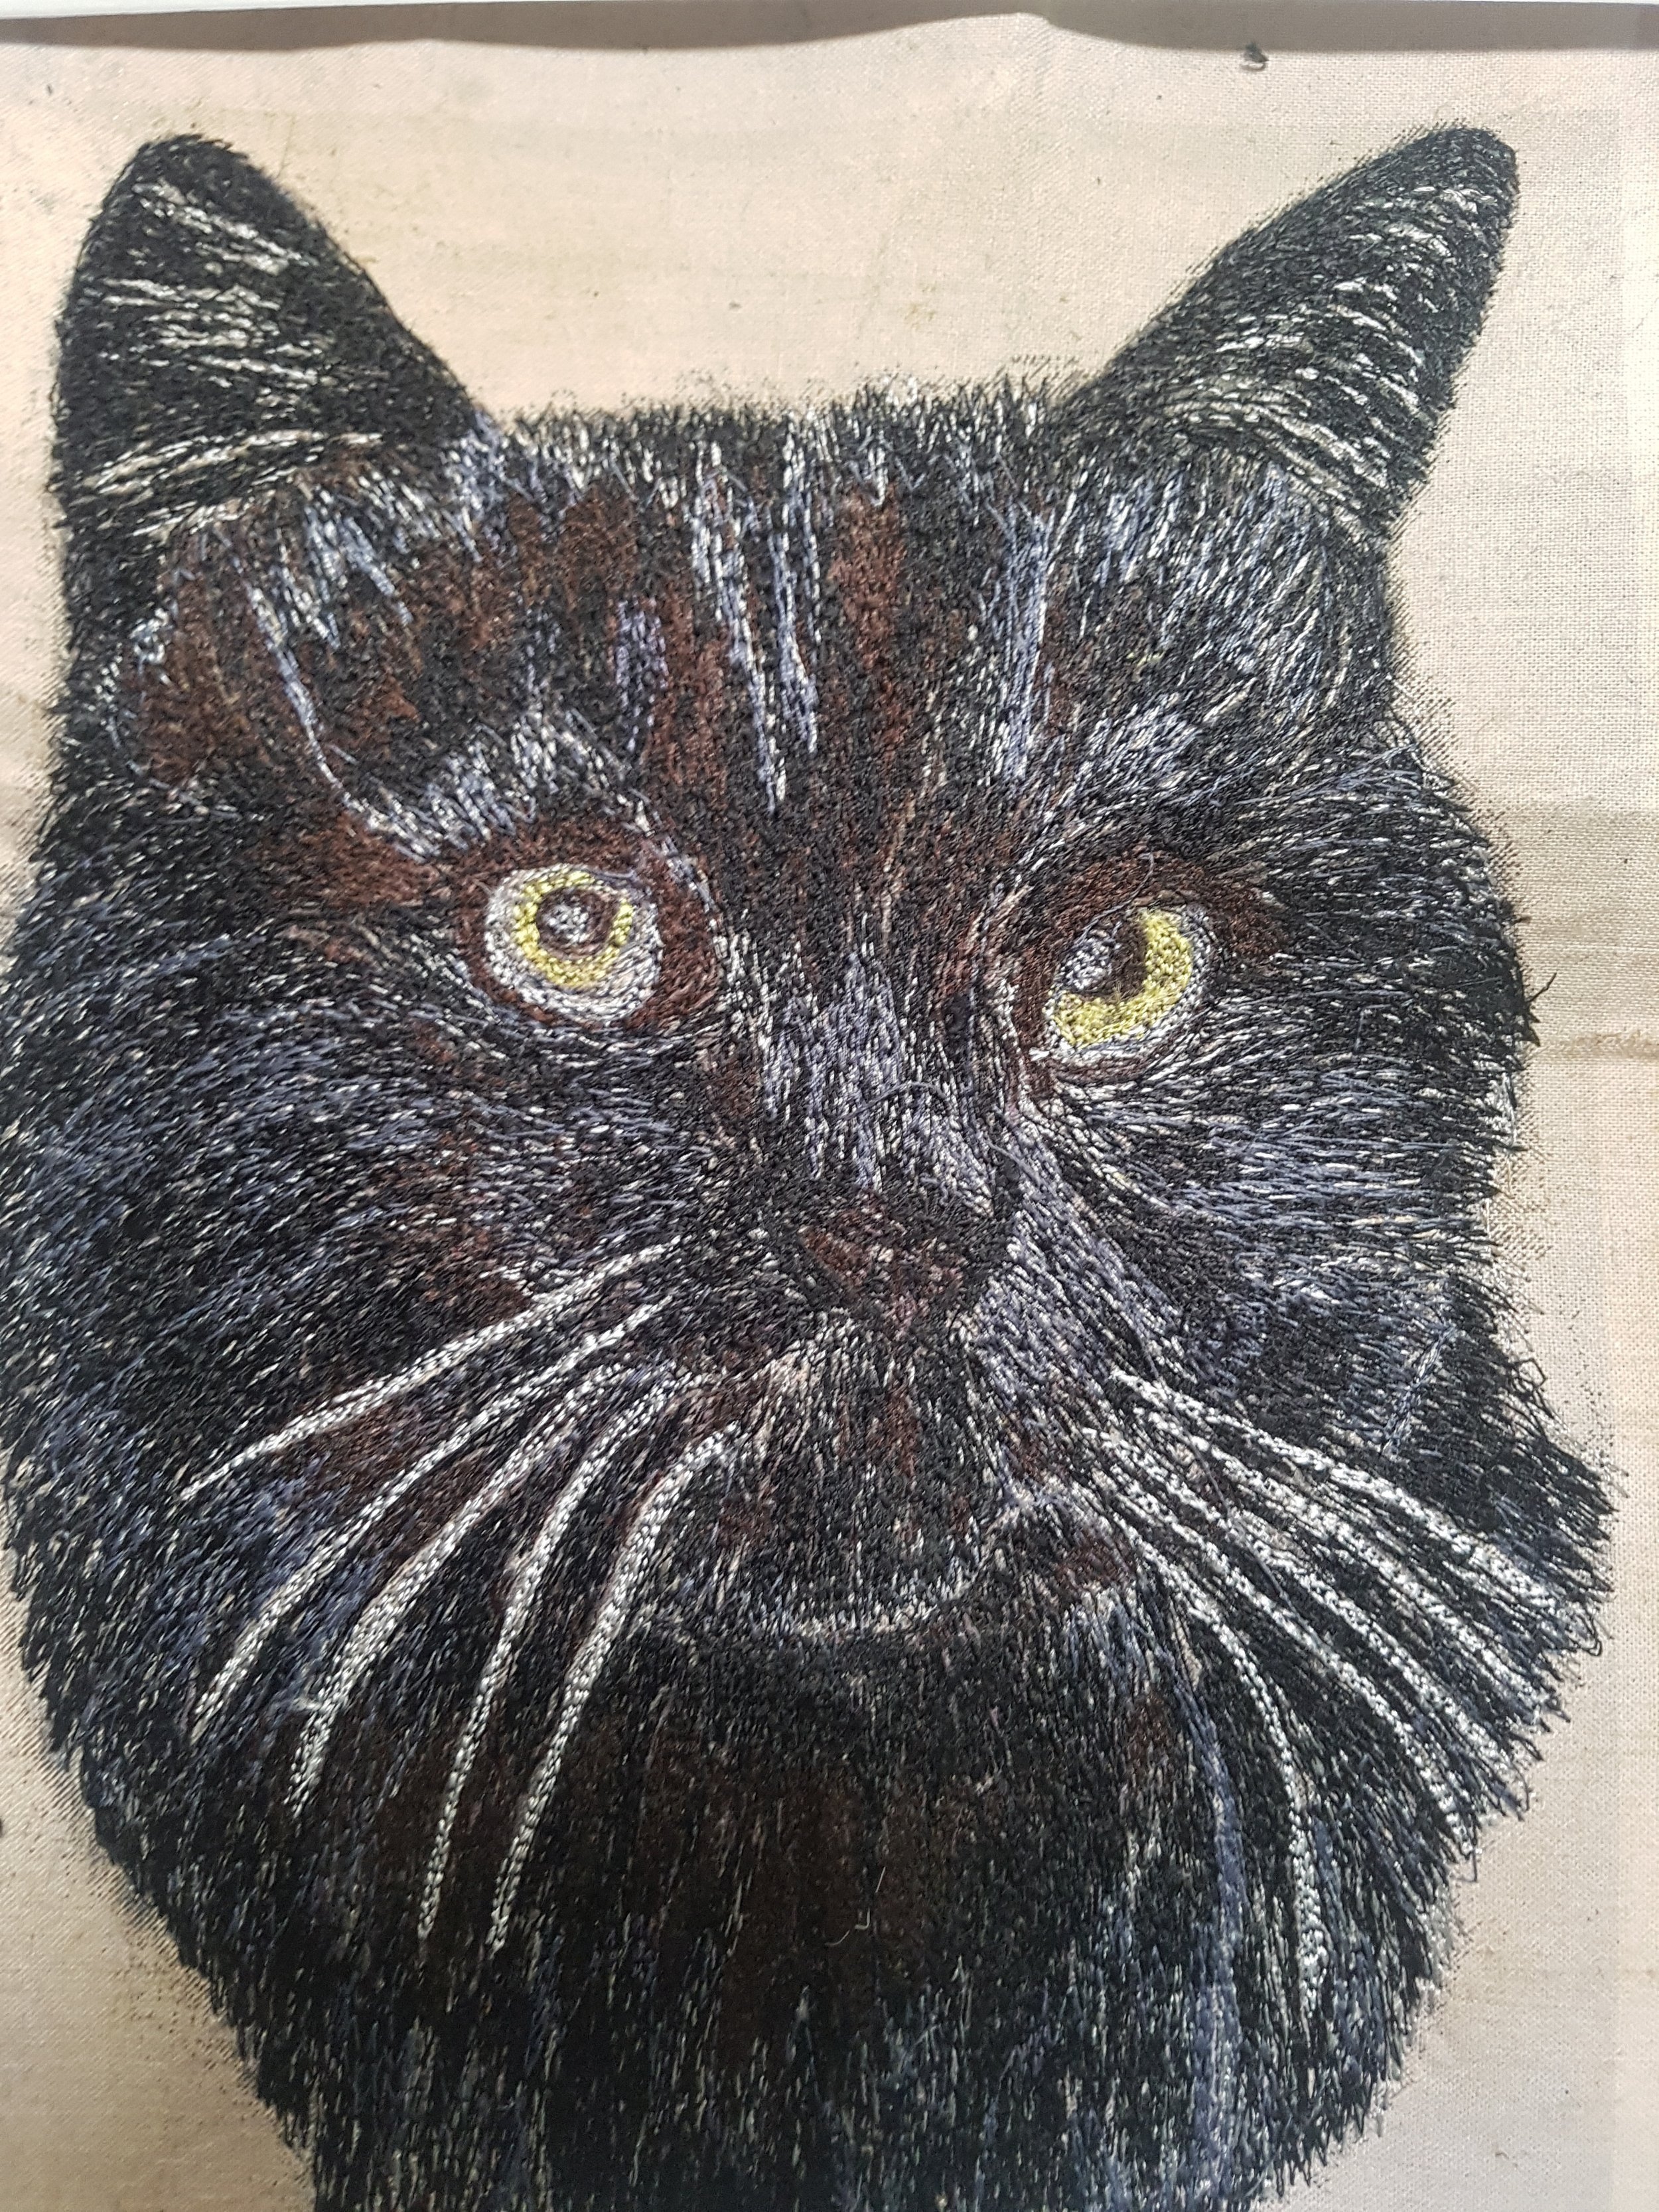

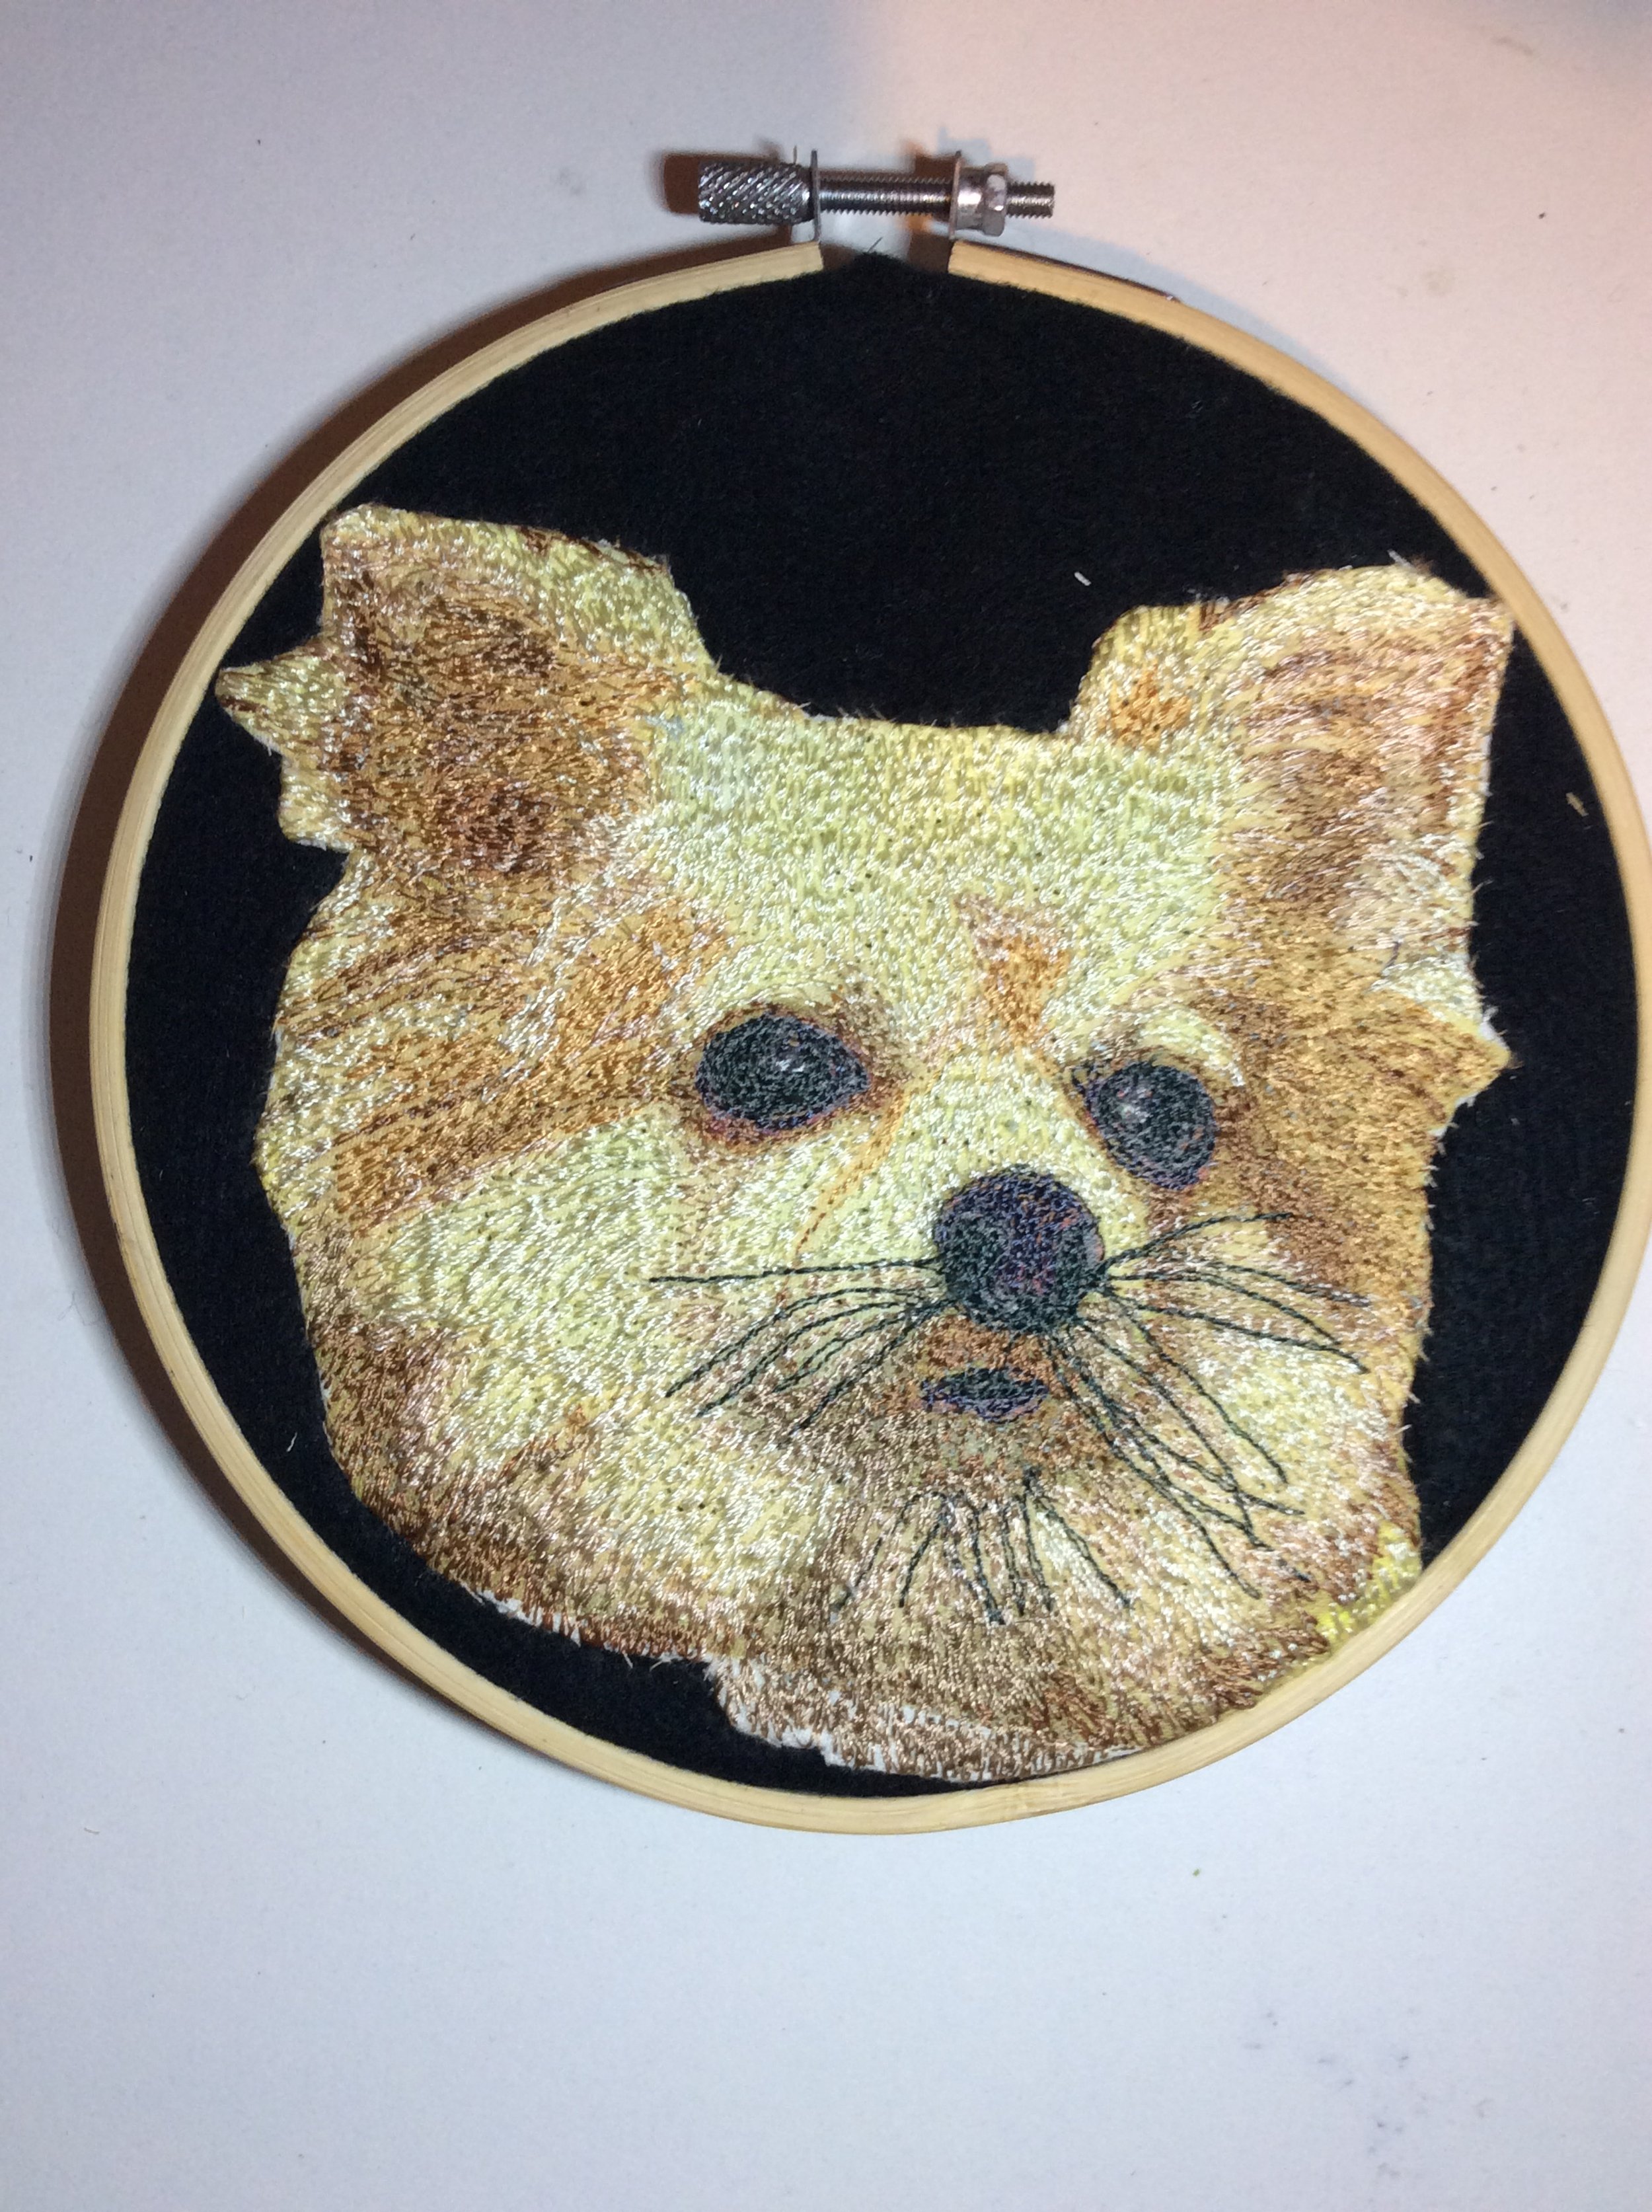

All of the art works above began as a photographic transfer. Some remained just as the photograph on fabric, others were worked into in a variety of styles. Some were created as a challenge of thread painting to get depth into a single colour. both the pet portraits fell into this category

OHP Transfers
This image is of Te Whare Tapu superimposed on a Matariki sky to show where the star formations align with the top of the whare. It is not perfect as there are a couple of places where the ink didn’t quite take and a crease in the fabric shows up but I have used this example to showcase both the print and these potential problems
I had read about printing on OHP (Overhead transparencies) and using citrasolv to transfer the image to fabric. I was keen to have a go but every time I printed on OHP the result was a blurry mess. Then I discovered that you need to have different OHP according to the type of printer. OHPs come designed to work with laser printers or ink jet printers. The inkjet OHPs have a sort of rough side that holds the ink so it doesn’t blur all over the sheet. It is the rough side that is printed on. I had an inkjet printer but was using laser OHPs.
Problem number one solved. Now I cold print a image that was what I wanted it to look like.
Next problem - Citrasolv wasn’t available in New Zealand. Would other citric cleaners work. I tried a common brand from the supermarket. I sprayed it onto the printed side of the OHP and placed my fabric on top. I should have realised that when I could see some of the spray drops on the OHP, those areas would bleed - they did. so the next option was to spray the fabric. It has to be quite wet. And Viola I had a print. I carefully lifted the OHP and had to respray the fabric in a couple of places but if you are careful when doing this you can put the OHP back down exactly where it was and not get a shadow effect. So second problem sorted.
This gives another option for transfer to fabric and probably other surfaces as well. The example above is not perfect. you need to be sure that any crease marks have been ironed away as these will show up as lines in the print. Sometimes even after ironing there will be the remainder of a line where the crease was and this will show up on the print

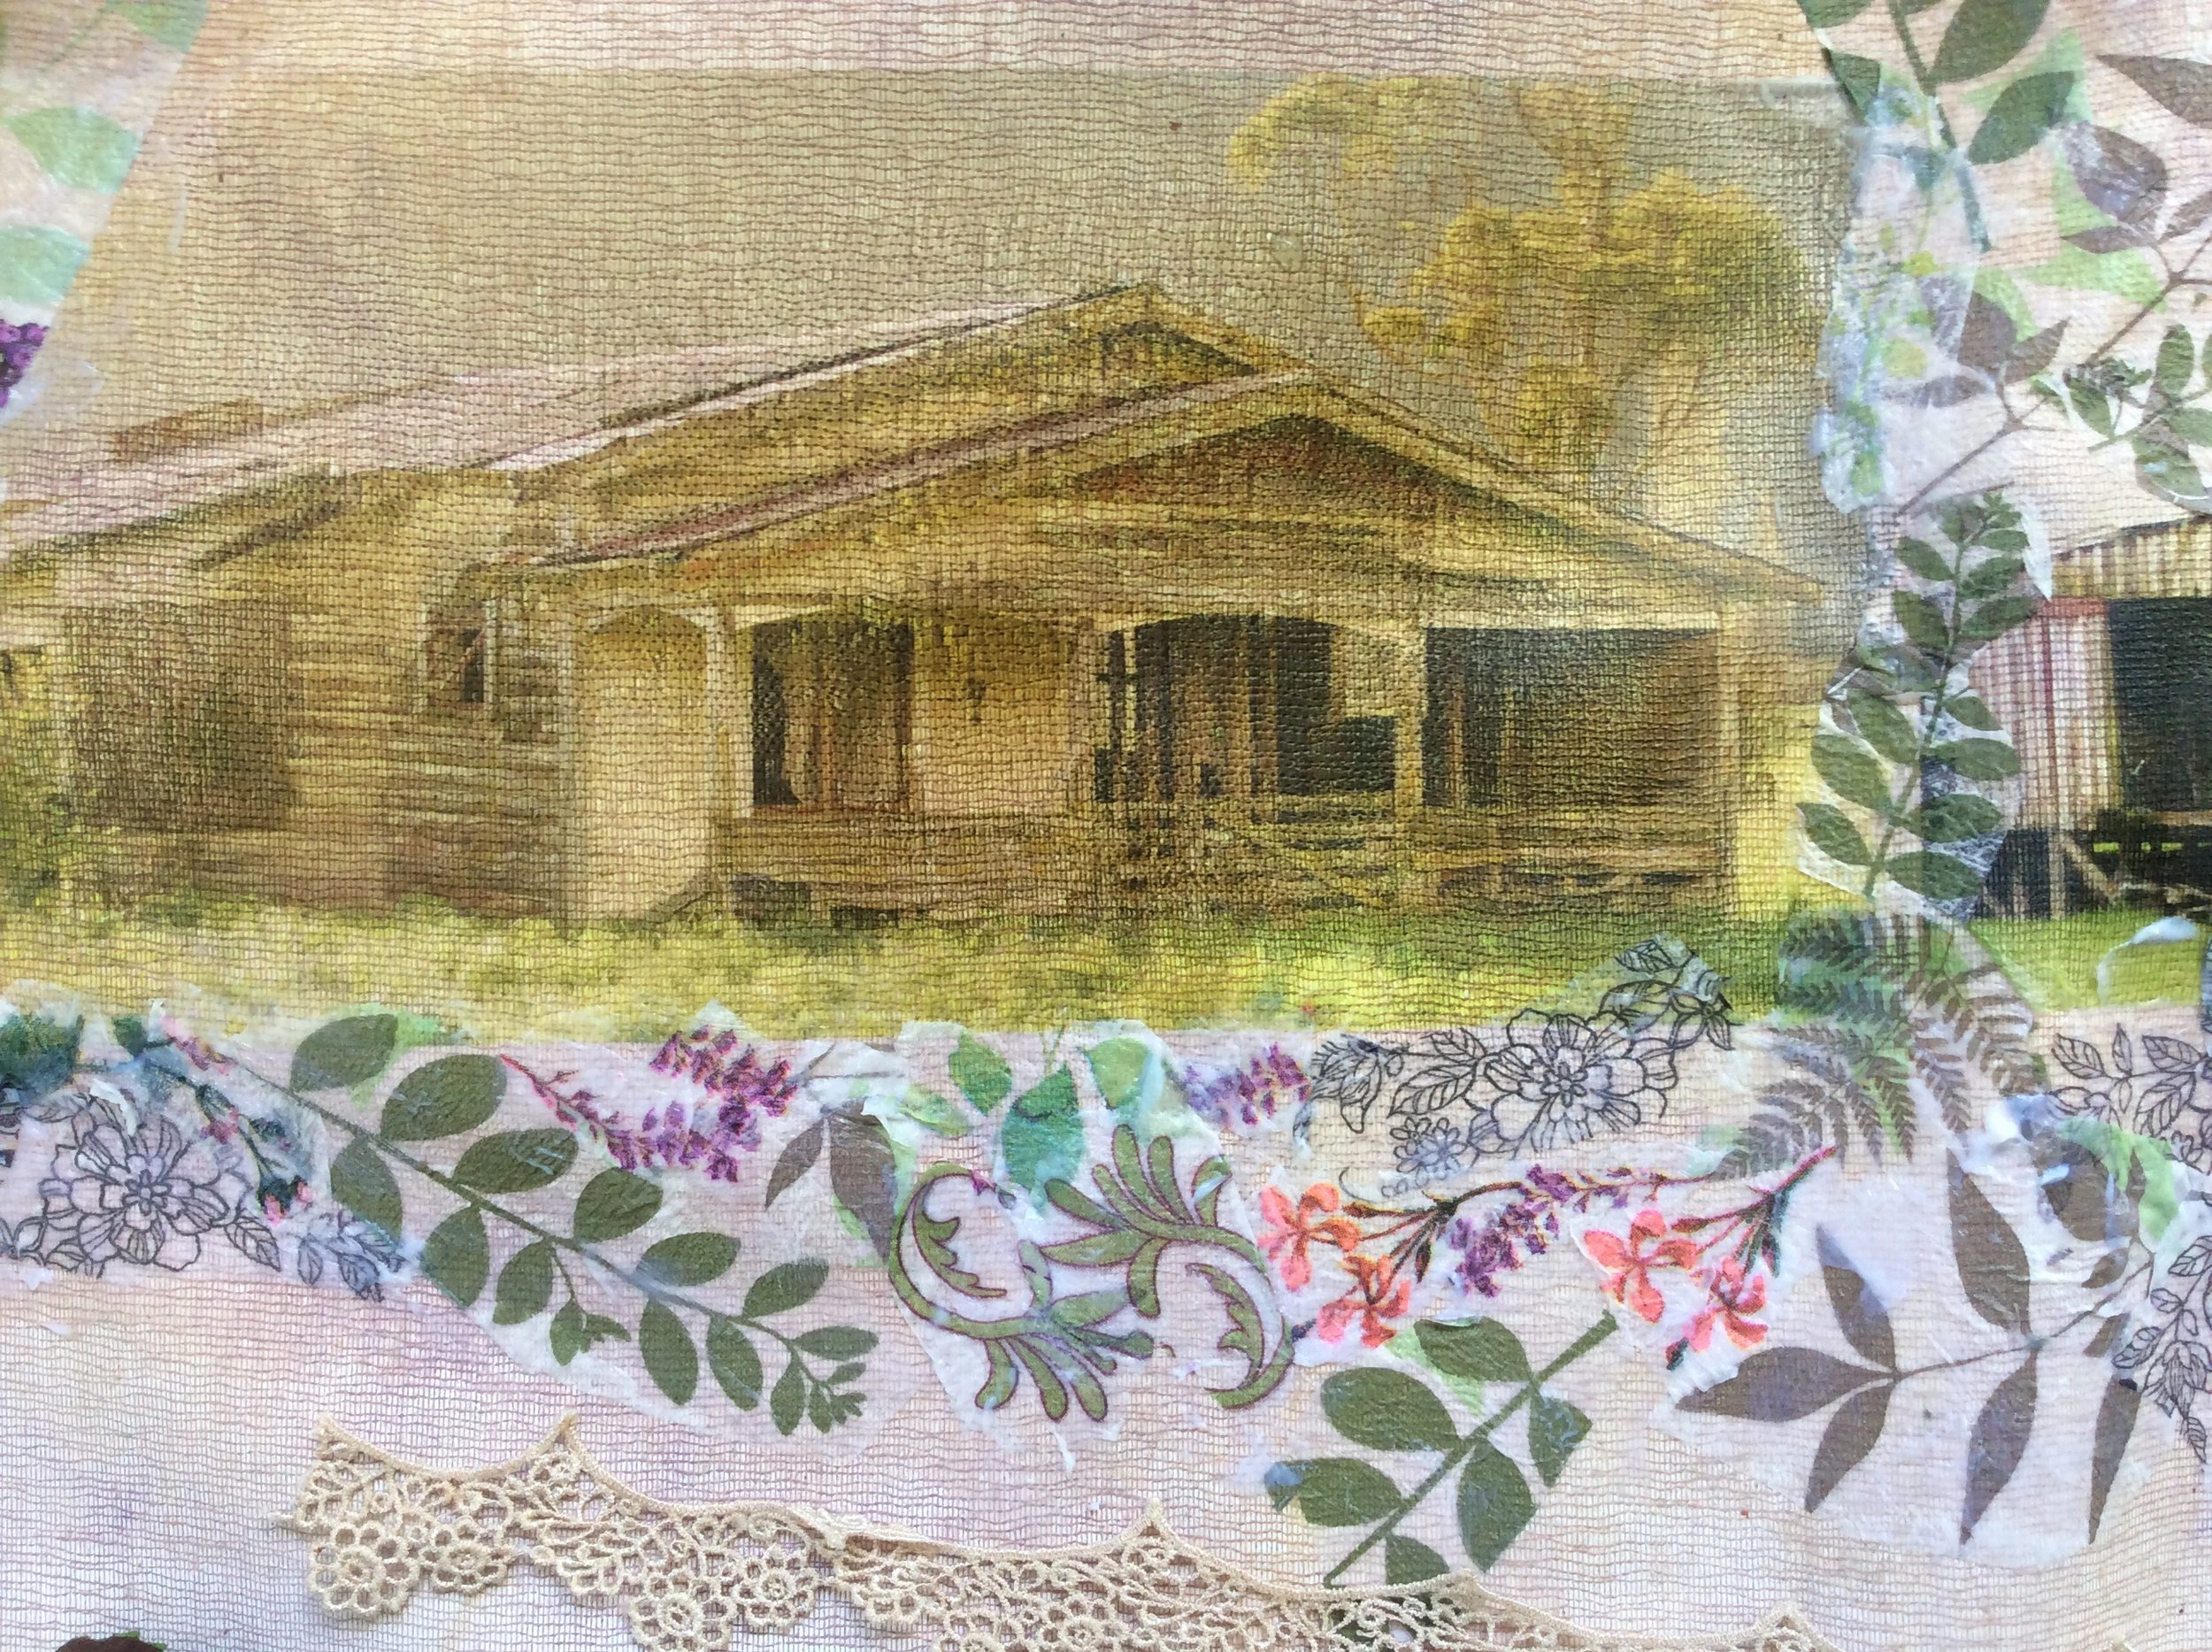
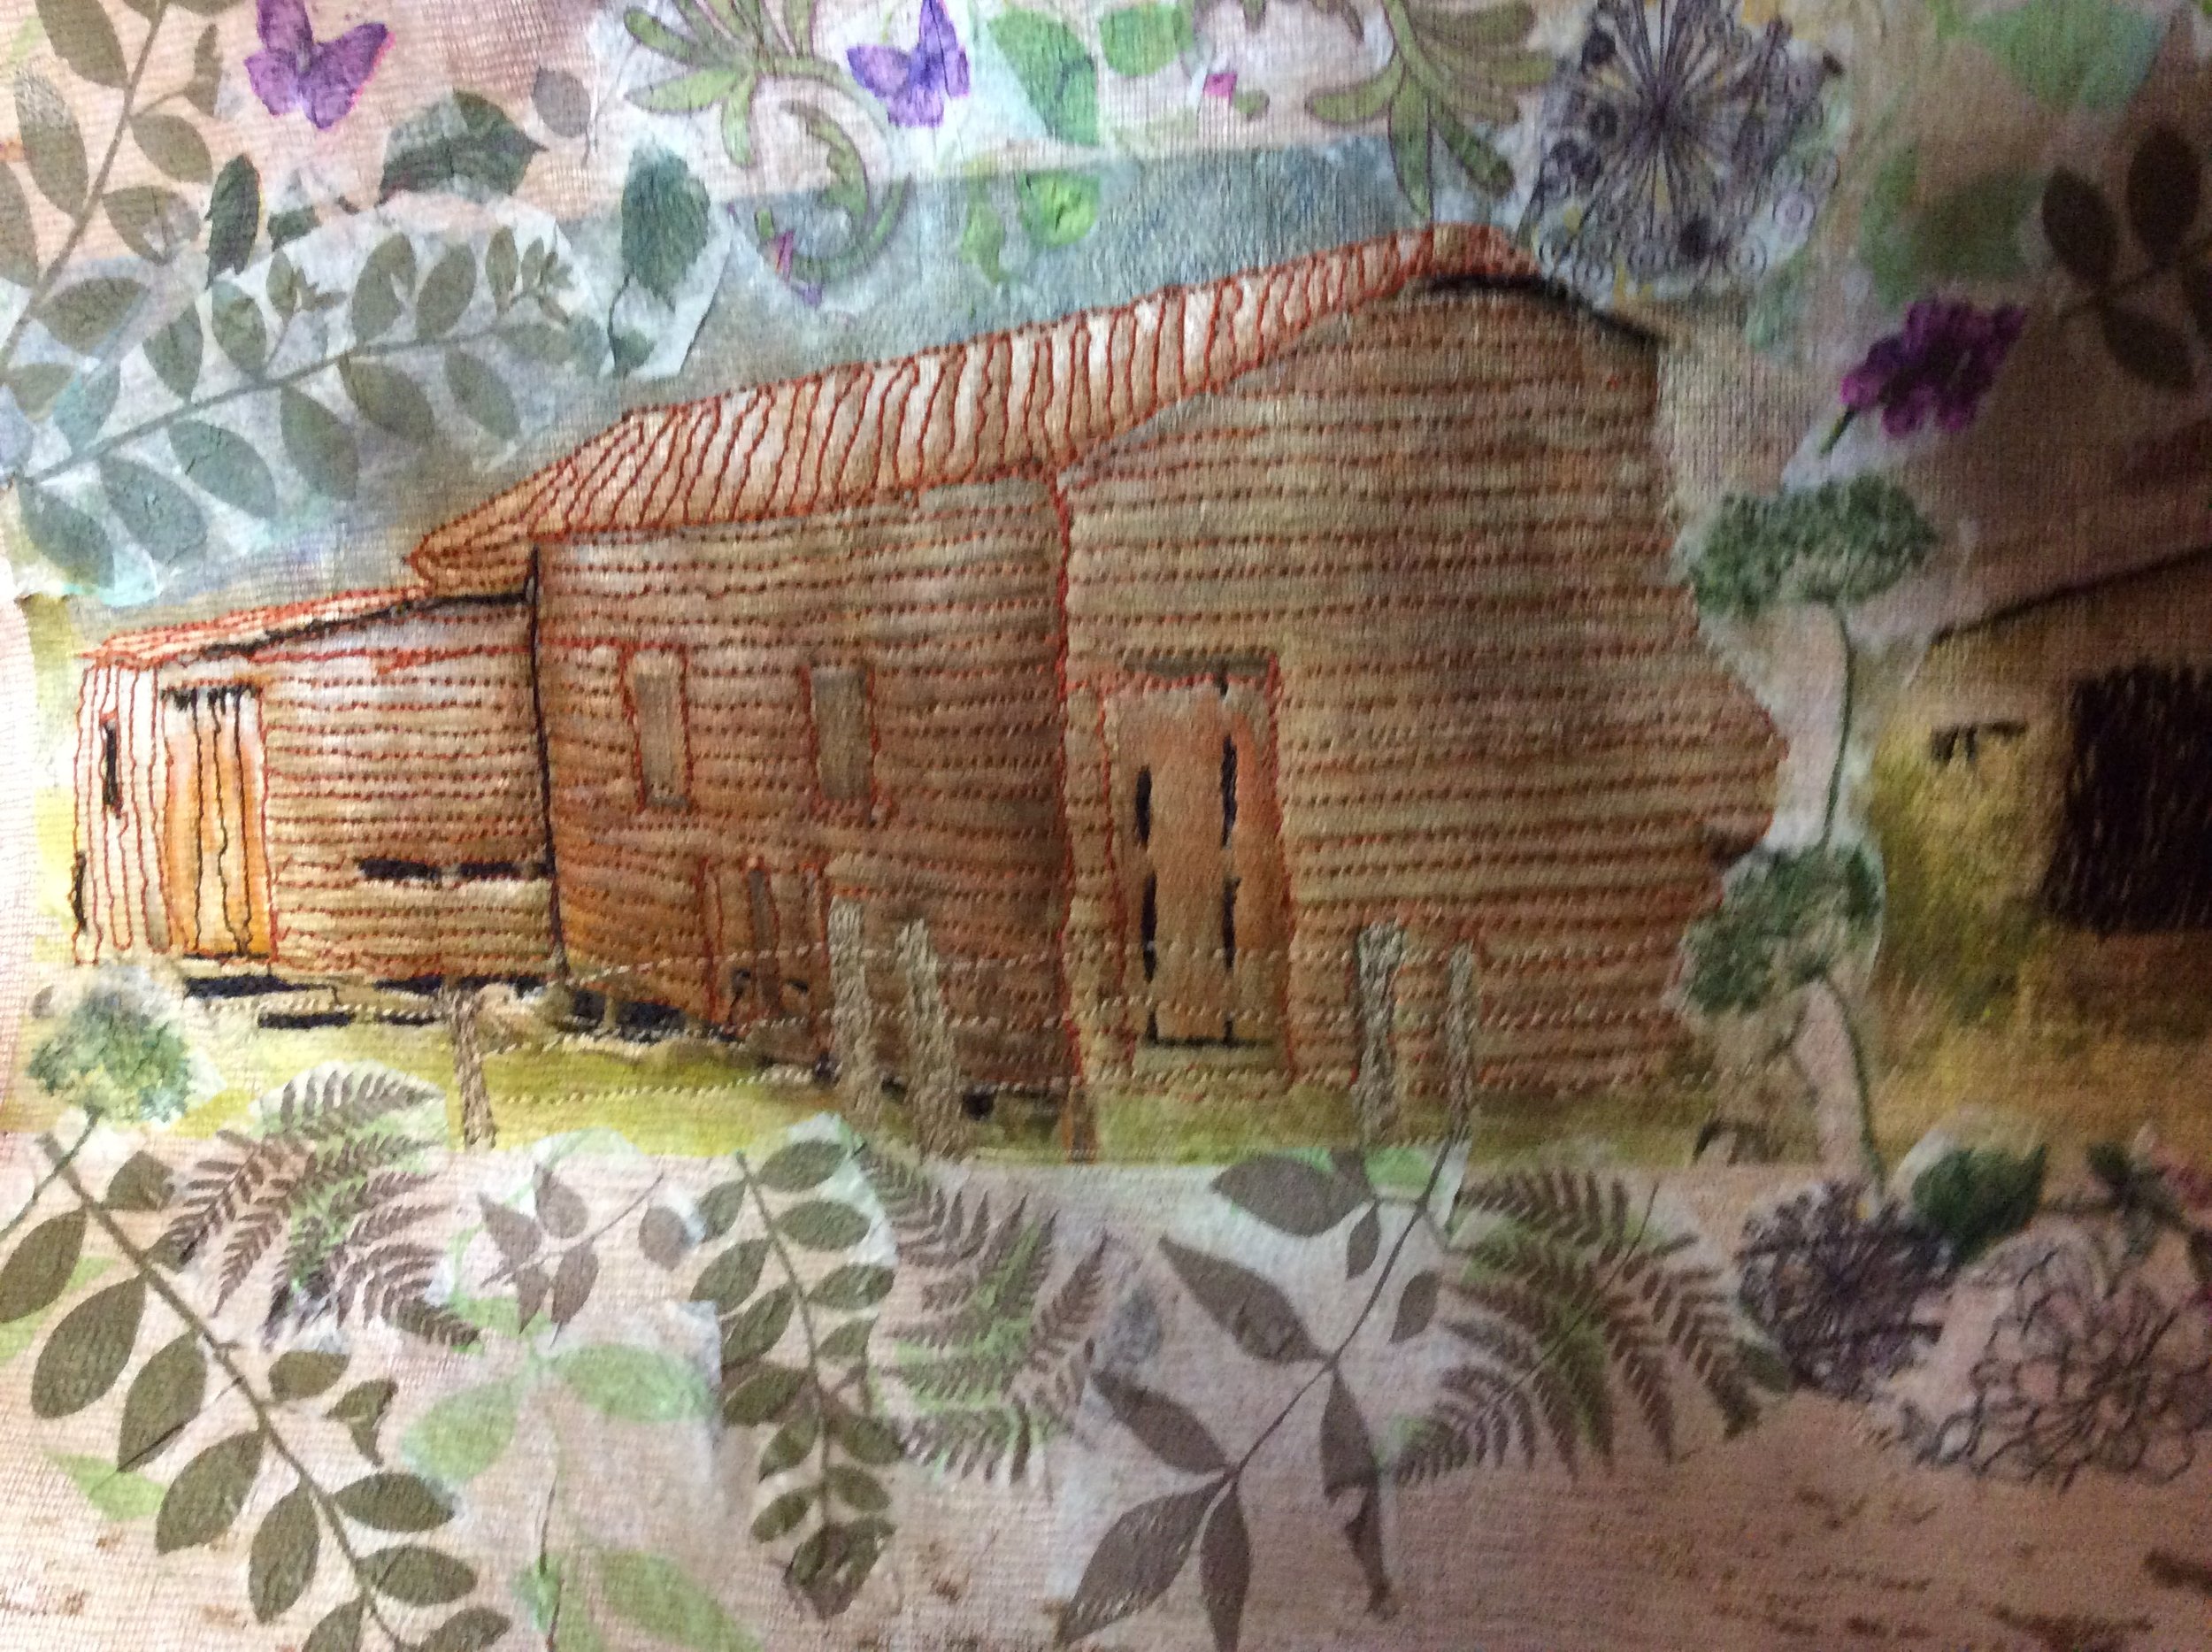
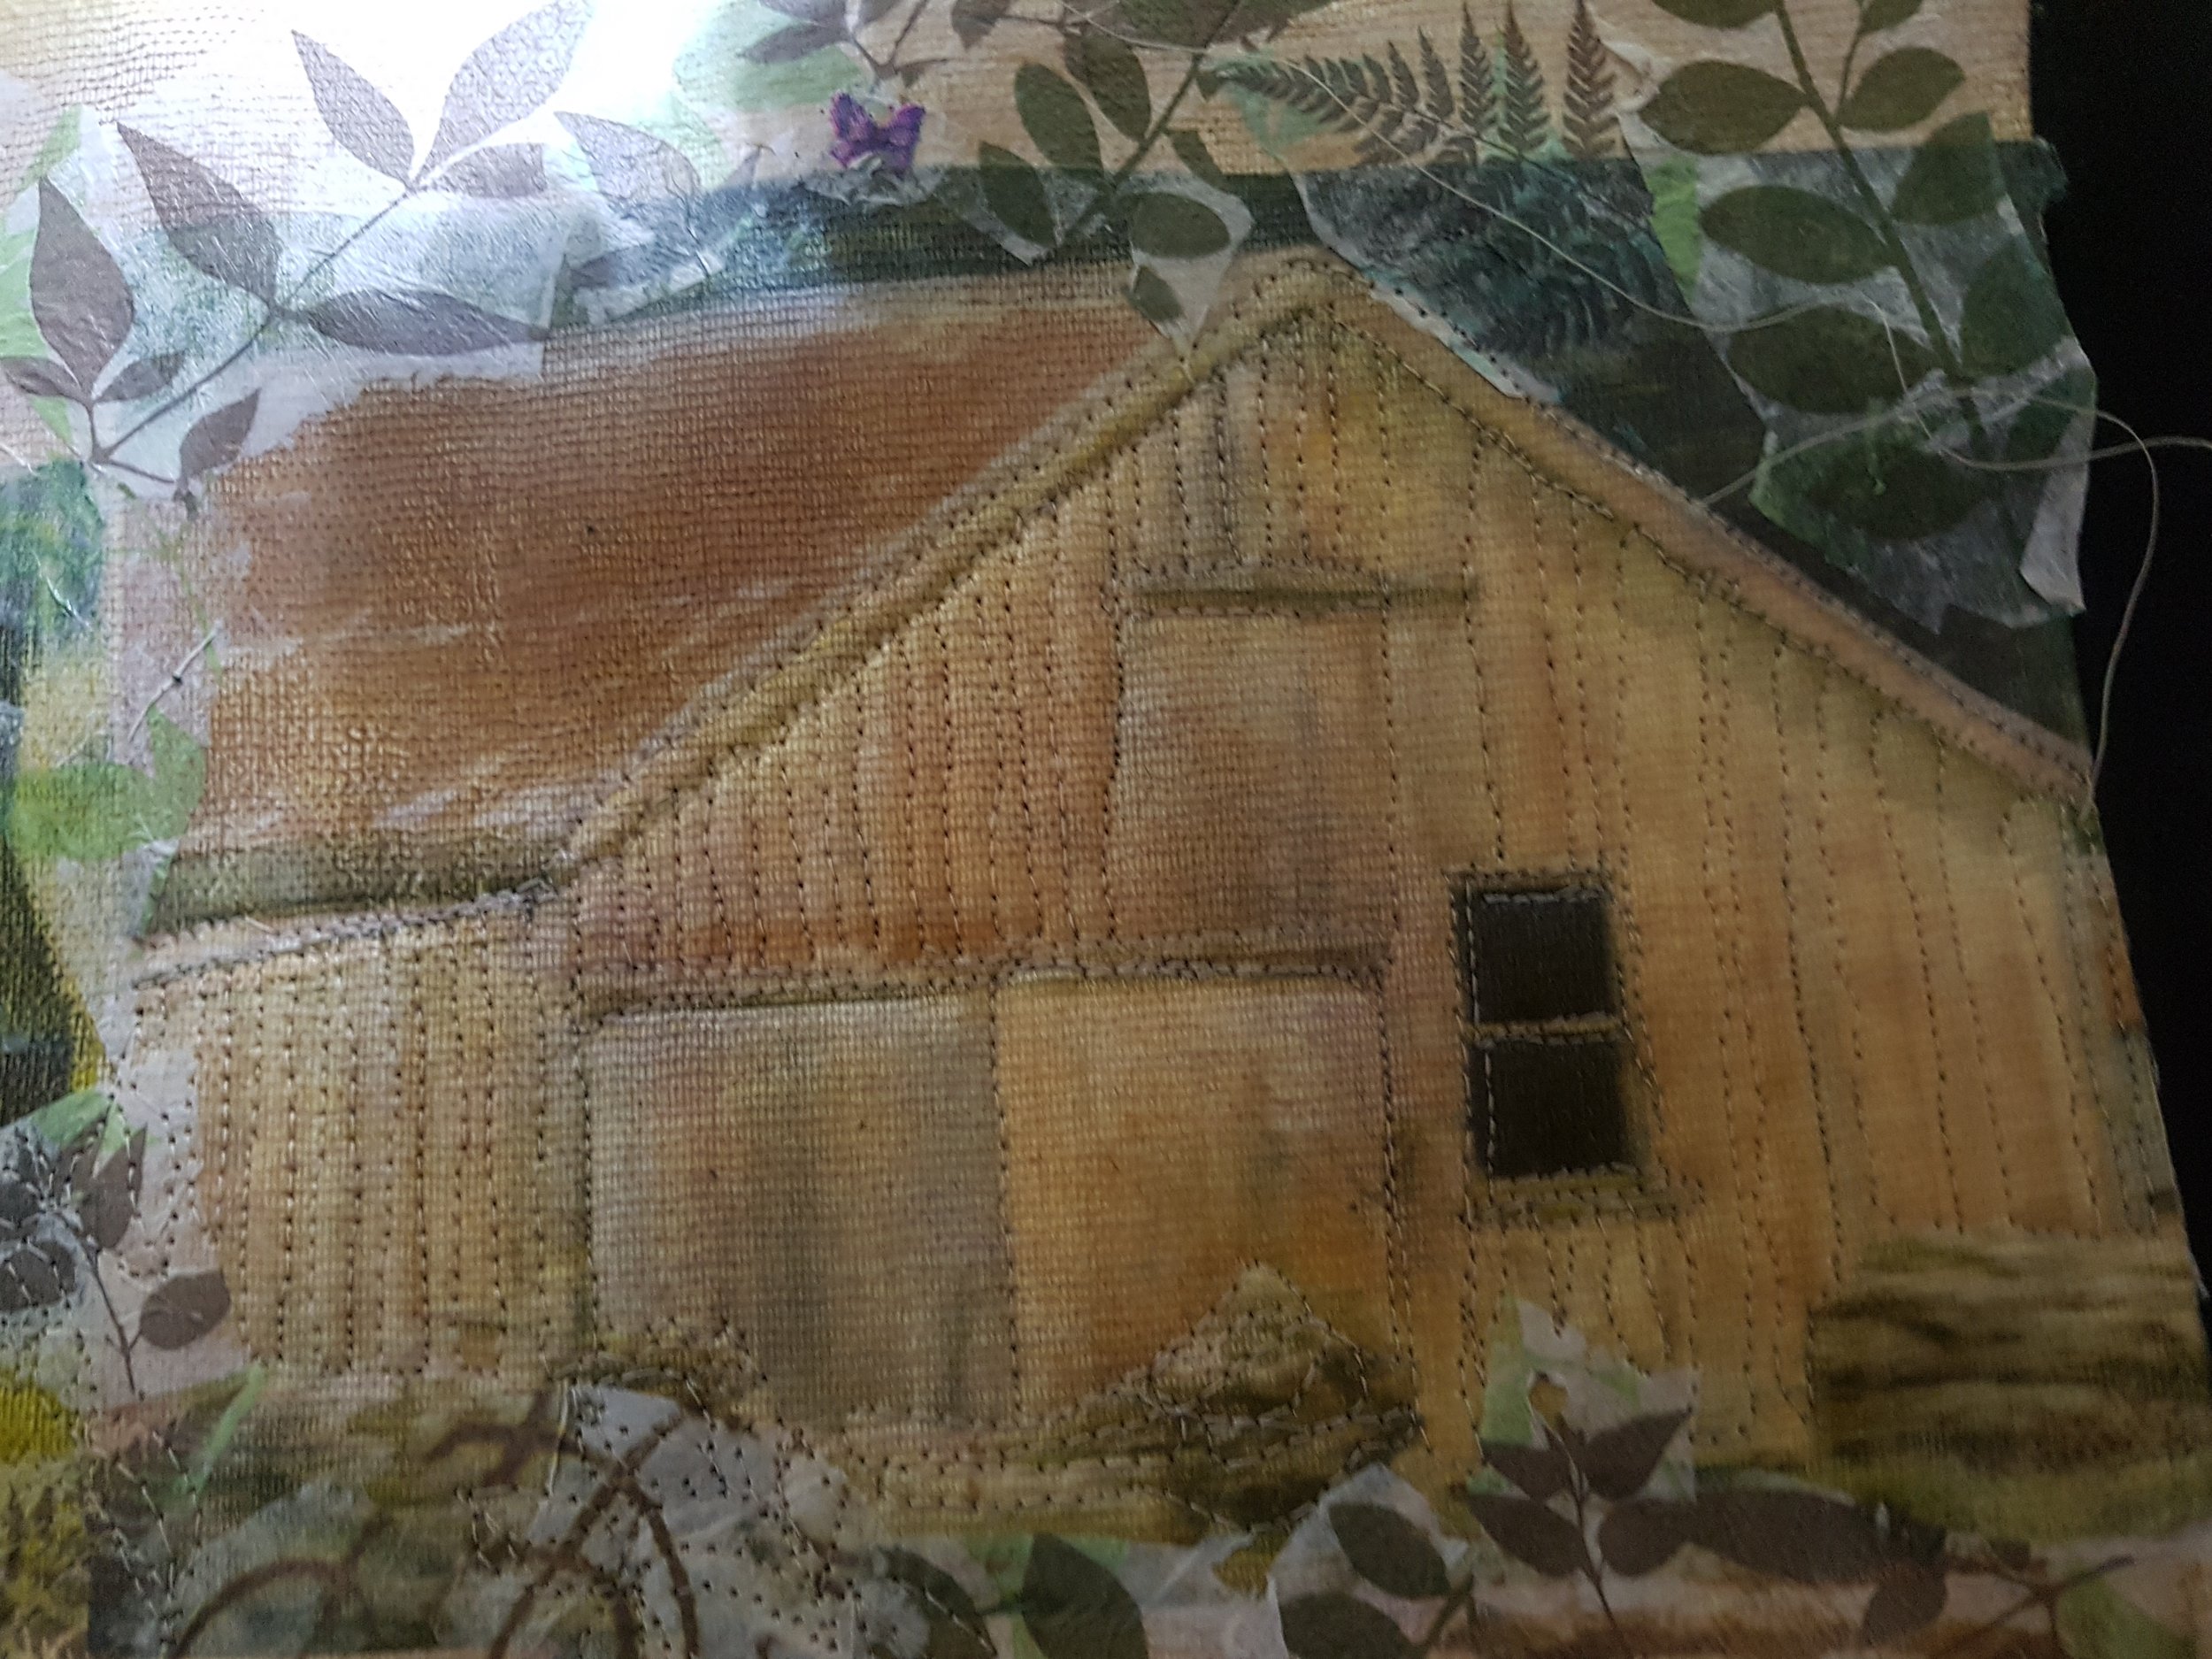
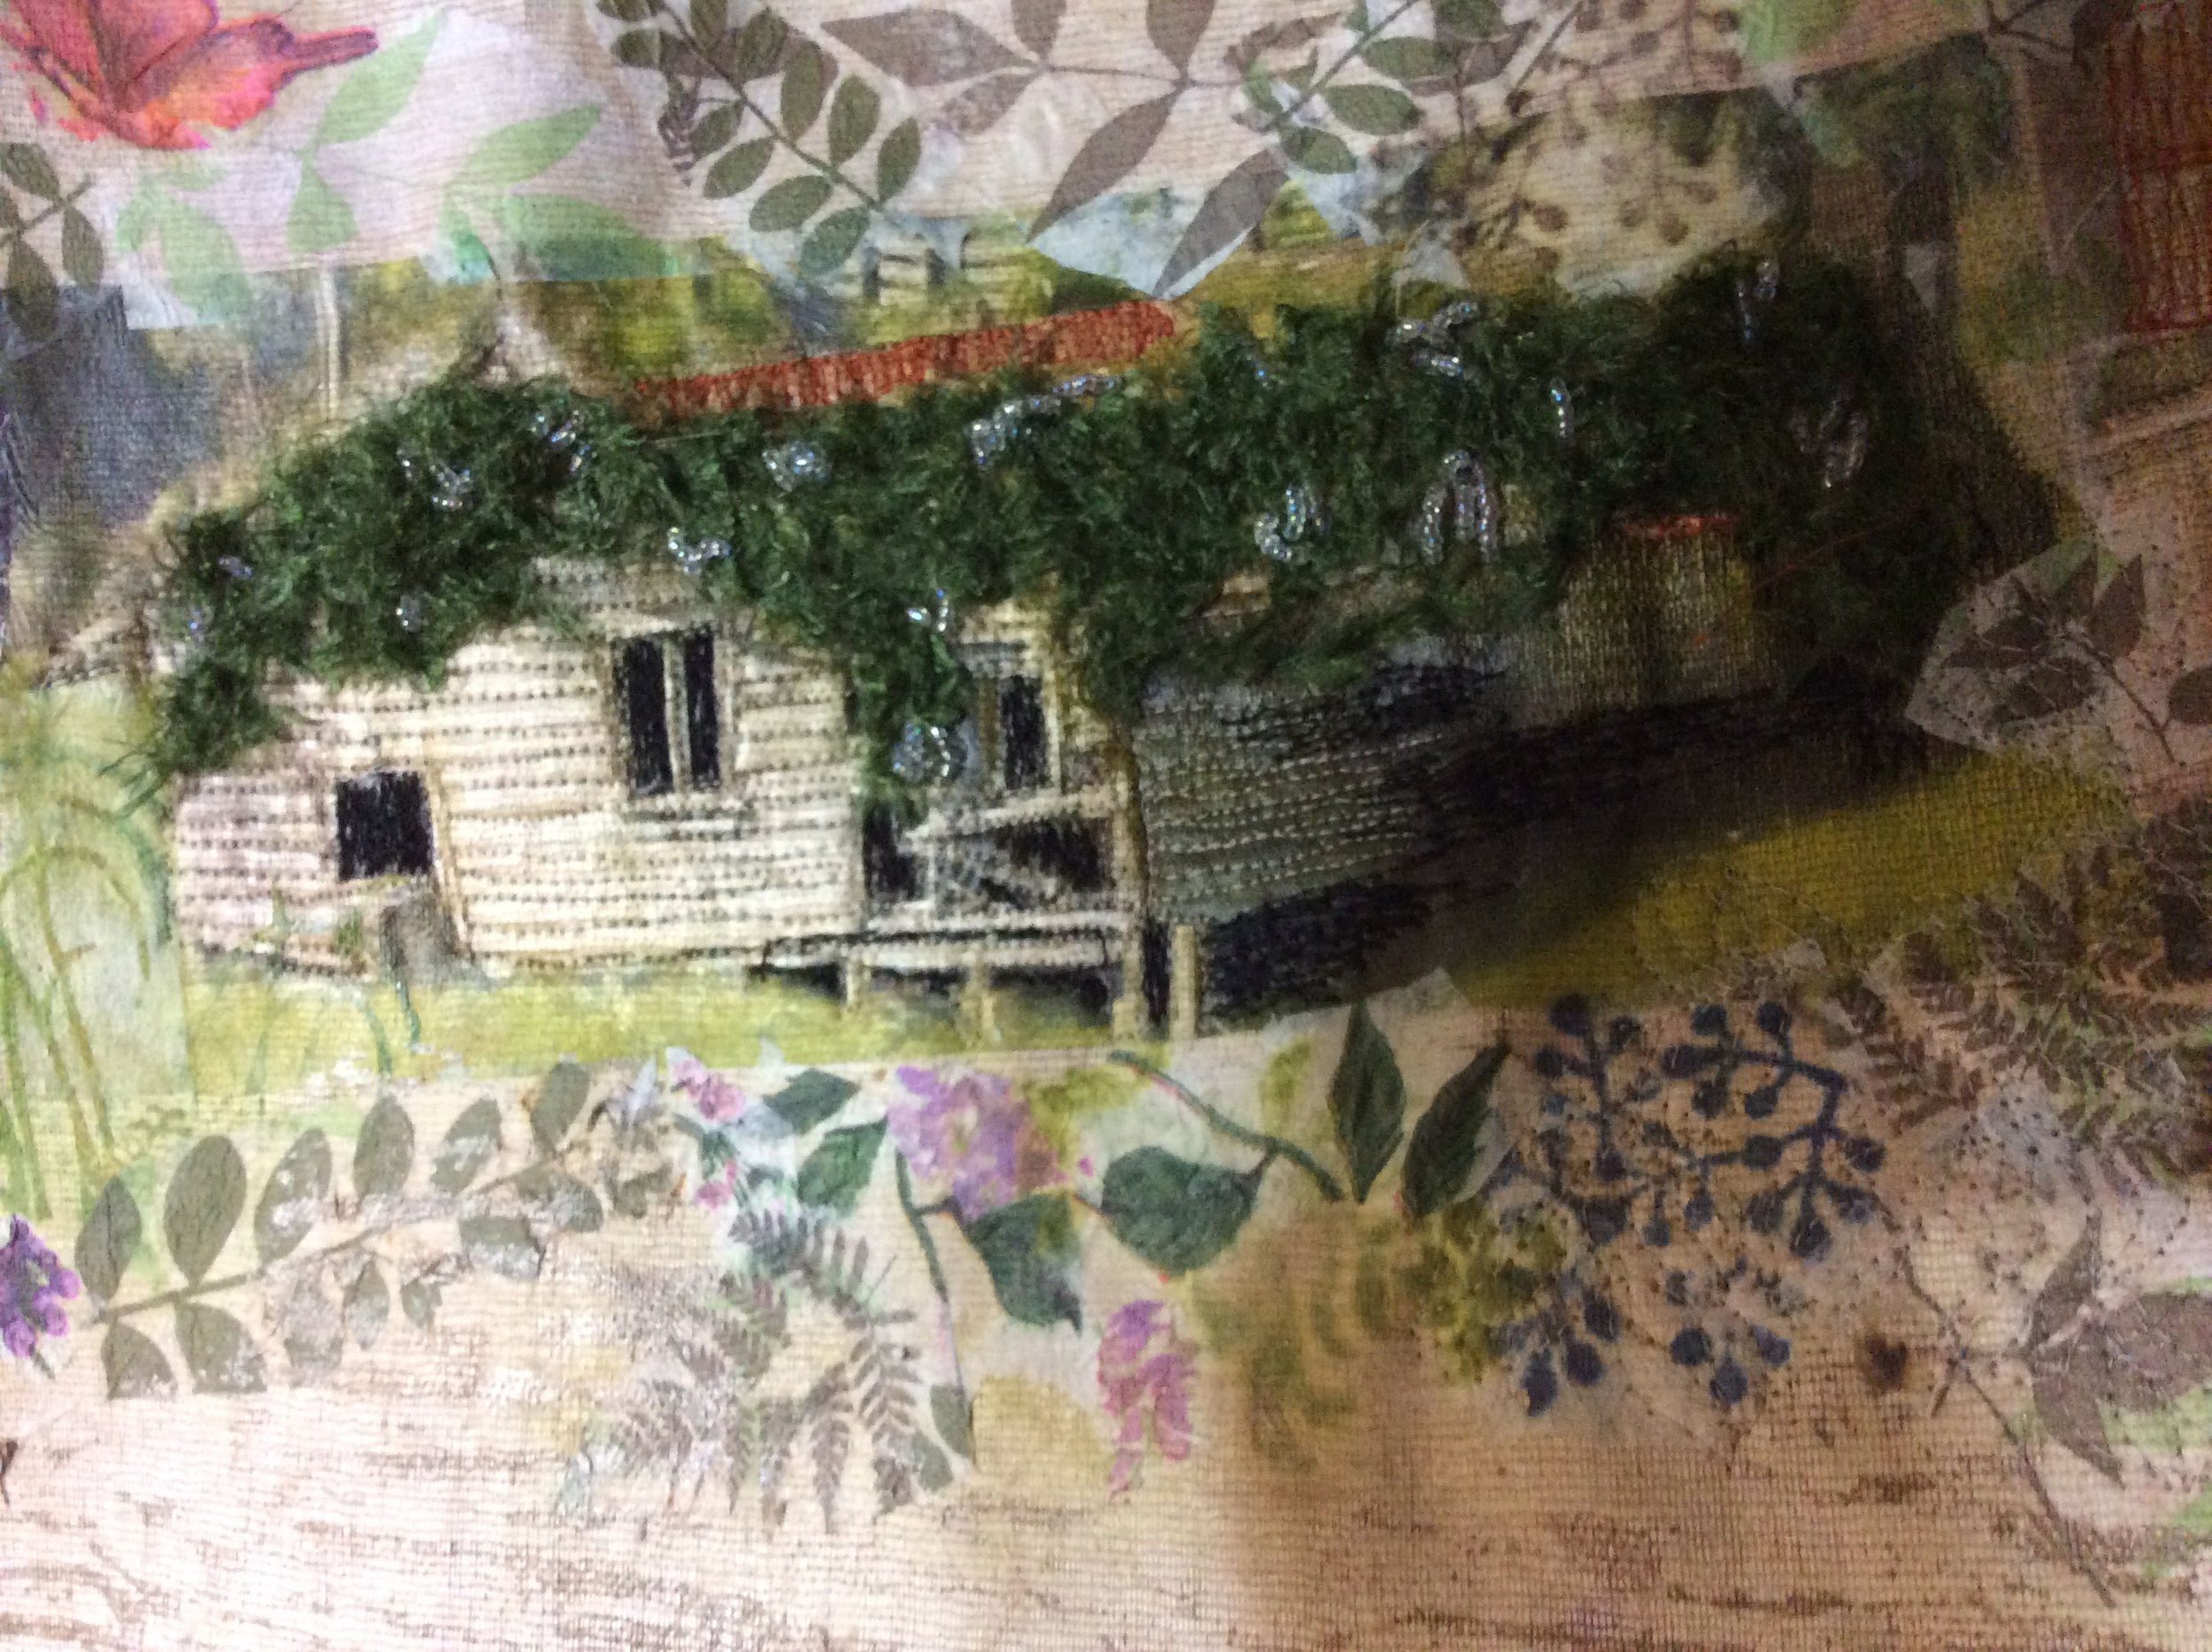
Heat Paper Transfer

This piece has heat transferred photograhic images that I took of old buildings on a trip South. It is on an acrylic substrate. The images have added stitch and the butterflies and foliage are laminated paper napkin prints. The top and bottom have been printed with a thermofax image
Heat Paper Transfer is a means of taking an image (photographic or abstract) and printing it onto the specially formulated paper in a standard home printer so it can be heat transferred onto fabric. If there is text or directional factors in the image, it will need to be mirror imaged before printing.
The paper usually comes in packs. Once printed if you do not want all the image you can cut away the parts that you do not want. Place the print side down and use a heat setting on your iron as hot as the fabric can take. Press for a little while then carefully lift the corner of the paper to see if the transfer is progressing. This process can also be done with a heat press if you have access to one,
This method is a relatively expensive method but does achieve a good result. The paper has improved a lot since it was first introduced to the market. Colour or black and white images can be transferred

Dendritic Printing

In this example i used copper and black acrylic paint - a bit lighter on the black might have been better
The word dendritic is a way of technically describing a branching (of Cells) but for our purposes it is used to describe the texture of branching - like on bark or wood grain.
Traditionally dendritic printing was carried out by applying acrylic paint to one sheet of glass and then placing another sheet of glass on top. However to avoid the sharp edges of the glass and provide for easier separating two sheets of transparency plastic works perfectly.
The paint is applied and smoothed out over one transparency using a foam brush. A second transparency is then placed over the painted surface and the two are squished together.
Now comes the fun part. The transparencies are pulled apart slowly and as you do this you get to see the feathering pattern appear. Each transparency will give a print. You can print either fabric or paper. You will probably only get one print per transparency and will need to scrub the transparencies to get them clean to use again.
This technique is not so much an end in itself but makes great applique or background textures

Here is an example where I have used dendritic printing in the background of this collage

Rubbing Plates

This fabric was made by using Shiva Paint sticks and commercial rubbing plates on black fabric. I intend to add decorative machine stitch to this so it is sitting in my “waiting to complete piie”
Making rubbings is an age old process of transferring patterns to a substrate be it paper or fabric. Some people collect rubbings of access plates on the roads. Shelley Stokes of Cedar Canyon Textiles (Mexico formerly US) has perfected the art. She uses Shiva paint sticks, an oil based paint in a stick form like a crayon. You need to peel the skin that forms off the top (or side) of the stick to be able to use it. The skin provides a protective covering that stops the stick from drying out and gives much longer longevity to the medium. If you do not care for the oil smell, gelato sticks also work well but they are very soft and you need to be careful not to overdo them. In the circular example below you can see how I overdid the rubbing a bit - at least to my eyes.
In the example above I have used commercially prepared rubbing plates but there are endless items around the house that will create interesting patterns to take rubbings from. Below are a few I found without really looking: a plastic table mat in a leaf design, a cardboard based “plate” (from a previous project with thin mdf cut circles) and some coarse mesh. I have used gelatos in this example.
I keep a large plastic bin with lots of texture “things” like the bottom of trays from supermarket food that often come in handy for printmaking and texture. I often pick up things from the thrift store that end up in this bin and every once in a while I have to have a cull as there is too much “stuff” to fit. My daughter has a gift store and sometimes thin cut decorations (like Christmas tree decorations) or small wall hangings provide a perfect option for texture plates.
![IMG_6596[1].JPG](https://images.squarespace-cdn.com/content/v1/639f6bda61e0456d11776132/1681593789204-LU1A3C14NP48MRFRPTR1/IMG_6596%5B1%5D.JPG)
![IMG_6595[1].JPG](https://images.squarespace-cdn.com/content/v1/639f6bda61e0456d11776132/1681593811157-WYAEG0YVQ1PYT4DKC4K2/IMG_6595%5B1%5D.JPG)

Layer Upon Layers

Several layers of stamps and thermofax screens have been applied to white fabric to create this design
Most of us have played around with stamps as a child but fewer of us see their potential in creating our own printed fabric. The piece above has 4 layers of stamps/thermofax images to create a complex web of pattern that could be used as a background or as parts for applique.
I was not confident in layering until I attended Jane Dunnewold’s 5 day course at Christchurch Symposium in 2017. It changed my whole approach to my art work. I now seldom buy fabric unless it is plain cotton or silk for me to work onto. This makes my work unique and provides a colour palette that suits whatever I am doing. Stamped fabric can be further enhanced by free machine stitching as the example below:

White cotton printed with texture tools on a gel plate and then thermofaxed (the blue) before free machine quilting the surface
Jane is a very talented surface design artist who has published several books such as “Complex Cloth”, “Art cloth” and “The Best of Both Worlds”. She has been teaching these topics for probably the last 30 years and so her expertise is considerable. It was Jane who introduced me to thermofax screens and the complex overlay of custom dying and surface impressions. She runs a year long program called Creative Strength training which I participated in in 2018 and which looks at archetypes and how they influence our life, our art and our inhibitions. Probably my biggest take away from that course was learning that my Saboteur often stopped me completing work because if it wasn’t finished it couldn’t be criticised. It was on that course that I completed what I call my 30 year quilt - a hand appliqued NZ Baltimore quilt that now has extensive machine quilting. I only know how long it was since I started that quilt because I had embroidered the date on one block.
Many of us have used the gel plate to create pattern but not always accepting that another layer can be applied. I learnt that if I am not happy with the result adding another layer in a contrasting colour/value can often bring things right. And the excitement of what emerges is always an added bonus

Photographic Lithography

The original photographic lithography print before cutting up
Traditional lithography uses as stone plate to print from. In an on line course run by Sally Tyrie (UK) I learnt this technique that uses a laser print (must be toner based so inkjet will not work) and oil based printing ink (acrylic ink will not work) The chemistry behind the success of this work is the oil adheres to the toner part of the print and can be removed from the white paper parts. In the image above you can see there is some printer “noise” not uncommon in traditional print effects.
The laser image needs to be clear black and white. The oil based printing ink is spread evenly and thinly over the print and then the print is rinsed under running water. If more of the ink needs to be removed from the white areas you can use a soft cloth to rub over those areas where there is no toner so that they become more defined.
This could then be printed in a press but as I do not have a printing press, I am always interested in ways to print in a home studio that do not require a press. The substrate to print on needs to be soaked in water and then patted dry with a towel (similar to traditional printing methods). I used 130gsm watercolour for this process paper but a tightly woven fabric should also work though I haven’t played around with that.
The inked image is placed ink side down on the substrate and then a sheet of deli paper put over the top to help protect the paper. Using a barren or a brayer firmly press all over the paper. Lift up a corner to check how the imprint is being transferred. If the transfer isn’t well advanced keep working the top of the paper. Once you are satisfied, lift the paper away. Note the image will be in reverse so if you have text or the image is important to be round one way you will need to reverse image the original print before you laser print it.
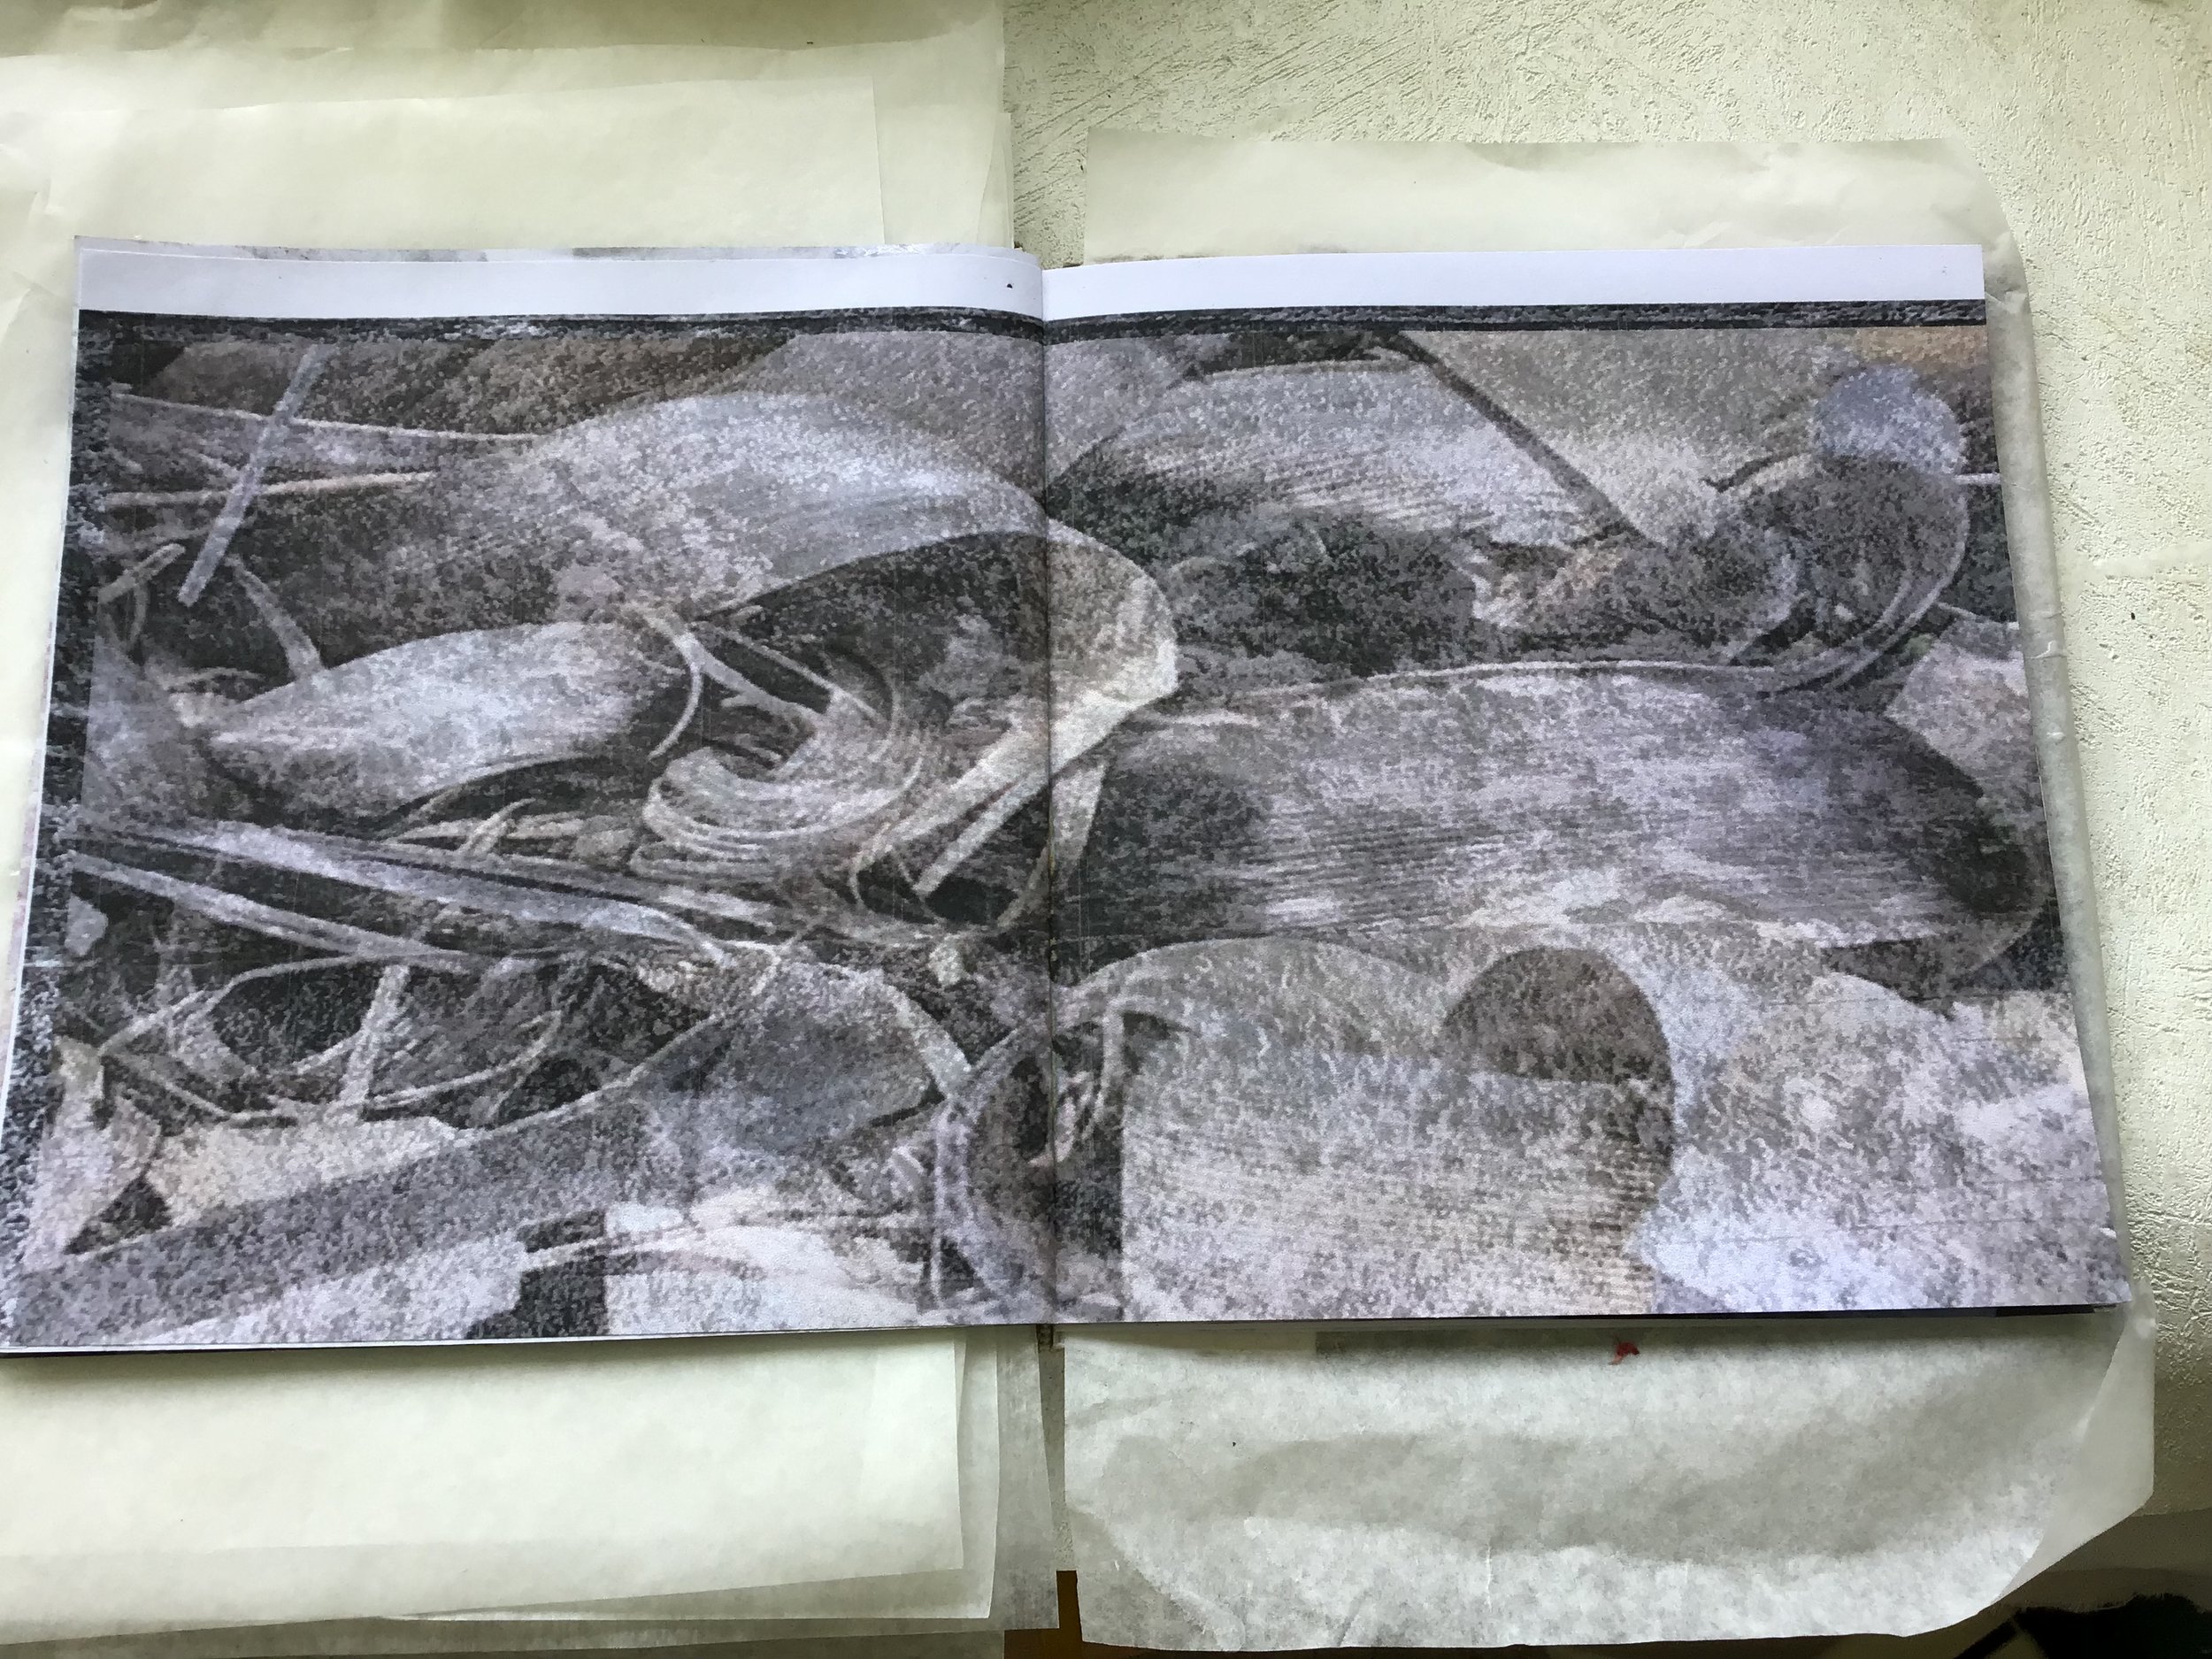
In this course my personal focus was on working with decay and deterioration so I used a photo I had taken at Mokau of sprayed pampas grass that was in the throes of breaking down.
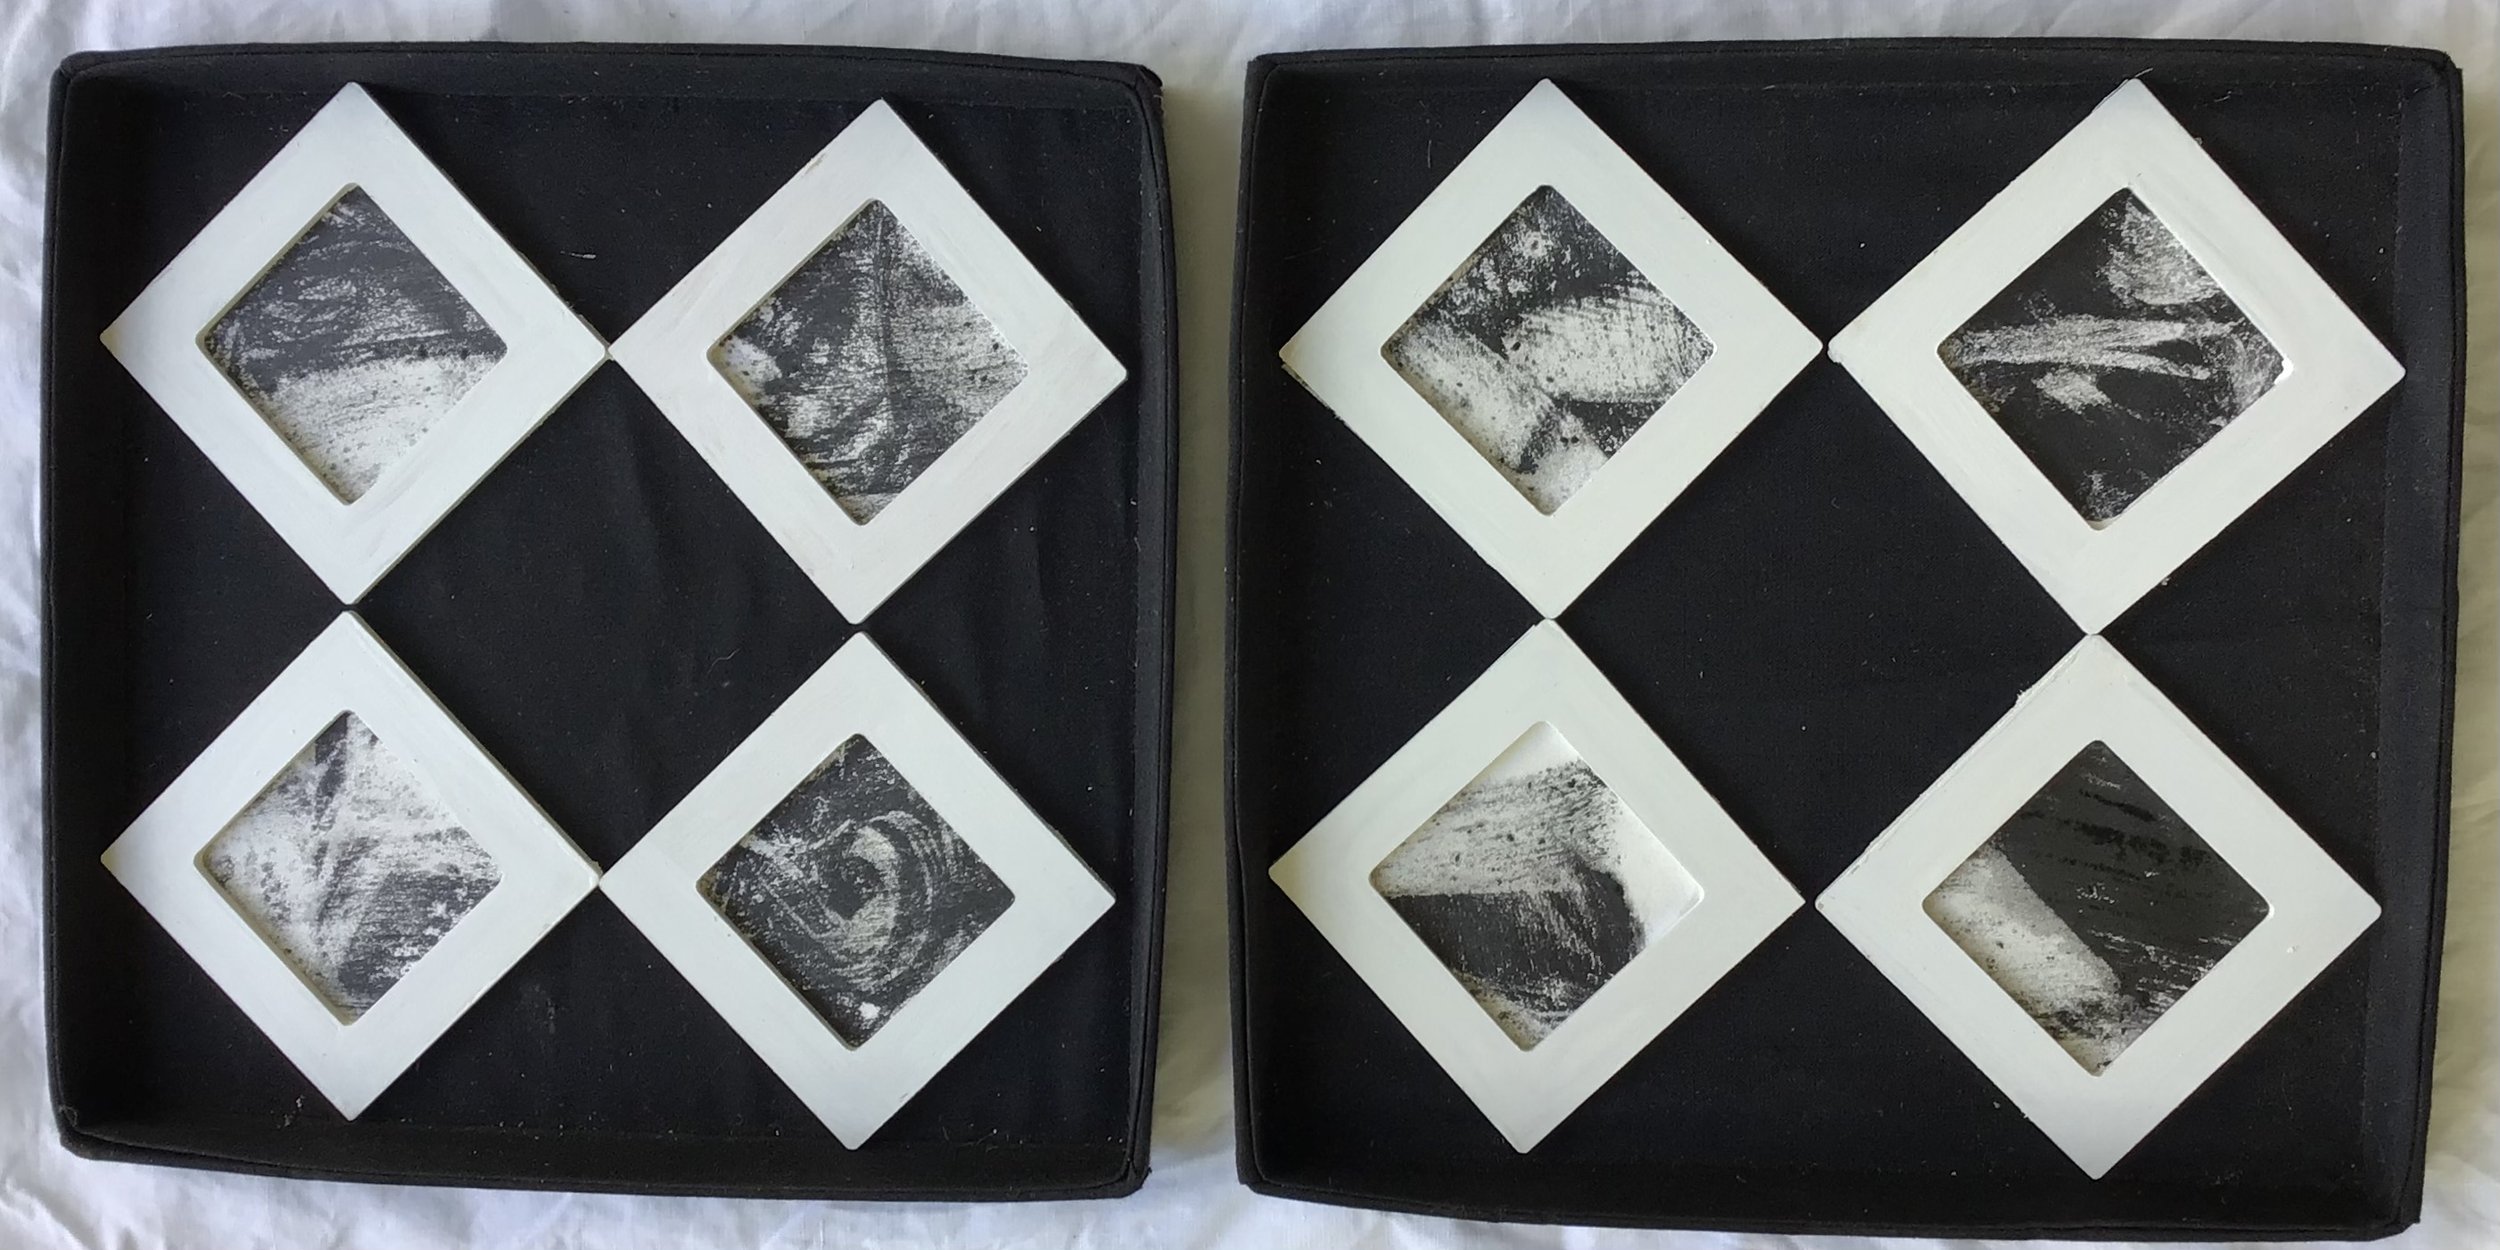
I am primarily a representational artist but in this course I wanted to push myself toward abstraction. The image below was part of an on line exhibition from the course entitled “What is revealed and what is concealed.” My focus here was to present the lithograph extracted to lines and forms that did not influence the viewers perception of the original piece. We were also encouraged to present our work in alternate ways so I cut up the lithograph and mounted it in small white frames that were then mounted diagonally in black box lid frames.
A further development using the same image was to use filters and overlays to present printed images of the decaying pampas grass. These were displayed in a small book format that was also part of the course.
I always find the abstraction process challenging so this was quite a challenge for me. The fact that I could reproduce the images and start over relatively easily helped me not be too precious in cutting up the original to concentrate on line and shape.

The cut up prints in box frame The bound book Filters of the original papas image

Tissue Paper Prints

This is a fun process that is good practice for looking at values. I tend to work in a limited palette with a pop of colour introduced by embellishments. In this piece I have used black acrylic paint and olive green lumiere mixed randomly on the plate.
The basic concept is to take some leaves and roll out a thin layer of paint/ink on a gel plate or perspex sheet. Place the leaves firmly on the plate and press down. Lift the leaves off and place ink side down on some tissue paper. This will give a positive print. you can also take some tissue and lift a negative print from the plate. you will need both positive and negative prints and a range of sizes and textures of leaves. Leave the prints to dry.
Tear around the edges of the print to remove excess tissue that will not be used. You could cut them but as we will laminate them on to a substrate with gel medium tearing creates a less visible edge to each print. Play around with a composition. I ten to like having a lighter positive print in the centre with darker negative prints surrounding it.
I have used 130 gsm watercolour paper for my substrate but a firmly woven fabric would work just as well. Put a thin layer of gel medium onto the substrate and position your prints carefully. As the tissue gets wet it will become quite fragile so moving it is often not possible. Smooth out any wrinkles gently and once all prints are applied leave to dry.
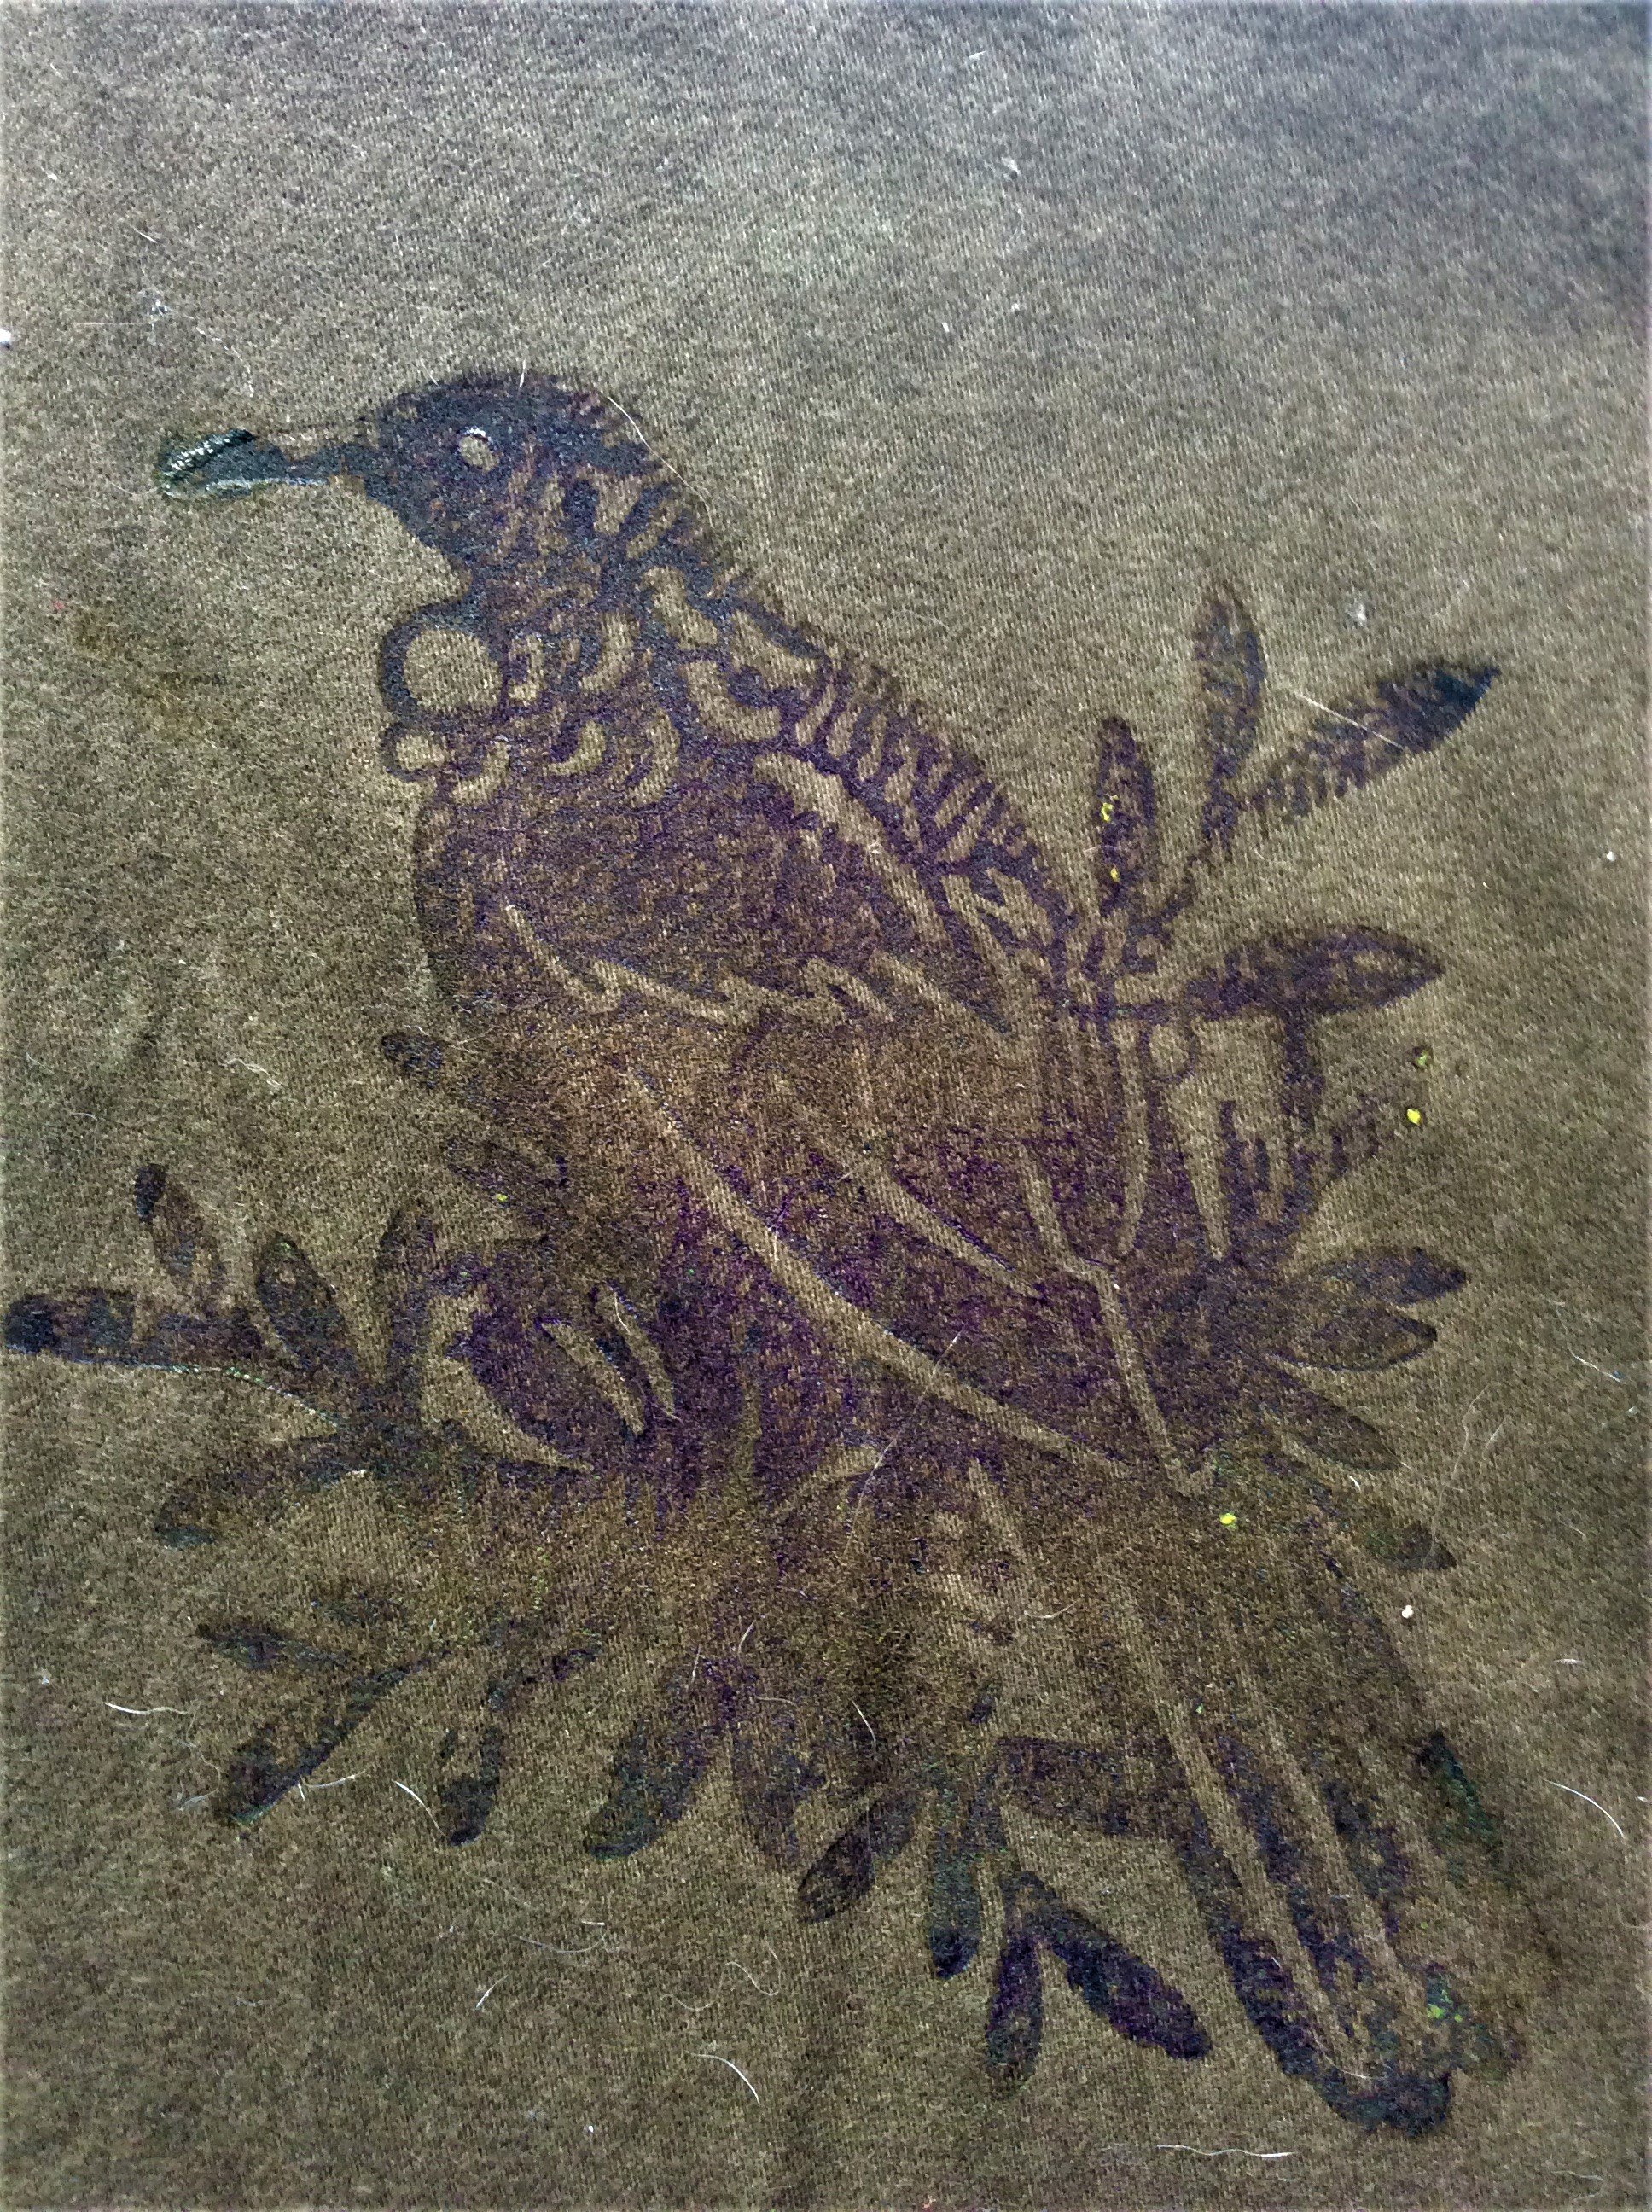
Now you can stitch into the composition or add embellishments. I have added a little fantail in this one - printed on teabag (abaca) paper and torn around and fixed with gel medium to the finished print.. I have used French knots in the Queen Anne’s lace print but little other stitching. I think my hands were getting tired from punching through the paper to stitch even though I tended to make a punch hole before I stitched

The leaves in the centre part are stitched, the berries are tiny seed beads and the flowers in the bottom leaf are hydrangeas stitched between layers of organza. Toward the top of the picture you can see a stamped puriri moth. So it is all about using different techniques. I thought that area was too dark so the addition of the moth added interest and lightened that area