
Gyotaku
2022 Hoffman Challenge NZ with Gyotaku printed kahawai fish

Part of the 2022 NZ Hoffman Challenge collection featuring Gyotaku fish
Gyotaku is an ancient Japanese printing method where the printing plate is a real fish. it was originally used by Japanese fishermen to record their catch. In the piece above the large kahawai fish have been printed on cotton and appliqued to the background. The fish was stuffed in the gill and body cavity area (where the guts were removed) with paper towels. it was stabilised by cutting a cavity approximately the size of the fish in a piece of Styrofoam ( so that the fish did not roll during printing. Acrylic paint was then applied to the body of the fish and cotton fabric pushed well over all nooks and crannies of the fish to transfer the impressions of the gills, fins, eye etc. These areas were further enhanced with stitch in black cotton. Although not so visible in this print, some prints will even reveal the patterns of the scales. I have tried gyotaku printing with mullet but their shape is not as appealing as the kahawai when printed. My husband is a keen fisherman but even so I often have to resort to purchasing whole fish at the supermarket when I want to carry out this sort of printing
The background has been painted with diluted acrylic and texture yarns have been used for the sea plants. The small reef fish have been made from shapes of organza stuffed with silver fabric. If you look very carefully you may be able to pick out the sea anemones that are strings of beads in clusters.
The requirements for the Hoffman challenge were that it must feature the challenge fabric - this is the reef fabric at the bottom, and fit within a metre square but not be square or rectangular

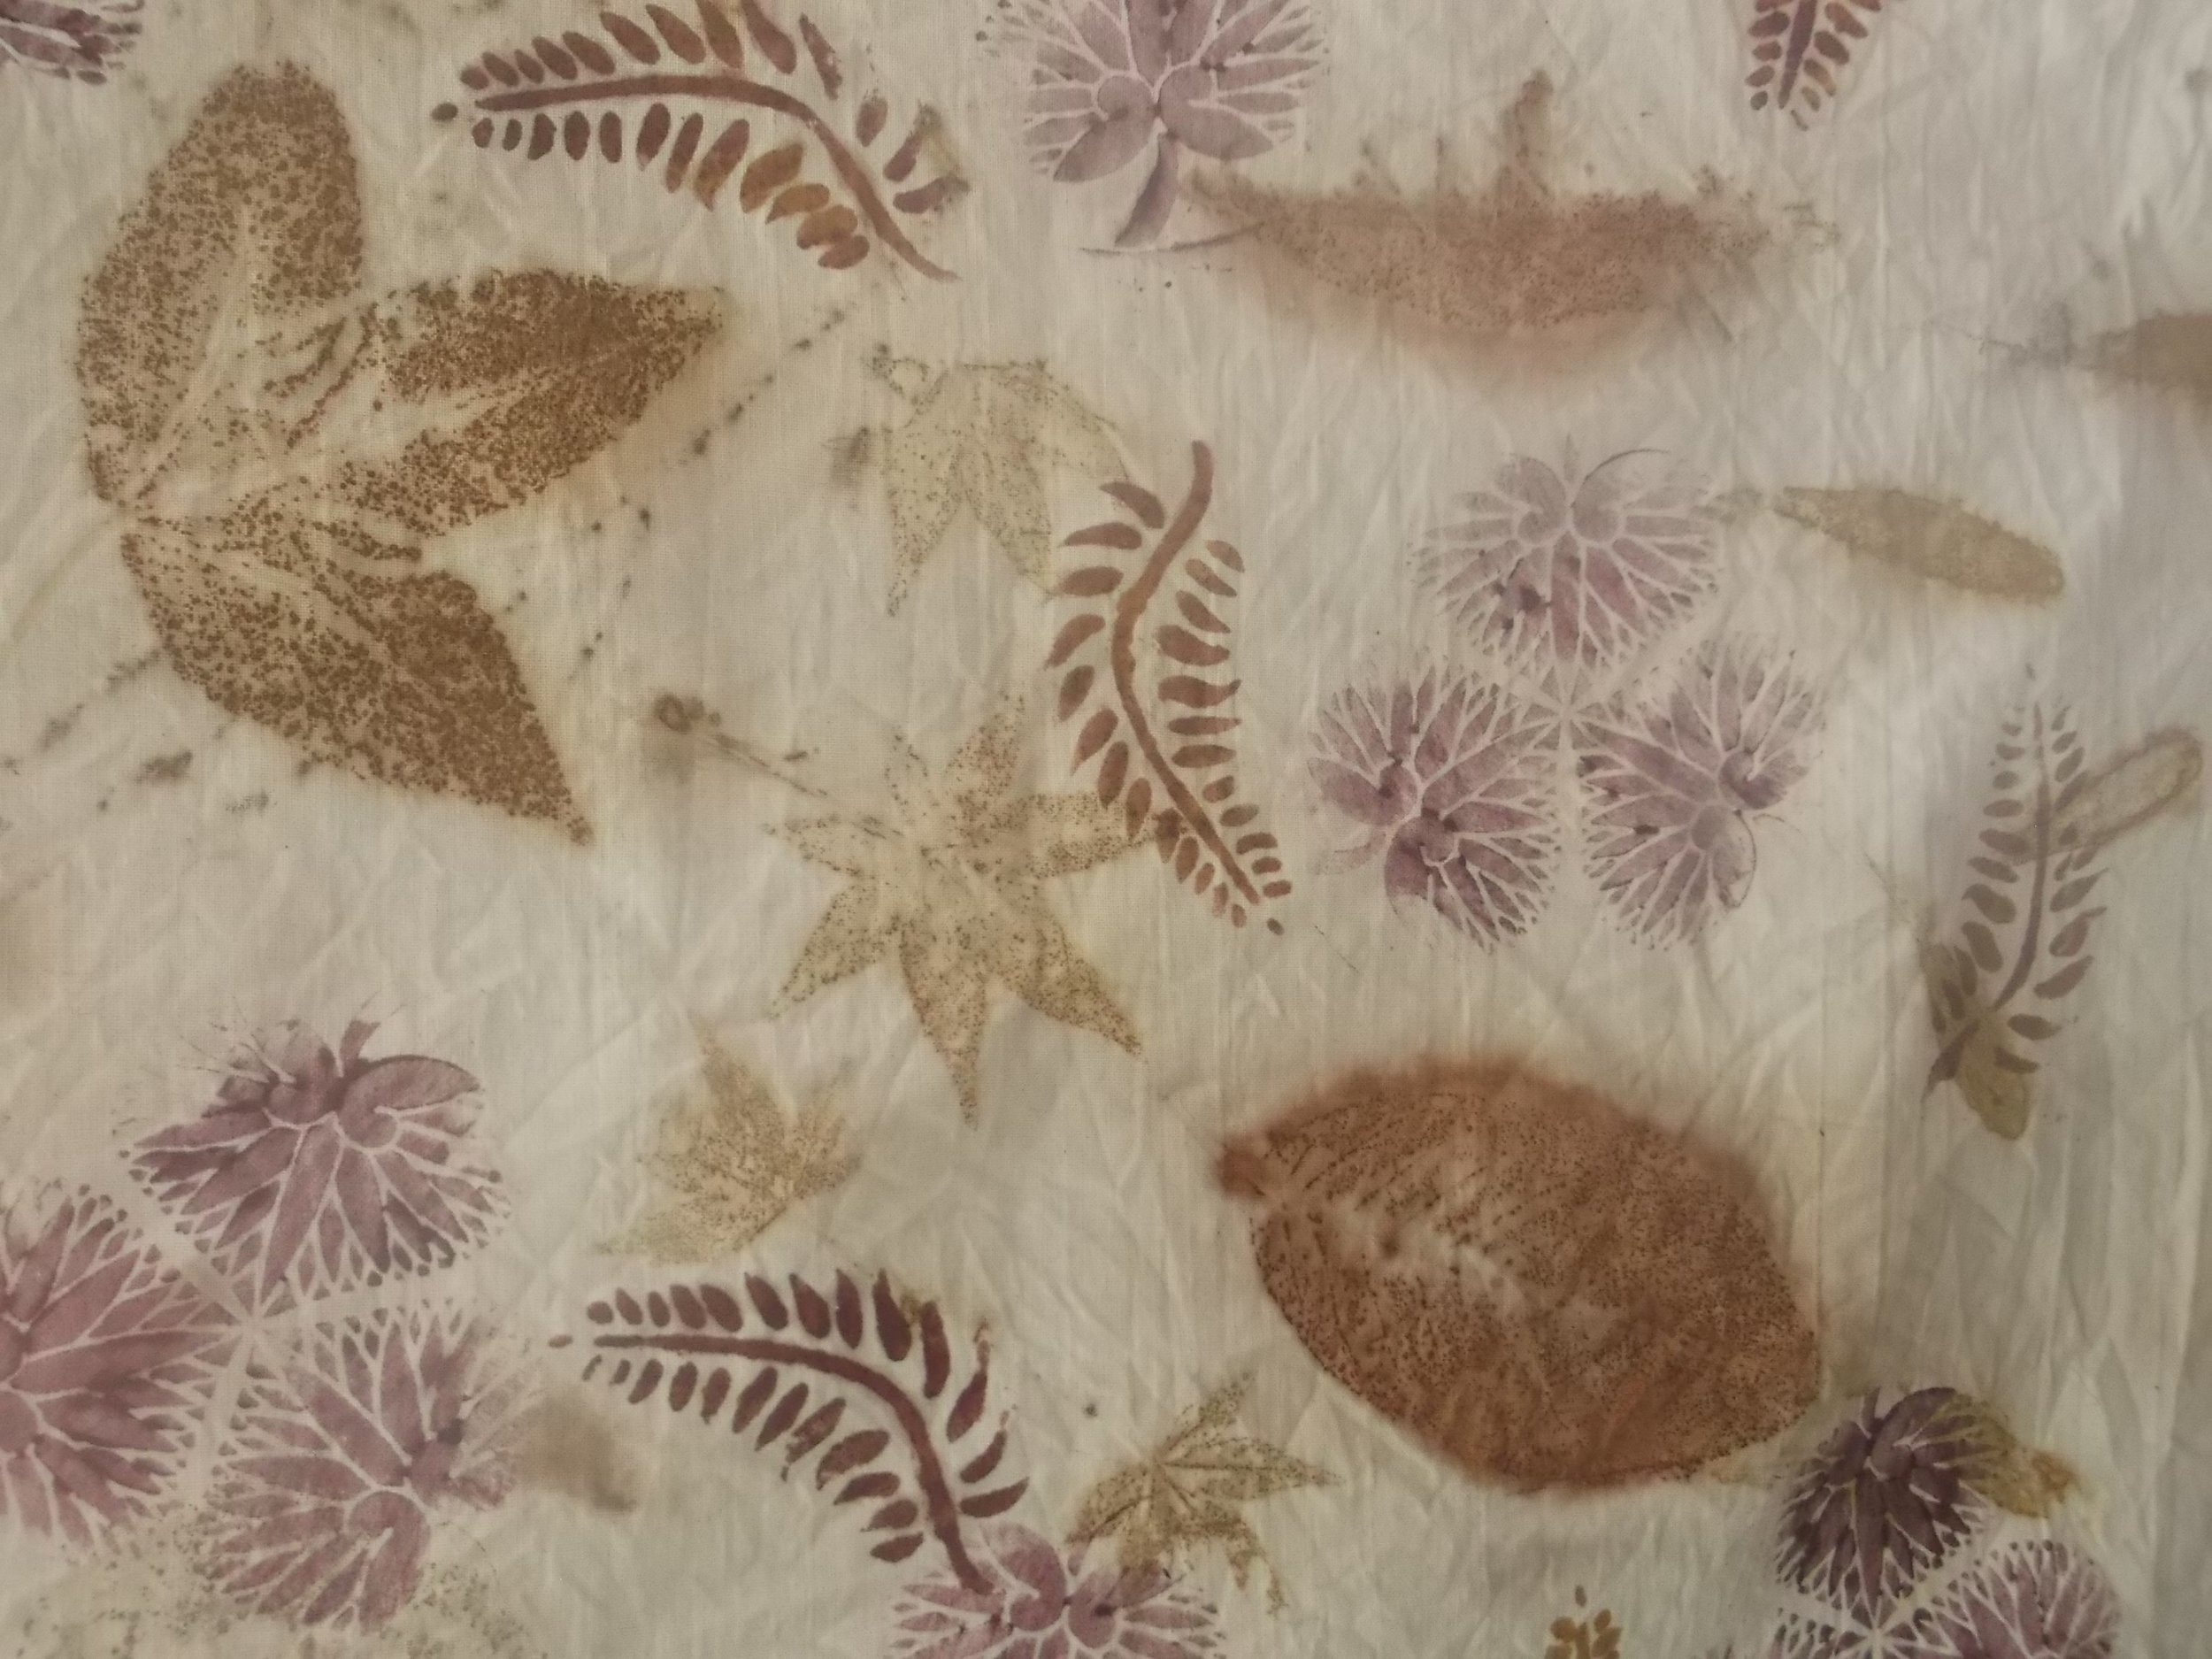
In this example the fish were direct printed onto a piece of eco dyed fabric which was too wet to give good impressions on the leaves. They were then outline stitched and the piece free motion quilted in a wavy pattern

More Ideas for Heatpress Printing

Added texture with spackling
This idea is one of Jane Dunnewold’s. It creates a textural background to the image being printed. The spackling (inside outside plaster) is applied to the water colour paper before immersing it in the mordant bath. The spackling is applied through a stencil - I have used a honeycomb stencil in the option above. Once the spackling is dry the process is the same as previously described

Not Really Without a Press
Day Lilies and Foliage Composition using a Heat Press
Jane Dunnewold (US) was the perfecter of this technique though I have to admit I have had less success with fabric than using water colour paper to create prints. The prints have a lovely water colour quality about them and can be enhanced with other techniques if so desired. Again I kept a comprehensive journal of my results so that I could keep track of what I did at different times. The advantages of using a heat press (I managed to pick up a second hand one for around $200) is that you can get floral imprints. The length of time in the steam bath tends to expire the colours of the flowers. Interestingly most red flowers print blue/purple. The day lily above was a deep burgundy red.
Like traditional eco printing the requirements are moisture, heat and pressure. The layers (rather than bundles) are laid out as follows: A teflon sheet, a wetted out sheet of felt (acrylic is OK but doesn’t hold the moisture quite as well), good weight water colour paper (I use 130gsm minimum), lay out the flowers that have been dipped or padded in a ferrous sulphate solution, another layer of wetted out felt and another tefon sheet. The water colour paper needs to be immersed in a bath of either iron sulphate (the colours will be dulled) or copper sulphate soln (the colours will be brighter) patter dry with a towel.
The heat press needs to be heated to 270-300°C and the layers placed on the plate and pressed for around 3 minutes. Be careful taking the bundle out as it can be very hot.
If wanting a coloured background a piece of interfacing dipped in procion dyes and placed on top of the foliage - the foliage must be the first thing on the water colour paper) will transfer colour to the background.

The flowers showing the colour of the print extracted

An example of using an interfacing sheet to provide coloour background

In this example I have added a bird printed on (teabag) paper and laminated with gel medium - silk organza works well too. The image needs to be carefully cut around to avoid seeing edges of the print substrate

An example from my samples journal. The temperature and time of pressing will be on the back of the sheet

And What About a Dirty Pot

The beginning of a dirty pot on top of my brazier. You can see I have added a piece of iron, onion skins, some eucalyptus and other foliage
A dirty pot is usually maintained out of doors. It is a slow eco print method for gaining not so precise images and can be added to indefinitely until the water starts to go sour. I have used an old aluminium jam pan which is probably not the best option as the aluminium may alter the colours gained. The fabric is bundled - often with more foliage and maybe some rusty iron pieces and placed in the pot and simmered for an indefinite length of time. The bundles are often not as precise as in the steaming method as the object is to cover the fabric with natural dyes in a random fashion.
Below I show you two examples from the dirty pot of animal fibres - one with the traditional bundling technique and one with a random bundling or wrapping of the fabric around items to cover the surface of the fabric

A piece of silk bundled in the traditional manner and placed in the dirty pot for about a day

An old woollen blanket roughly bundled with leaves and rusty iron and simmered in the dirty pot for about a day and a half

So What About about Animal Fibres

Silk scarves hanging in my studio. These were printed onto purchased silk scarf blanks and were done for a local craft promotion
A lot of eco dyers only work with silk/wool because animal fibres are much easier to get good results from. I have mainly worked with cotton because of the cost advantage but having returned from India with several metres of economical silk in my bag, I also will be trying to eco dye with silk.
Animal fibres include wool, silk, alpaca and the structure of the fibres allows them to take up the eco print much more readily and without the need to so much pre-preparation.
These fibres do not need to be scoured, in fact scouring them may damage the fibres. Just wash in hot water with a ph neutral soap such as Dawn or Joy or Fairy.
Using the dry weight of fabric as a base to calculate the amount of potassium aluminium sulphate dissolve 20% of the dry weight in very hoy water. Add sufficient hot water to raise the temperature to 150° F (66° C) Immerse the silk and stire well. Let stand for 2 hours. Remove and rinse well.
I have achieved some results without mordanting the silk but the images will not be so precise.
It is always a good idea to keep a record of what you do so that if something goes wrong you can analyse it. I tend to take a photo of my leaves before printing and often do sample swatches to keep a record of variations in a process.

Liquidambar and maple leaves laid out with underside down prior to bundling

An experiment using onion skins and variations achieved

Eco dying as a base for hand stitching

Stitching and embellishing the leaf shapes is one alternative but eco dyed fabric also makes a lovely base for stitching on, especially if it is chosen to fit the subject matter. This small picture demonstrates some eco printed fabric with an outline stitch in simple running stitch. I traced the outline of a photograph (enlarged on the computer) of my granddaughter’s face onto tissue paper. Then I stitched through the tissue paper to transfer the image to the fabric. This is a method Sue Stone (UK) often uses for transferring images to stitch. Once the paper is in place you can run the blunt end of the needle along the stitch line and keeping tension over the stitches so they don’t pull, gently pull away the tissue paper. I like the monochromatic look that this piece has described.

A More Practical Project

A simple cotton overshirt
I used a simple pattern to make this edge to edge overshirt. The cotton was eco dyed rolled on a 1/2 inch plastic tube so that I could bend it around to fit in the steamer. The leaves were harvested in Autumn and stored in the freezer till late summer. Leaves used are liquidambar, beech, maple

The Samples Quilt

This quilt is made of a mix of cotton and silk eco printed samples stitched together in a random fashion after I had enhanced each sample with stitch and embellishment. The quilt was then spaghetti quilted horizontally. Leaves in this quilt include cotinus, liquidambar, forest tulip, oak, maples, herb robert, beach, ferns, acacia, Queen Anne’s lace

Making the Ecoprint Bundle
Ready to steam the bundle

A nice tight eco bundle ready for steaming
Next to fabric preparation the most important thing is to create a really tight bundle for steaming. To prevent bleeding through the layers on the roll a barrier is required. The most common barrier is to use plastic sheeting. If you use part of a painter’s dropsheet you will be able to use the same piece of plastic many times over. This is more environmentally friendly than using cling wrap which will be a single use plastic.
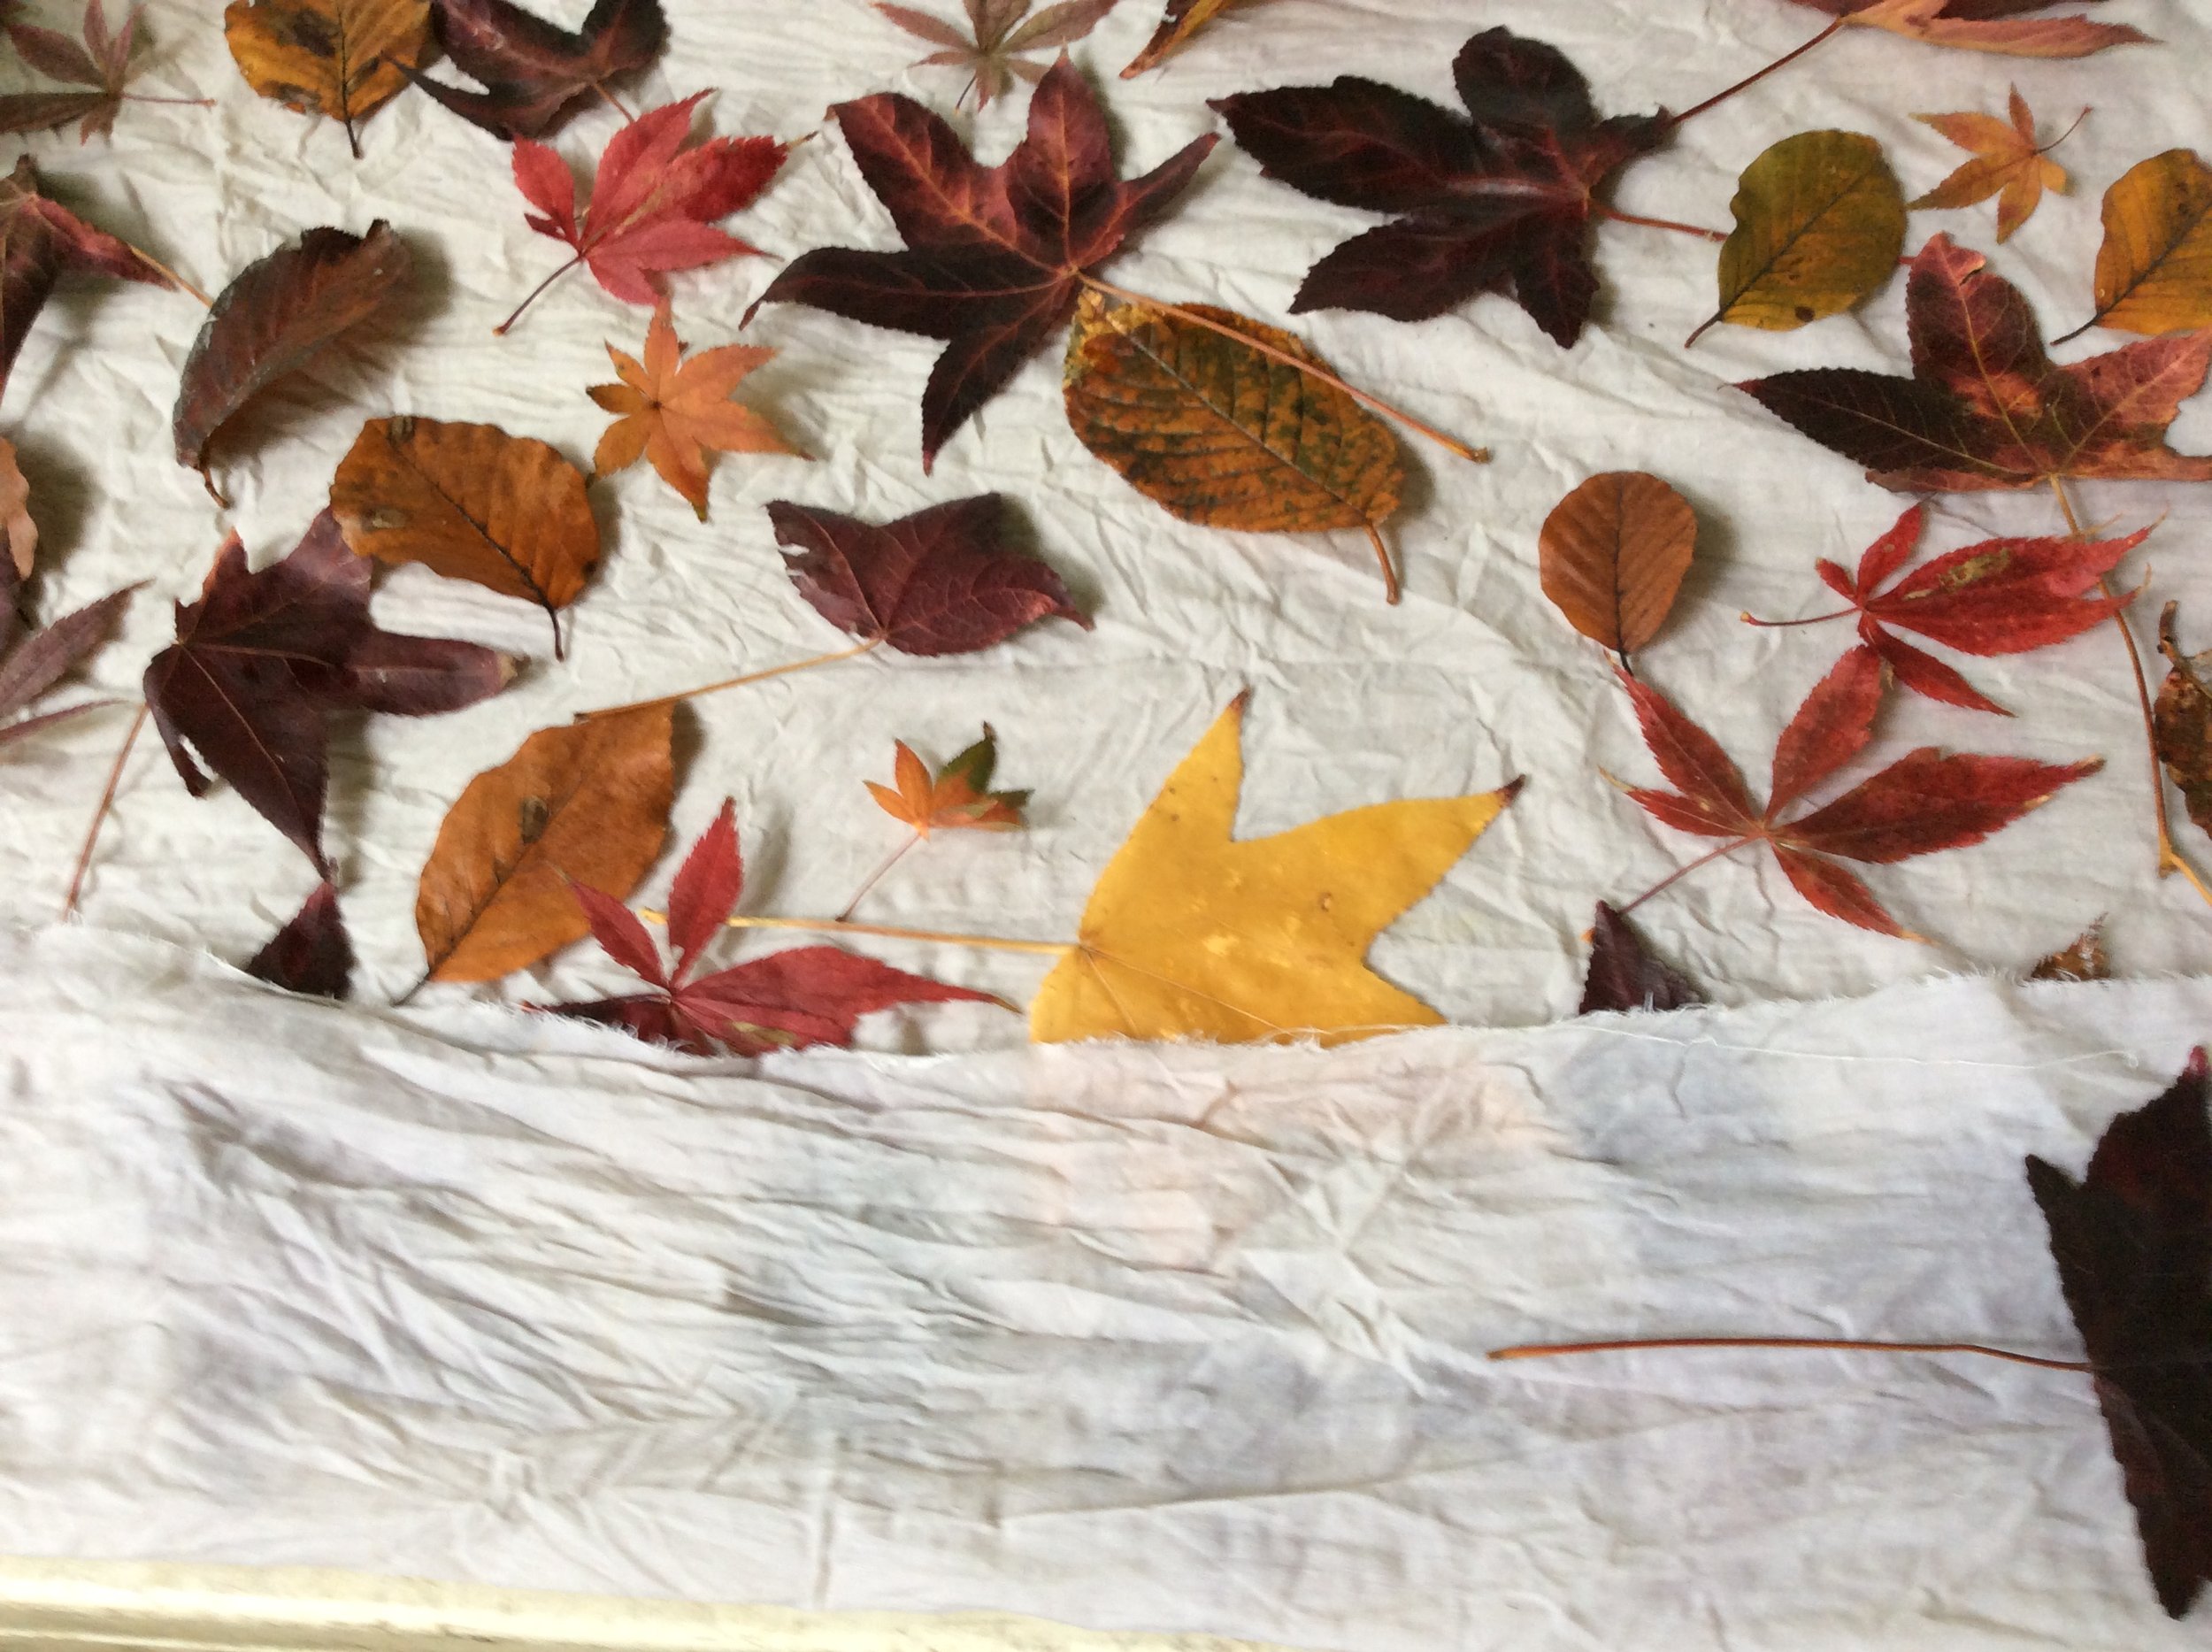
Lay the plastic out on your work bench and place the mordanted cotton on top of it. The fabric needs to be damp - not wet. If the fabric is too wet you will get blurred images. You can use a spray bottle of water to spritz the fabric. Lay out the leaves you want to use on top of the sheet. I find spring and Autumn foliage gives the best (but different) prints. You can always freeze leaves and rehydrate them to use in your work. I have stored frozen leaves for a couple of years on a shelf in my freezer and they are fine. Just bring them back to normal by rehydrating in a bowl of water and pat dry. Remember, you will get a different effect for leaves that are placed tops side down to leaves placed underside down.
Soak some paper towel in a ferrous sulphate solution (refer What is an iron blanket) and place this over the leaves. To get a really tight bundle put a weight (like a 6 pack of soda) on one end of the laid out fabric. You can roll without anything but I find the use of a dowel or aluminium rod makes bundling easier. Just start by rolling the end away from the weight a little bit. Lift the fabric a little and apply tension as you roll so your bundle is nice and tight.
When you get to the end you can secure the bundle with some twine. If you tie the twice really tightly you may get interesting marks on the prints.
If you are wanting to work with a wider fabric pile you may need to use plastic tubing. This is much more difficult to roll but you can then coil it in your steamer.
The bundle now needs to be steamed for about 2 hours. Do not place the bundle directly into the water at the steamer base. Use a brick or something so the bundle is clear of the water.
You may need to keep an eye on the water level to be sure it does not evaporate away during the steaming process. You can place several bundles in the same steamer if you have room.
Suggestions for steaming are: are multi layered vegetable steamer, a slow cooker ( turkey roaster in the US), a fish steamer. I have managed to pick all of these up quite cheaply at a thrift/recycle depot.
Be careful when you remove the bundle as it will be very hot. You can leave it till it is cold to unwrap if you are patient enough. I am always over keen to see what I have created. This is like unwrapping a Christmas box and very exciting
Eco prints can make great starting points for printing yardage from companies like Spoonflower. And you can manipulate them to created colour variations

A print that I used to create yardage from
Preparing cellulose Fibres for ecoprinting
water discoloured from scouring new fabric

Eco printed fabric with the addition of block prints using natural dyes
There are shortcut methods but the results can be variable. This method will insure the best possible results from steaming bundles for eco printing - I will discuss bundling in another post. Because we are using chemicals it is a good idea to have a set of measures and pots etc to use just for eco dying. I pick mine up very cheaply for time to time at thrift stores.
Scouring
Scouring is the first process. This removes all the fabric finish so it doesn’t interfere with the printing process. Even vintage linens may have residual soap particles that need to be removed. Weigh your fabric dry and record this weight. For every 1000gms of fabric you will need 80 gms of soda ash (8% of weight). soda ash is the ph modifier used in spas and swimming pools so this is the most economical way to purchase it. Small packets can be purchased from craft stores but it is much more expensive to purchase that way. You will also need about 1 tsp of a ph neutral washing powder such as Joy, Fairy or Dawn. Some people recommend using synthrapol but this can be difficult to obtain and has some carcinogenic properties so I prefer to stay away from it.. Three quarters fill a large pot with water. The pot needs to be large enough to accommodate the fabric and easily move it around in the water.
Dissolve the soda ash in boiling water and add to the pot
Add the detergent
Add the fabric and bring to the boil. simmer for 1 -2 hours. You will be shocked at how much the water discolours.
Remove and rinse well before applying mordant or you can dry and store for later use. Make sure you label stored fabric or you will find you don’t remember if this was just scoured or mordanted. Believe me I am speaking from experience.
The water is fine to put down the drain.
Mordanting - the tannin step
There are various tannins available. Some add a slight colour to the fabric but all will add impetus to the cellulose fibre. The tannin increases the ability of the mordant to “bite” into the fabric so the print is adhered. Mordant comes from the French word to bite. Using your dry weight of fabric (WOF) you will need 10% of the weight in grams. Oak gall tannin does not colour the fabric but is difficult to obtain in New Zealand as the oak gall is made by a wasp which we do not have in this country. I tend to use myrobalan as it does not leave much colour disturbance.
The tannin powder needs to be mixed slowly to a past and added to hot water - ideally below 140degrees to stop the tannin darkening. Add the mixture to a large pot of water and add the fabric. The fabric needs to be well wetted before adding to the pot. Try to not allow pockets of ait or folds as you add the water so that all fibres are subjected to the tannin.. Stirr
Stir again after 30 minutes. After an hour you can remove the fabric and squeeze out excess liquid. You can dry and label or go to the next phase.
Mordanting the fabric
This is the final step in preparation of cellulose fibres. Again using weight of dry fabric to calculate proportions add 12% potassium aluminium sulphate and 1.5 % soda ash. this sometimes fizzes in the pot so be careful when you add these two together. Add the wet fabric and Bring to a simmering point. Simmer for one hour. Remove, rinse and dry or continue to use for natural dying processes
Note This process is only for cellulose fibres - those created from plant materials - cotton, linen, banboo, ramie etc.
It all seems a bit of a process but i tend to prepare a batch of fabric and then store that for use as I am eco dying - hence the importance of labelling which stage of the process you have stored the fabric as you won’t be able to tell from the fabric
Commercially printed white on white cotton fabric gives some interesting effects.
By following this process your prints will be permanent and able to be laundered without undue fading.

What is an Iron Blanket
Preparing to eco dye - steaming
An array of Autumn leaves laid out on dampened, mordanted cotton ready for the iron blanket to be placed on top
When I first started eco dying I kept hearing on line about iron blankets but it took me quite a while to find out what it was. The use of a post mordant modifier often increases the clarity of the leaf print received. The most common of these is the use of iron (ferrous sulphate) Ferrous sulphate is a slightly greenish powder that dissolves easily in water. The stronger you make the solution the darker the result will be. It tends to dull colours I use about 1 tsp in 1/2 gallon of water. Ferrous sulphate will darken the prints so experiment a bit and don’t overdo it. Copper sulphate is another product that can be used in a similar way but it brightens colours.
Some eco dyers will dip their mordanted fabric in a prepared solution of ferrous sulphate but the fabric must be wrung out really well as fabric that is too damp will give blurred images. Others my dip their leaves in a ferrous sulphate solution or use a stamp pad of felt that has been soaked in ferrous sulphate. Note that the way the leaves are placed on hr fabric to be printed will alter the print result. Leaves placed with the underside down often give the most satisfying result but it depends on the effect requied.
My preferred use of an iron blanket is to us ordinary kitchen towel. Soak it in the ferrous sulphate solution and wring out well. Carefully open out the towel and place over the laid out leaves. A piece of non mordanted fabric can also be used in this way but the prints on the paper towel are often amazing and ca be used in journal or lamination work after the main event.

Ecoprinting
A page of eco dying results from my November journal

A Page from my November eco print journal using liquidambar leaves and showing the prints achieved by pla
lcing leaves top side down and underside down
Eco printing is general a term used to express the use of flowers and foliage to print on fabric or paper and transfer the substances in the leaf/flower to the substrate. Depending on the outcome desired the bundles (or fabric or paper) my be boiled or steamed. Animal fibres such as wool, silk etc uptake the imprints much easier than cellulose fabrics (cotton, bamboo, linen. All fabrics need to be scoured by washing or boiling to remove finishes in the fabric that may prevent the uptake of the foliar prints. Different effects will be achieved at different times of the year and at variable climatic conditions. For example, especially when trying to print on cotton, tannins play a major part of the process. Cellulose fibres work best when the substrate has been mordanted (treated) with a tannin base prior to mordanting with a chemical. I spent a year experimenting and recording what leaves imprinted each month and what happened with various mordants. The common factors in eco printing are heat, contact and moisture but the best imprints occur when not too much moisture is present. Too much moisture tends to create less precise leaf prints. India Flint is perhaps the best known proponent of eco printing in general but Jane Dunnewold has championed the use of a heat press in eco printing. This enables prints to be achieved in as little as 3 minutes whereas traditional boiling or steaming methods require 2 hours or longer. Flower prints tend to burn out in the longer time frames so are much brighter when achieved with a heat press

Thermofax Printing

An example of a thermofax software screen utilising an image provided by Tauranga Mini Owners’ Club
Thermofax printing utilises an old fashioned printing technique that “burns holes into a special screen fabric so that detailed images can be created and used several times over. Modern thermofax machines us a combination of computer software (to create and load the image) and a specialised printer to create the image to be burnt into the screen. Like silk screen, the screens can be used multiple times but they must be carefully cleaned so that the ink/paint does not dry in the screen and make the burnt area useless for the images to pass through. There are a number of places that provide commercial screens, both custom made and a selection of there own designs. In the US Jane Dunnewold Studios is a good example.
The resulting prints from the thermofax screen. These prints were made on give away goody bags for the rally of the King Country

More on Dabu Dying
The process of dabu dying - dying with a mud resist

Here is the stamped cloth just after it was taken from the indigo vat. Note the sawdust shavings are still in place on the fabric at this stage
The slurry made from the mud, gum and lime is poured into a layered tray. The tray has a bottom layer of mesh, then burlap cheesecloth and organza so that the blocks take up the mud evenly. The print blocks we saw ( noted in a previous post) also used this type of tray layering. The wood blocks are stamped onto the cloth and carefully lifted. Immediately the wet imprint is covered with fine sawdust. Once the whole cloth is done it is left to dry. Then it is immersed in the indigo vat. Indigo dying is always amazing as the fabric is green when it comes out and oxidizes to the familiar indigo blue colour. I spoke with an artisan at the Delhi craft centre and obviously this technique works well with other cold water dyes (such as procion dyes). In India most of the dyes are natural dyes that are made by the artisan such as the indigo.
I spoke to the owner of this facility and said that I came from Waitomo - an area rich in lime and known for producing some of the purest lime in the world. His comment was I must listen carefully to his instruction and take the knowledge home and try it in my country because the artisan skills must not be lost. You betcha I will try. It is a sad story of many of the time consuming art/craft practices that the younger generation see an easier life in other areas and are not wanting to follow in the traditional pattern of learning the family crafts so not only are the skills in danger of waning but a way of life is also threatened. I tended to speak to the practitioners about the technical aspects of their craft work and they were all so willing to share. An amazing people and an amazing experience
Back at home I have researched the acacia gum used and found we know it as gum Arabic - the same that is used for thickening inks and dyes for other mixed media applications. I am going to start my experiments with Xanthum/guar gum as these are considerably cheaper, easy to source and require less of the gum to achieve the same results. Lime is easy enough to get and a google on black mud brings up a description of black mud being made with ferrous compounds from insufficient water. So now I am keen to get to the beach and see if I can find some tidal river mud that just might work

Materials for Dabu Dying
Materials needed for Dabu Resist Dying
Mixing the lime/gum mixture with the mud mixture to create the resist
30 Mar
Dabus Dying is the application of a mixture of Lime, Acacia gum (Gum Arabic) and black mud to create a pattern with a wood block stamp that will act as a resist in the dye pot. The stamp is covered with fine sawdust so the applied pattern can be clearly seen and the sawdust acts as a protector for the gum mix during dying. In the photograph you can see the lime and acacia gum mix having the mud mix added. The sods of mud have been soaked for two days to insure they are completely softened and integrated with the water.
When I spoke to the owner of the Dabu dying facility he was impressed that I can from Waitomo - a high lime area and reinforced that I should listen carefully and take the skills home to practice in New Zealand so the craft will not be lost
since returning home I have discovered that Acacia gum is gum Arabic that is used in thickening dyes and inks in many applications. I have also found that guar gum or xanthum gum might be a suitable substitute. They are readily available, less expensive and require a smaller amount of gum to create the thickening effect. The black mud used, according to my research is black due to ferrous deposits from reduced water flushing so now I can hardly wait to get to the beach and see if I can find some river mud that is black and semi liquid

Indian Textile Tour
Block Printing with multiple layersImperfect Image Transfer

It took me 8 years to get there but what an adventure. Ten days of bright impressions, textile adventures and photographic opportunities. I had intended to go on a similar tour with Colouricious in 2019 but by the February I could see that Covid was becoming a problem. Just as well I cancelled out or I would not have got back into New Zealand when Jacinda closed the border. Having saved for four years to go, it was a blow and then we had 3 years of lock downs due to the pandemic. My husband was diagnosed with lung cancer from asbestosis and had to have the top third of his right lung removed so another year fled by.
I had followed Pan Holland’s website for many years and when she announced her inaugural tour of Rajastan in March this year, I decided it was now or never. And it was an amazing immersion into culture, history, design and textiles. I feel so fortunate to have been part of this.
I had been collecting printing blocks for some time but seeing the number and complexity of the blocks available was something else. In the photo above you can see a multi layer block being stamped. This entails the alignment of the base print with subsequent blocks that can be printed in different colours. I think there were three colours in this imprint. Of course the ability to add stitch or other substrates is always in the back of my mind.
The layers in the ink tray were of significant interest. There was a layer of mesh, then a layer of burlap then a layer of cheesecloth then a layer of organza - each layer being finer than the previous one to ensure the ink was taken up on the block evenly and without any globules. Often in western use we use a sponge to dab on the print block or a one layer sponge/felt pad. It will be interesting to experiment to see if the prints I make are more precise.

I wasn’t quick enough to get to try the multi layer one except for the elephant and then I printed the solid shape first so it was difficult to align the outline around the solid shape. Lots of fun!!!
Imperfect Image Transfer
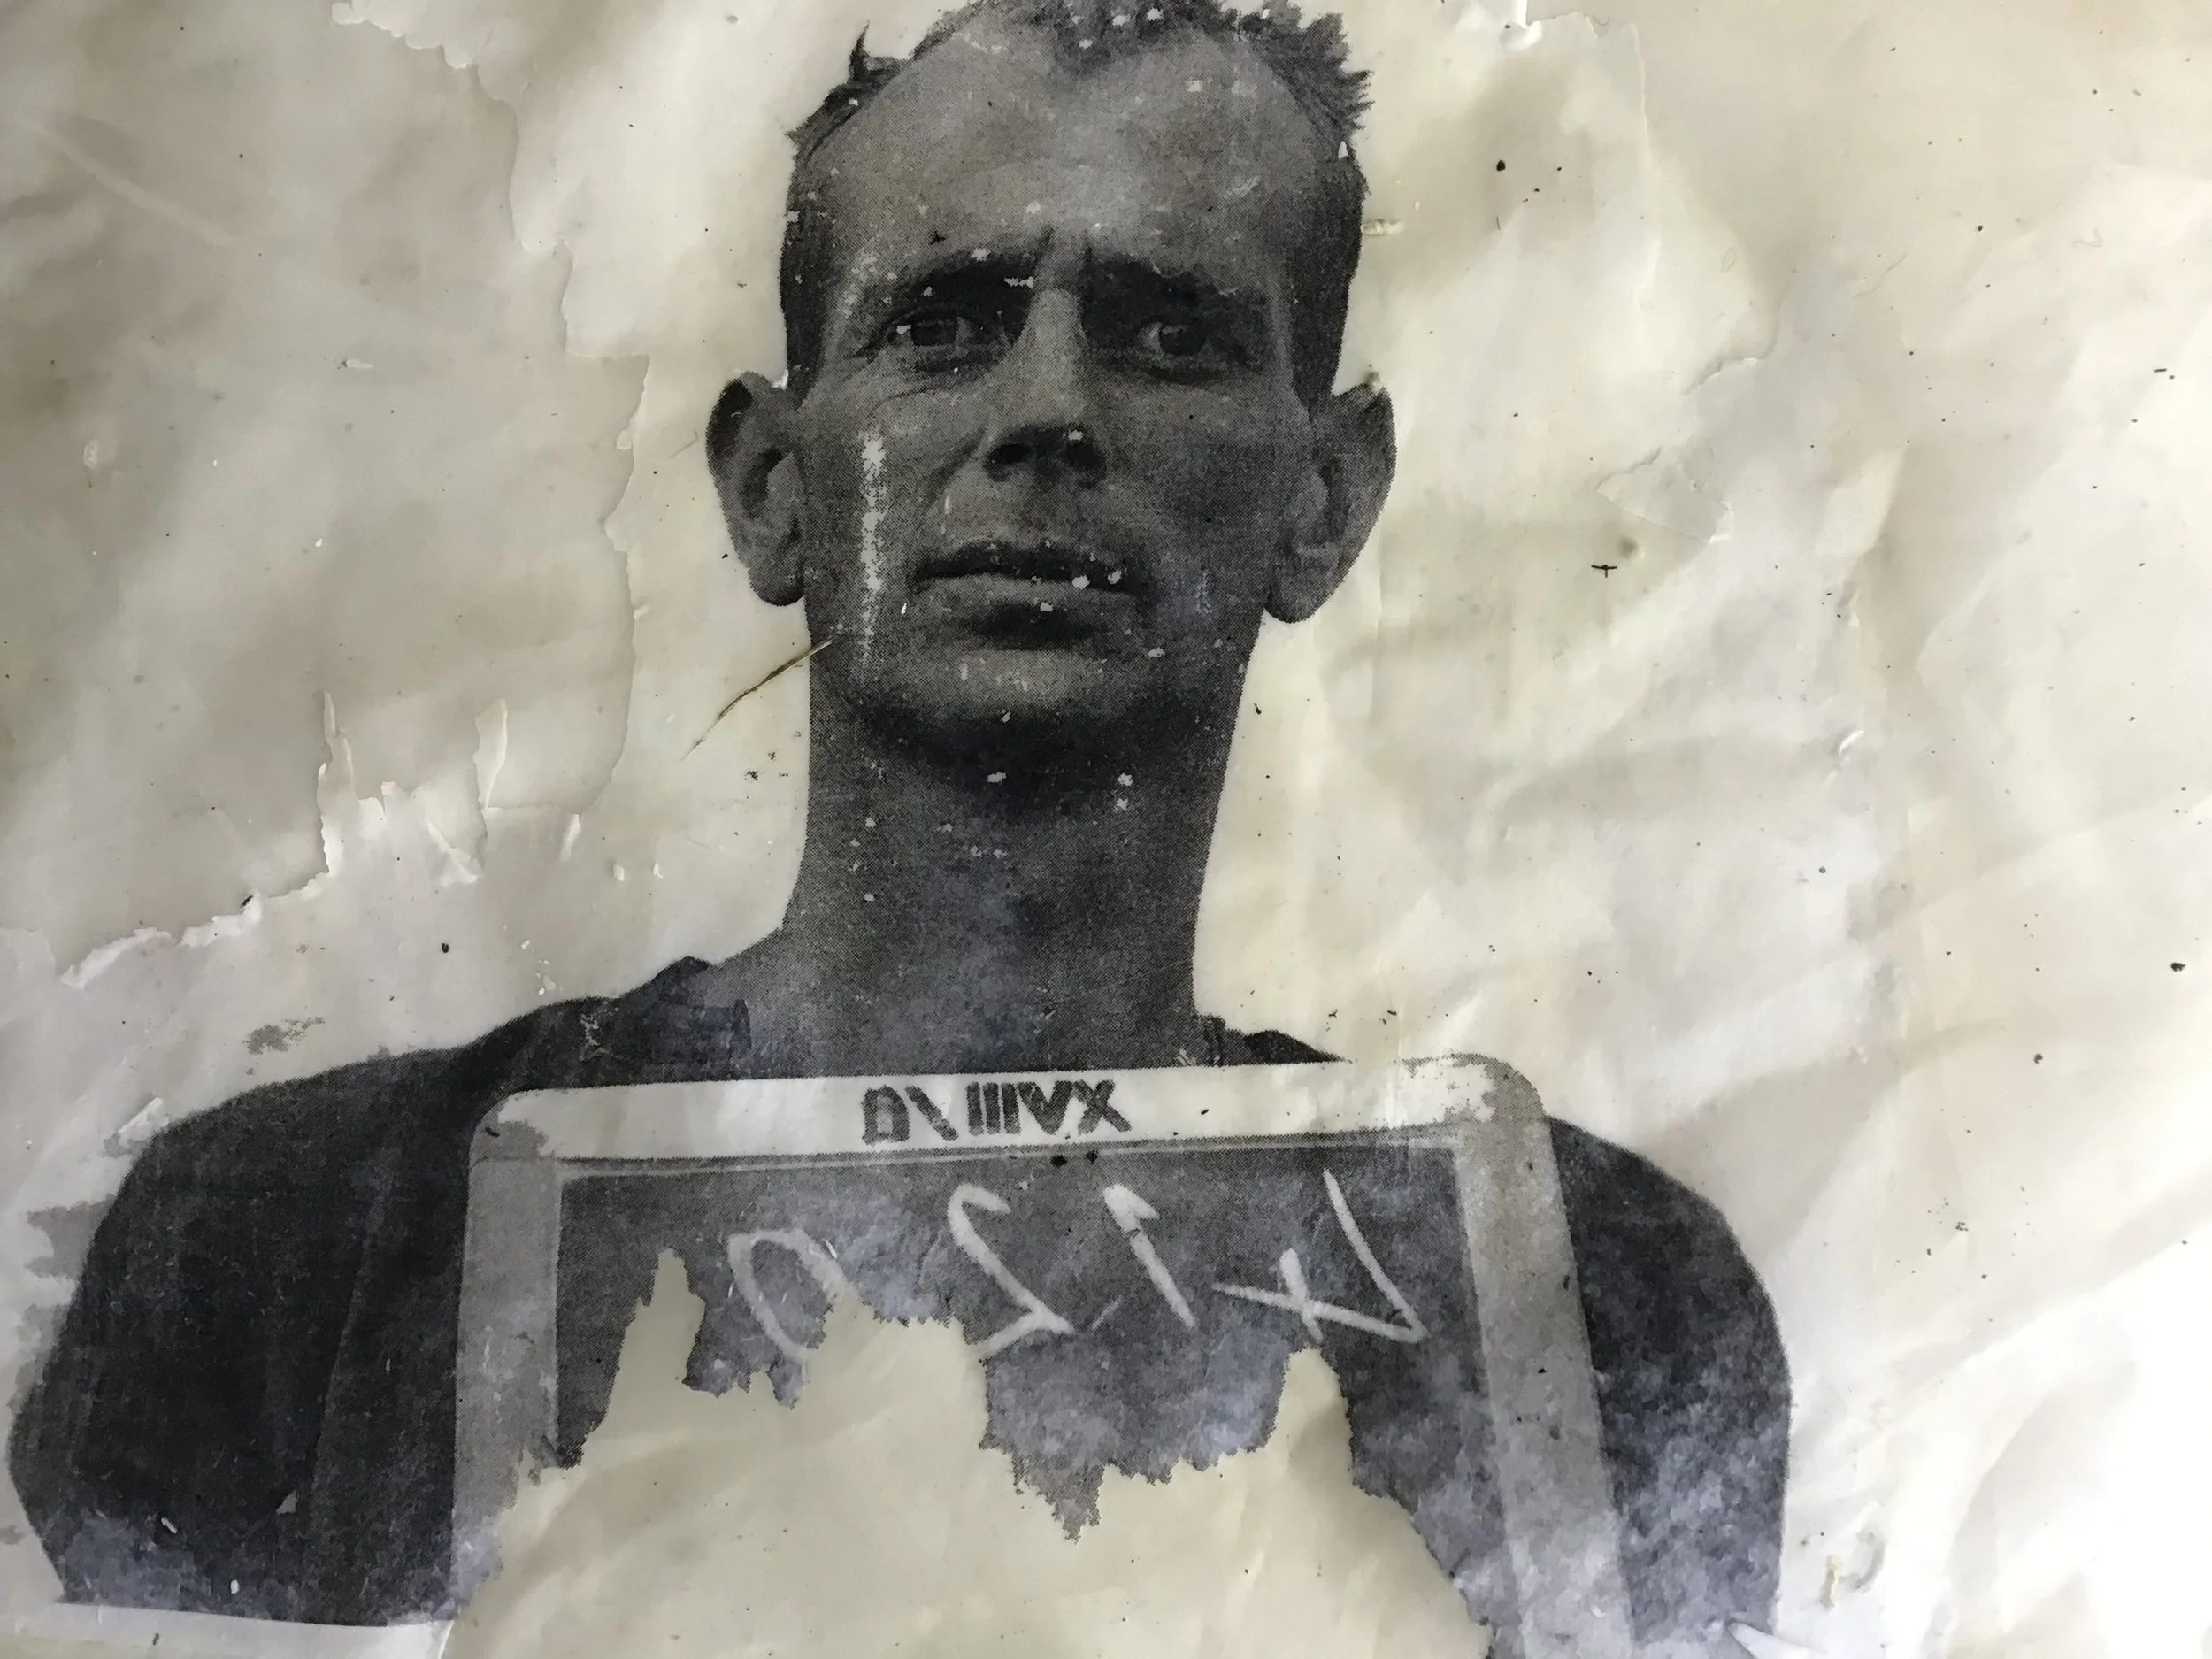
Laser print transferred to silk organza
A laser printed image of my father as a POW WWII with paper rubbed away - on a silk organza substrate
30 Mar
I have been playing around with the transfer of photographic images from paper base to fabric. I began with a laser (or photocopied) high resolution image that I wanted to transfer to fabric. I used a heavy gel medium to cover the image and then presented it onto the fabric using a brayer or to smooth out any wrinkles. This was left to dry. Once dry I wet the image with water and began carefully rubbing off the paper base so that the toner remained on the surface of the fabric. If wanting to use text the text must be mirror imaged to get it to come out the right way round. In word, this must be done via a text box as the program doesn’t have a mirror option for standard text. In tis first attempt you can see that i didn’t mirror image the photo so the text is back to front. I also rubbed a bit hard or didn’t apply sufficient gel at the bottom. Depending on the substrate, the photo transfer may take on the texture of the substrate : for example cheesecloth may give a more ethereal looking transfer. This image is of my Dad as he was placed in Stalag 18 A for 5 years in world war II and I intend to make a memorial quilt of his time journey to being a prisoner of war
laser print transfer to paper paper to fabric paper to paper

Printing Without a Press -an introduction
It all begins with an idea.

Coreoposis, acacia leaves and heuchera flowers heat set in a heat press for 3 minutes. Printed on water colour paper
It all begins with an idea. Or sometimes a process I want to explore and add to my art work. Sometimes I think i am a collector of methods but they way I use those methods is often quite unique to my way of working. My work is informed by both my own experiments and from the wealth of creative options that have sprung up on the web since Covid. Living in a small rural centre in New Zealand, it is often difficult and expensive to take advantage of the top textile and mixed media artists, but, Covid, and the presentations on line, have enabled me to take advantage of some of the textile greats of our time